Install and Configure vRealize Operations Manager 8.2 Part 4 Create Alerts and Notifications

In the previous three post we went through installing and configuring the vROPs virtual appliance, connecting to vCenter server and configuring Window Active directory as an identity source.

Part 1: Install and Configure vRealize Operations Manager 8.2 Part 1 – TheSleepyAdmins

Part 2: Install and Configure vRealize Operations Manager 8.2 Part 2 Connect to vCenter – TheSleepyAdmins

Part 3: Install and Configure vRealize Operations Manager 8.2 Part 3 AD Authentication – TheSleepyAdmins

In this post we will be going through the different alert types and configuring actions bases on certain alerts.

Alerts:

Below are the three types of alert in vROPs:
Health Alerts:
The health alert list is all the generated alerts that are configured to affect the health of your
environment and require immediate attention. You use the health alert list to evaluate,
prioritize, and immediately begin resolving the problems.


Risk Alerts:
The risk alerts list is all the generated alerts that are configured to indicate risk in your
environment. Address risk alerts in the near future, before the triggering symptoms that
generated the alert negatively affect the health of your environment.


Efficiency Alerts:
The efficiency alerts list is all the generated alerts that are configured to indicate problems
with the efficient use of your monitored objects in your environment. Address efficiency
alerts to reclaim wasted space or to improve the performance of objects in your environment.

Each alert type has four different severity types, info, warning, immediate and critical. The can all be configured

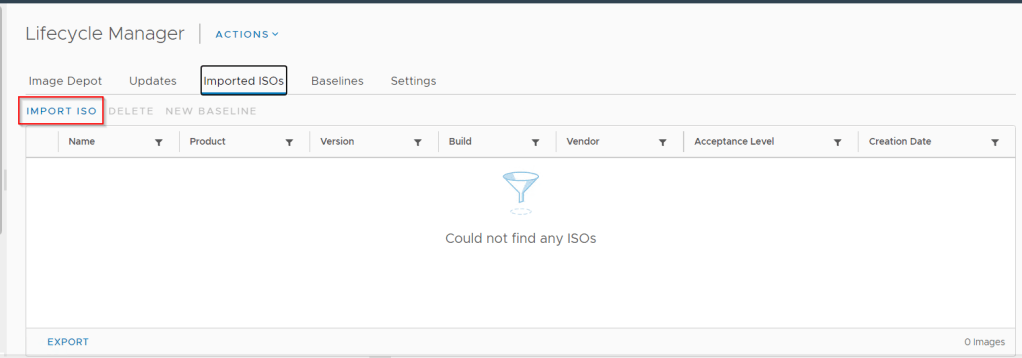
To create a custom alert logon to vROPs web client > alerts > Alert Definitions

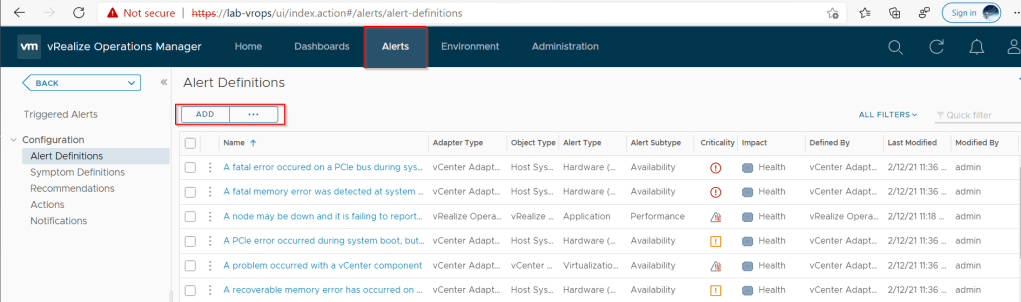
Click Add, give the alert a name

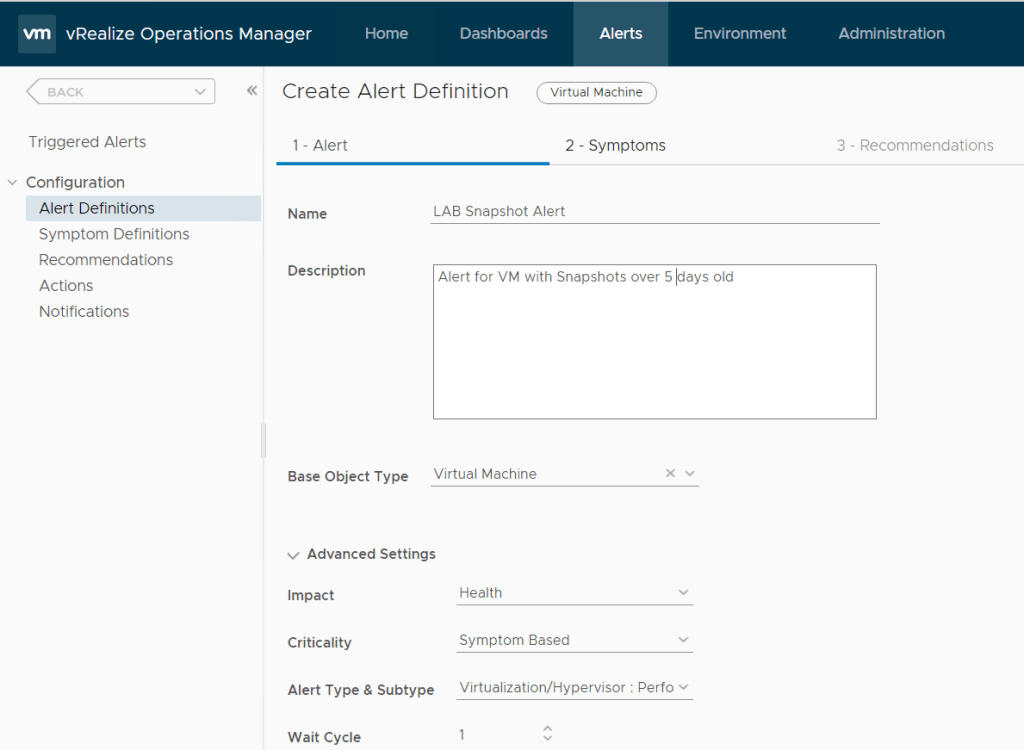
We will be using virtual machine so we will

select base object type and select vCenter Adapter > virtual Machine

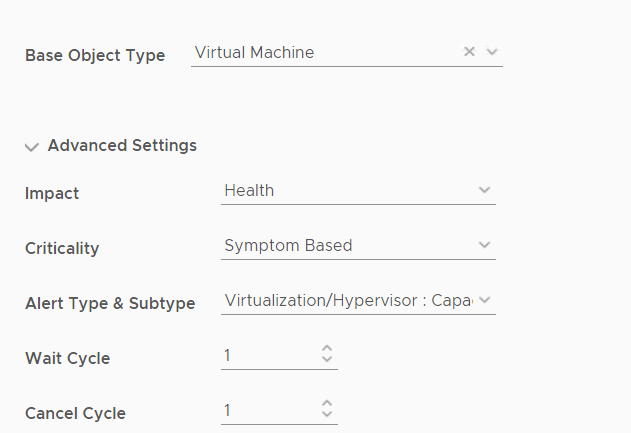
We want to alert on Capacity so click on advanced.

Impact = Health

Criticality = Symptom based

Alert Type & Subtype = Virtualization/Hypervisor : Capacity

Next we need to add the a symptom that will be used to trigger the alert. If there is no symptom that matches what we want to alert on we can create a new symptom. For snapshot there is only greater than 2 days so we will create a new symptom.

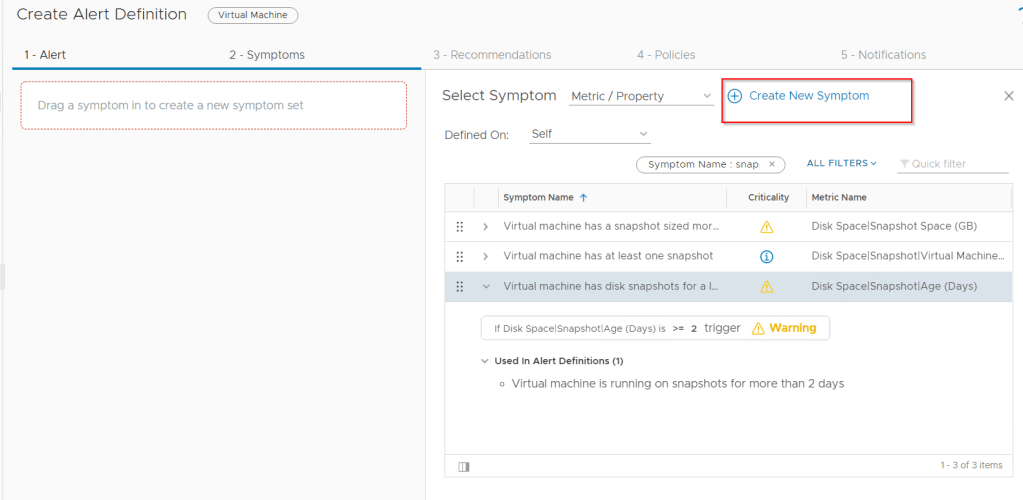
We will be using Virtual Machine: Disk space > Snapshot > Age (Days) and set the value to greater than 5 days.

We can set a recommendation that already exists to not keep snapshots over 72 hours or create a custom recommendation.

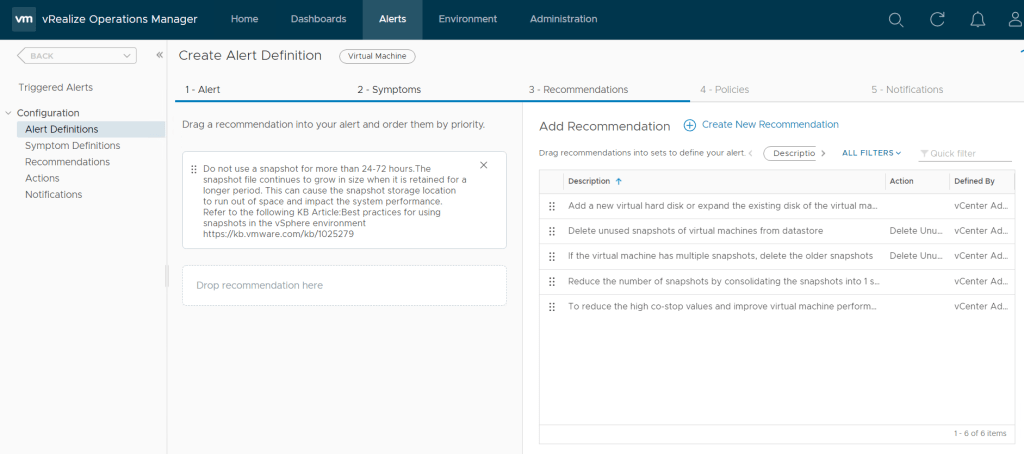
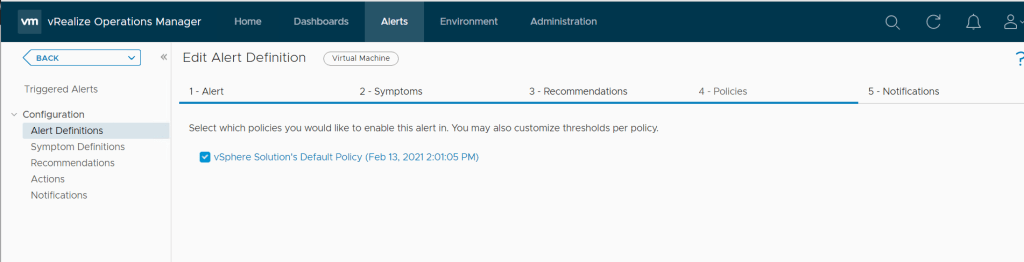
We can also apply a policy we will use the default policy.

Complete the wizard to create the new alert.

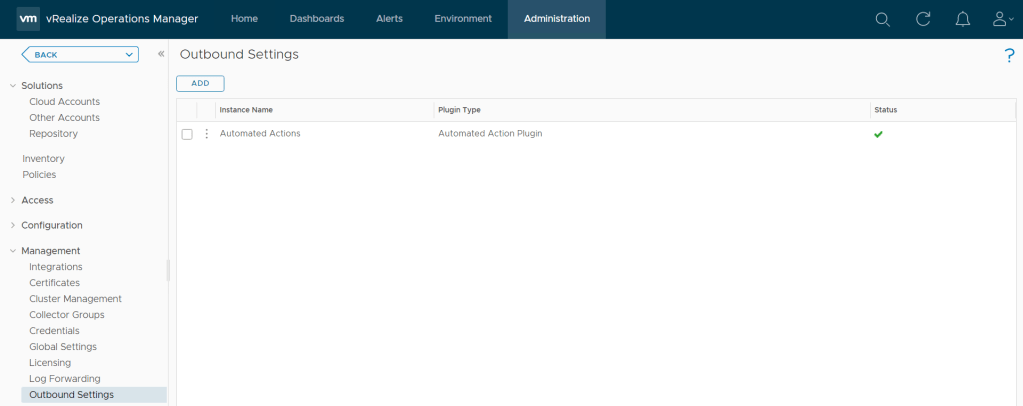
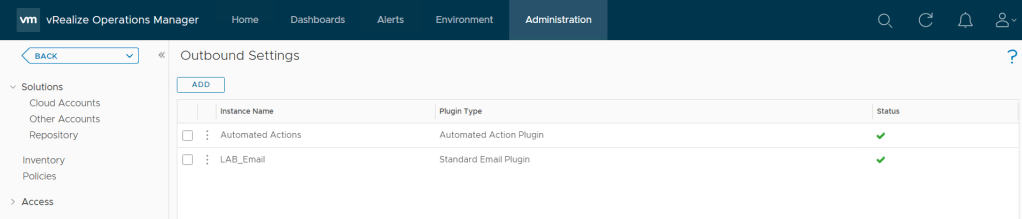
Next we will configure an email notification instance to allow alerts to be emailed.

Go to Administration > Outbound Settings > Add

Added in the email servers settings.

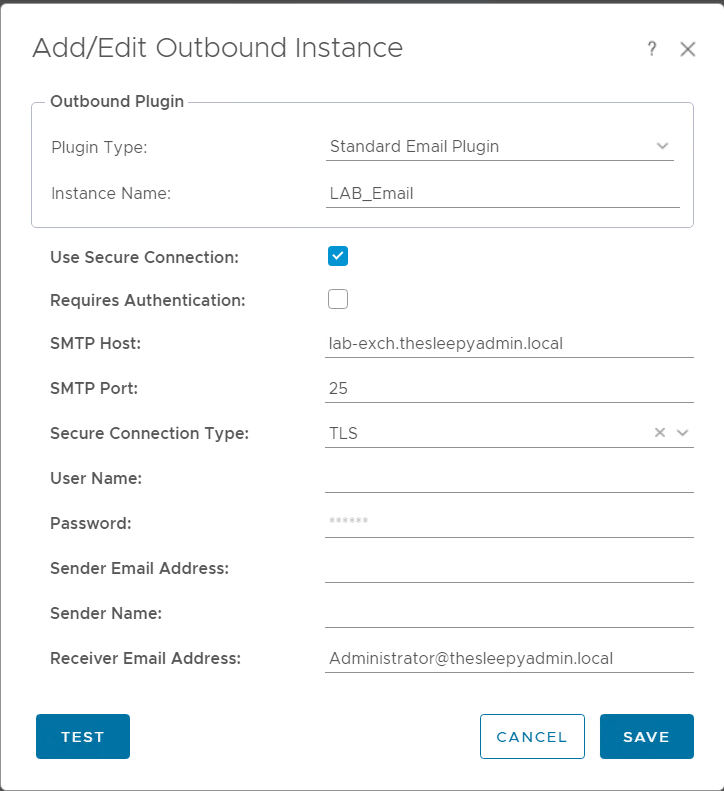
Click test to validate the mail flow is working.

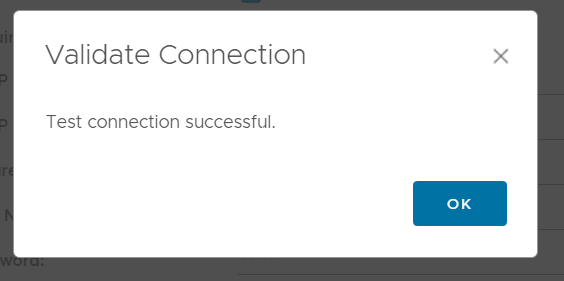
Click save to to complete.

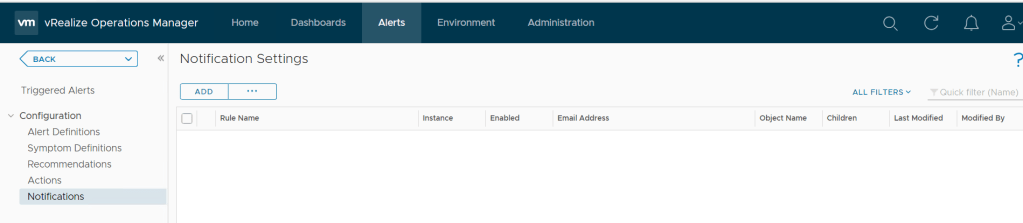
Once we have the outbound email instance configured, we can setup alerts to send emails notifications.

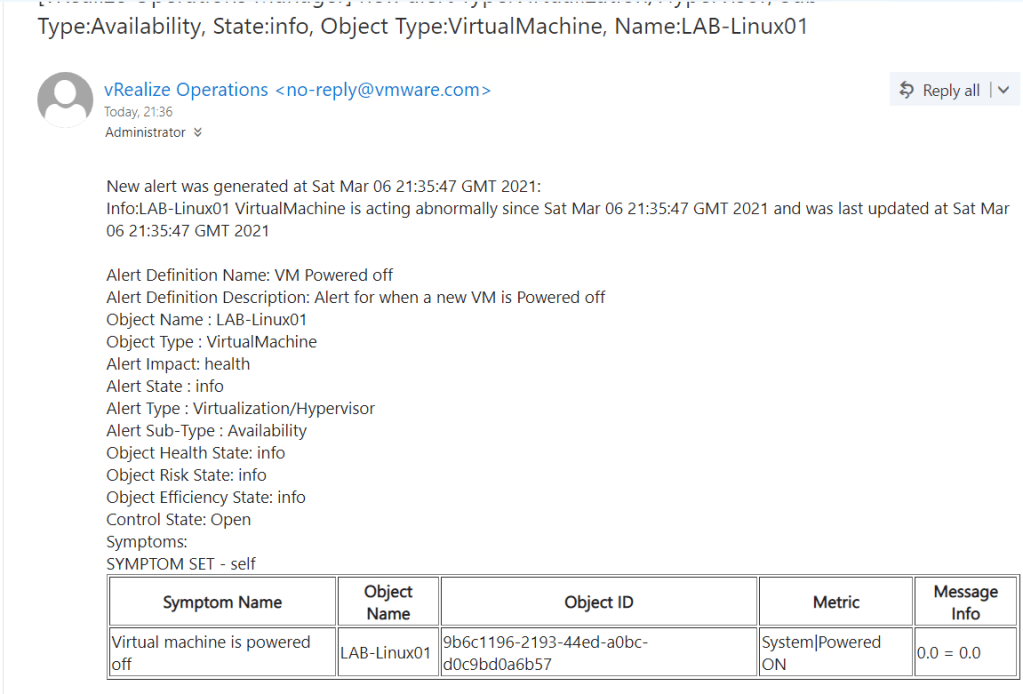
I created a new alert for Powered off VM so it would be easier to get a alert to trigger to test the email notification.

Go to Alerts > Notification

Next add in the details and select the email instance we setup earlier. I will be alerting for when LAB-Linux01 is powered off so will use object and specify the VM name and alert definition.

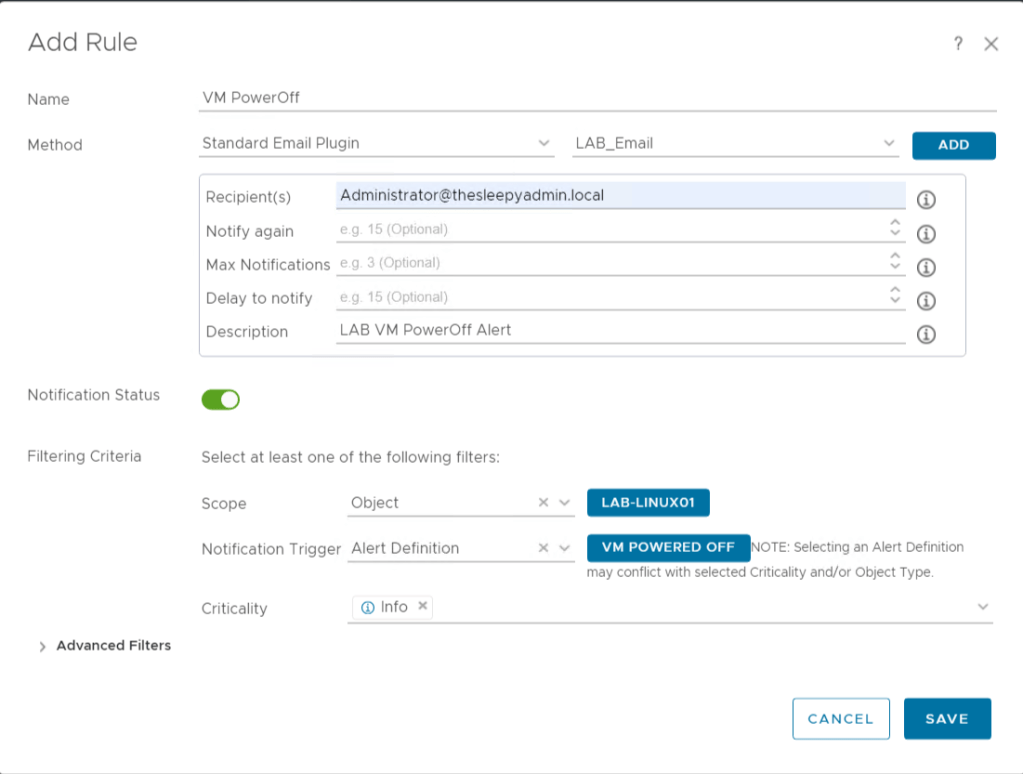
Click save to create the notification.

Now once the VM is powered off we will get an notification.

In the next post we will be going through creating a dashboard.

Install and Configure vRealize Operations Manager 8.2 Part 3 AD Authentication

In the previous post in this series we went through installing vROps virtual appliance and connecting to vCenter. In this post we will go through adding an AD authentication source and configuring access groups.

Part 1: Install and Configure vRealize Operations Manager 8.2 Part 1 – TheSleepyAdmins

Part 2: Install and Configure vRealize Operations Manager 8.2 Part 2 Connect to vCenter – TheSleepyAdmins

There are 5 different authentication sources that can be added to vROps.

  • SSO SAML: An XML-based standard for a web browser single sign-on that enables users to perform single sign-on to multiple applications.
  • VMware Identity Manager: A platform where you can manage users and groups, manage resources and user authentication, and access policies and entitle users to resources.
  • Open LDAP: A platform-independent protocol that provides access to an LDAP database on another machine to import user accounts.
  • Active Directory: Specifies the use on Active directory to be used to import users accounts or groups.
  • Other: Specifies any other LDAP-based directory services, such as Novel or OpenDJ, used to import user accounts from an LDAP database on a Linux Mac machine.

First we need to logon to the vROps web client > Administration > Authentication Sources

Click Add and select the source type required. We use Microsoft AD so we will be using Active Directory.

Give the identity source a display name I usually use the domain name as this make it simpler when view settings. Use basic as this auto-discovers the DC and DN (Distinguished Name).

Add the user account that will be used to for the LDAP connections to the domain. This account should only need to have domain users rights.

I also always create a specific service account to be uses for each application AD integration. I would also recommend using SSL/TLS where possible as this will encrypt the LDAP requests between the appliance and the domain controller.

Click on details to view the auto discovered host and

Click test verify all settings are correct, if set to use SSL there will be a prompt to accept the certificate.

Once the test is successful we can complete adding the authentication source.

This image has an empty alt attribute; its file name is image-54.png

Once completed the AD source should show.

This image has an empty alt attribute; its file name is image-55.png

Next we will configure the groups in AD that will be used to assign access roles in vROps.

To add the groups they need to be imported from AD and then assign the required role.

Go to Administrator > Access Control > import

Use the search string to check for the groups.

Select the role that will be assigned to the group

Assign the other required roles and select the object that are required for the group.

To test we can open a new session and select the AD authentication source instead of local user.

We can check the domain controller security event logs to confirm the authentication.

Based on the roles assinged the user will only have limited access.

In the next post we will go through configure alerting and create some capacity planning reports that can be used to plan for future compute requirements.

Install and Configure vRealize Operations Manager 8.2 Part 2 Connect to vCenter

In part one of the blog series on installing and configuring vROps we deployed the virtual appliance. In this post we will be adding our vCenter server to vRops.

Part 1: Install and Configure vRealize Operations Manager 8.2 Part 1 – TheSleepyAdmins

There are a few different types of accounts that can be added.

  • vCenter
  • VMC
  • AWS
  • Microsoft Azure

To add vCenter we need to logon to the vROps web client and go to Administration > Cloud Accoutns > Add Account

Select the account type for vCenter

Give the cloud Account a name, description and the vCenter DNS address and a logon credentials.

Click the validate connect to confirm the details are correct. If the certificate is not trusted you will be asked to review and confirm the certificate.

Once successfully completed we can then added vCenter.

The connection will now be setup and once completed will show under cloud accounts.

To view if information on the vCenter server is being collected we can go to Environment > vSphere Hosts and Clusters > vSphere World.

vROps can take a little time before metrics and alert start to show.

In the next post we will go through configuring AD Authentication and configuring group based access control.

Install and Configure vRealize Operations Manager 8.2 Part 1

In the next set of post’s we will be going through installing and configure vRealize Operations manager (vROps). I haven’t had to install or configure vROps in a few years so want to go back over it before we replaced our existing deployment.

vROps is a application from VMware that can be used to monitor, optimize and manage VMware management tools like vCentre, ESXi..

There are 3 different editions of vROps.

Standard: Allows management of vSphere only.

Advanced: Adding VMware cloud (AWS / Azure), Operating system monitoring and dashboards.

Enterprise: Give all the advanced features but also allows for application / database monitoring and third party management packs.

vROps Editions: Series Overview – VMware Cloud Management

We will be using Enterpirse edition.

vRops can be used for performance monitoring, over or under provisioned VM’s, capacity planning and trend analysis.

In this post we will be going through the initial virtual appliance deployment.

First step is to check what size appliance is going to be required.

We can use the sizing guidelines to select the right appliance size for the environment.

vRealize Operations 8.2 Sizing Guidelines (80893) (vmware.com)

Or use the VMware sizing tool

vRealize Sizing Tool (vmware.com)

Select the version you are installing and then add in the number of vCenter, host, datastores and VM that will have data collected and this will then give you the recommended sizing for your vROps deployment.

In my case it was extra small deployment.

What I always do before deploying any VMware appliance is create a static DNS record. This makes it easier to connect to the appliance after it’s deployed and for some appliance (like vCenter server its a requirement or the deployment will fail.)

This image has an empty alt attribute; its file name is image-24.png

To download the required vROps appliance go to my VMware and select the required version.

Download VMware vSphere – My VMware

To deploy the OVA create a new VM in VMware and select deploy VM from OVF or OVA file.

Give the appliance a Name and either drag and drop the OVA file or browse to the location and select.

Select a datastore

Agree to the end user license agreement.

Select a network, deployment type size, disk provisioning (thin or thick) and if VMware will be powered on automatically. Since this is only a single vCenter setup we will be using a small deployment type.

Set the timezone and network IP, gateway, netmask and domain name

Review the settings and complete.

The VM will start to deploy.

Once the deployment is completed, connect to either the IP or FQDN of the appliance to start the setup.

Select either express or new installation. We will be using the express installation as we only have one vCenter.

Set the admin password.

Complete the install

When the deployment completed the vROps logon page should show.

Logon and completed the installation.

Accept the End user agreement.

Enter your product key or use the evaluation.

You can join customer experience or untick to not take part.

Click finish to complete.

vROps is now installed.

In the next post we will go through connecting to vCenter Server, configure Active directory integration and build out some dashboards.

VMware PowerCLI Integrated Authentication Issues

Recently we have been having an issue with VMware PowerCLI not passing through the users credentials when running Connect-viserver to connect to our vCenter servers.

This has been causing problems when trying to use scheduled task to automated reports and run remediation task like removing old snapshots or reporting on VMware Tools versions as it is prompting for credentials.

For integrated authentication to work, the vCenter servers needs to be setup to allow single sign on for the domain that you will be connecting from, so confirm that your Active Directory Identity source is added and that SSO works from the web client. If not, complete this first before trying to use PowerCLI with integrated authentication.

I have SSO configured and tested so this wasn’t my issue.

When using the older version of PowerCli version 6.5 and below we had no issue with integrated authentication and would connecting to vCenter server without prompting me for credentials.

We could continue to use the old version of PowerCLI but we would be missing out on improvement and new commandlets so I wanted to try and get the newer version working for automated task.

First we install the VMware.PowerCLI module using Install-Module VMware.PowerCLI, the current version is 12.1

When I tried to connect using this version of PowerCLI I get prompted for a user name and password and this is what is stopping my automated task from running.

There are a few ways to workaround the prompt and this can also be used to confirm if SSO is working correctly. One way would be to add credential store item that can be used for connecting.

To add this use the VICredentialstore commandlet.

New-VICredentialStoreItem -User domain\username -Password Password -Host vc.domain.local -File C:\Temp\vicreds.xml

This outputs the credential to an xml file that can then be imported and called using Connect-VIserver.

$logon = Get-ViCredentialStoreItem -File C:\Temp\vicreds.xml
Connect-VIServer -Server $logon.Host -User $logon.User -Password $logon.Passwor

This works but I don’t really want to have a xml file that has information saved to it and someone might remove the folder or file by mistake.

The other way would be similar but using a txt file with the converted to a secure string password but again this relies on a file which is not ideal and not really all that secure.

The last option and one that I wouldn’t recommend at all is to hard code a username and password in the script.

So now that we have gone through some work arounds I decided to have a look at the actually problem .

The above proves that authenticating against AD is working so I knew it wasn’t an account or SSO issue so it had to be an issue with PowerCLI itself.

I connect using a my user name and passwords and it connect without issue.

I then check the VPX log under /storage/log/vmware/vpxd to see if there are an issue but I didn’t see any issues.

Next I tried to use the -verbose parameter to return more information on what exactly connect-viserver was doing,

This then returned an error for TLS.

I next checked the settings on PowerCLI configuration settings.

To check the PowerCLI configuration use

Get-PowerCLIConfiguration

When checking the configuration the Invalidcerificaeaction was set to unset.

I changed this setting to warn instead of unset

Once this setting was changed I can now connect to PowerCLI with integrated authentication, I do get a long warning message though I could set this to ignore and this returns no warning or error.

There are two ways around this instead of changing the above setting. One is to install the the certificate as a trusted root certificate so that the cert is trusted.

Or if you have an internal certificate authority you to replace the default VMware cert with an internal cert.

Once this is done the connection work without requiring manual intervention and my automated scripts can be run using scheduled tasks again with the latest version of PowerCLI. Hopefully this will be helpful to anyone else having this issue.

Upgrading ESXI Host From 6.7 to 7.0 Using vSphere Lifecycle Manager

In this post we will go through using vSphere Lifecycle Manager VLM to upgrade an ESXI host from 6.7 to 7.0. Lifecycle Manager replaces vSphere Update Manager in vCenter server 7.0 the process is pretty much the same as in VUM.

Before upgrading to a new version of ESXI first step should be to check VMware compatibility, this can be done by either checking the VMware compatibility matrix.

VMware Compatibility Guide – System Search

Or in VLM we can now use Hardware compatibility, This syncs a list of compatible hardware and this can then be checked directly on the host to verify if the ESXI host hardware is supported.

To check using VLM, Open the vSphere web client > Menu > Lifecycle Manager

We then need to sync the hardware compatibility list. Click Actions > Sync HCL

Once synced we can run a compatibility check from the Host > Updates > Hardware Compatibility

After the compatibility is all confirmed and no issues are found, we can go ahead with the upgrade.

Next we need to download the ISO image for ESXI 7.0 that will be imported to VLM and used in the upgrade baseline.

Download VMware vSphere – My VMware

To import the ISO go back to VLM > Imported ISOs > Import ISO

Click browse and select the ESXI ISO that was downloaded earlier.

The ISO will then start to import.

The ISO should now show under Imported ISOs

Next we need to create a new upgrade baseline, this can either be done under baseline or by selecting the image and clicking on New Baseline.

Give the baseline a name

Select the ISO to be used

Click next and finsh off the baseline

Check baselines to confirm the creation has completed.

The baseline can be assigned to the host individually or the cluster. I am going to apply to the cluster. Go to the Cluster and select Updates > Attach.

Select the upgrade baseline.

We can check the compliance for the baseline for all host in the cluster.

To remediate you can either do this from the cluster or on the individual host. I will remediate from the host itself.

Go to the host, Select Updates > Baseline > Upgrade Baseline > Remediate

Accept the end user agreement.

The upgrade will do a remediation pre check before allowing the upgrade.

Once you click Remediate, the upgrade task will start

The host should now reboot and start the upgrade.

When we check the baseline the host should now show as compliant and running ESXI 7.0.

Upgrading a host using VLM is a straight forward process and makes it easy to keep your ESXI host at the latest release version.

How to Update vCenter 7.0 Virtual Appliance

The process of patching vCenter server appliance has become a lot easier in recent years. Keeping vCenter fully up to date is important for stability and security.

In this post we will go through the process of patching for vCenter 7.0 to the latest version using the GUI connecting to the internet. You can also update using command line or by downloading and mounting the ISO image.

First we need to logon to the admin management console.

https://vcenter.domain.local:5480

Use the root logon that was configure when setting up the appliance.

First steps is to confirm there is a valid backup of the appliance.

Click backup now.

There is an issue with vCenter 6.7U2 and above where it fails on SMB with SMB location is invalid if SMBv1 is disabled. So if you get that error you can just enabled SMBv1 temporarily or enabled OpenSSH on Windows to allow SSH connection which is what I would do in production.

Once completed the backup should kick off.

I also usually take a snapshot as that is the quickest recover option.

Once we have a back up, we can now continue with the updating the appliance. The current version of the appliance is 7.0.0.10100.

Go to Update and click check updates

Once the check is completed select the latest patch. Select either stage only or stage and install if you want the update to be installed straight away. The version we will be updating to is 7.0.1.00200.

Accept the end user agreement.

This will run a pre-check on vCenter before the upgrade will continue. Once no issue are found put in the administrator’s password.

Tick the box to confirm that a backup has been completed.

The install will now start and can take a hour or so to complete.

During the upgrade there will be outages to vCenter while services restart.

a

vCenter should now be update to the latest version.

VMware vRealize Log Insight Adding Windows Servers

In the last post we went through querying logs using the different filter options and how to create a dashboard using the queries in vRealize Log Insight (vRLI).

Part 1: VMware vRealize Log Insight Install and Configure – TheSleepyAdmins

Part 2: VMware vRealize Log Insight AD Authentication and Role Based Access – TheSleepyAdmins

Part 3: VMware vRealize Log Insight Query Logs and Creating Dashboards – TheSleepyAdmins

In this post we will go through adding a Windows server agent and adding the content pack

To add a server we need to download the agent by logging on to vRLI > Administration > Agents and click on download log insight agent.

Select the required agent to be downloaded.

Once downloaded copy the installer to the server and run.

Enter in the FQDN or IP address for the vRLI server is not already there and click install.

To install the agent using command line the below can be used just need to update the path and msi file name.

Path to msi\VMware-Log-Insight-Agent-8.2.0-16776561_*.msi /quiet

You can also add some command line switches to change the default install

Path to msi\VMware-Log-Insight-Agent-8.2.0-16776561_*.msi SERVERHOST=LAB-vRLI.thesleepyadmin.local LIAGENT_AUTOUPDATE=yes /quiet /lxv* vRLI_Agent_install.log

Command-line Options for vRealize Log Insight Agent Installation on Linux (vmware.com)

Once installed, the agent should now show under the agent tab in vRLI.

Next we need to add the Windows content pack to vRLI, Go to Content Packs and search for Microsoft Windows

Click on the content pack and install

Now that the content pack is added, we can copy the Microsoft – Windows to a new group so that its assigned to Windows agents.

Select copy template

Give the Agent group a name and description

Once copied you can change the settings if required or turn off some events if there not required, in this we will be leaving them as default.

Add a filter so that the Windows servers are added to the agent group. This can be done by Hostname, IP, OS or version.

Click save new group to finish.

It can take a little while for the agent configuration to update and for events to start being sent.

Once they do start to send events you should see the counters update.

We can now go to Interactive Analytics and query the events logs.

If there are different application specific events logs that need to be added they can be added to the existing group or a different agent group can be created.

To add addtional event logs to the existing agent group, go back to the agent group.

Go to build and on Windows Event Log click new.

Give the Windows Event Log a name

Copy the event log name from Windows event viewer and put this under Windows Event Log Channel in vRLI.

Click save agent group.

Now once a task is run the events should now show in vRLI.

This concluded the series on vRealize Log Insight, going through this shows that log insight is a good tool for centrally managing and monitoring system logs and events and can be used for VMware, Windows and Linux servers. Hope that this series of post have been helpful.

VMware vRealize Log Insight Query Logs and Creating Dashboards

In the previous post we went through setting up AD Authentication and role based access in vRealize Log Insight (vRLI).

Part 1: VMware vRealize Log Insight Install and Configure – TheSleepyAdmins

Part 2: VMware vRealize Log Insight AD Authentication and Role Based Access – TheSleepyAdmins

In this post we will be going through querying logs and creating a Dashboard.

vRealize Log Insight collects, imports, and analyzes logs to help with troubleshooting problems with systems, services, and applications.

You can search and filter log events on the Interactive Analytics tab, Logs can be queried using different filters like text, timestamp, source, fields and Regular Expressions

TypeDescription
TimestampThe time when the event occurred
SourceWhere the event originated. This could be the originator of the syslog messages such as an ESXi host or a forwarder such as a syslog aggregation.
TextThe raw text of the event.
FieldsA name-value pair extracted from the event. Fields are delivered to the server as static fields only when an agent uses the CFAPI protocol.

Below is the user guide for vRLI

Using vRealize Log Insight – vRealize Log Insight 8.2 (vmware.com)

First we will be going through querying logs.

Open vRLI > Interactive Analytics, This will show all logs to query use the Add filter button

In the below we are going to query any hosts that have disconnected over the last 48 hours. Below are the two filters I used for the host disconnections.

vmw_vc_alarm_status contains Red

vmw_vc_alarm_type contains host connection and power state

We create a table view for events. Below is for snapshots taken in the last 48 hours , we can then add additional information by clicking on time series button and adding group by fields.

vmc_vc_task_type contains create virtual machine snapshot and virtualmachine.createsnapshot

I wanted to add the users that created the snapshot, source and VM name.

This image has an empty alt attribute; its file name is image-188.png

There are a lot of different event types that can be queried and it will all depend on what event’s you are looking for.

Next we will create a dashboard with a few different queries. To create a new dashboard go to Dashboards > New Dashboard

Give the Dashboard a name and select if it should be shared with all users.

Create a filter and click Add to Dashboard

Give the filter a name

If there are any existing filters that are currently in any other dashboard they can be cloned to your custom dashboard by clicking on the the gear icon and selecting clone, then select your custom dashboard.

Once all the required queries are added to the dashboard we can go to My Dashboards to view.

In the next post we will go through adding a Windows agent and adding the content pack for Windows.

VMware vRealize Log Insight AD Authentication and Role Based Access

In the previous post we went through installing and the initial configuration for vRealize log Insight (vRLI).

Part 1: VMware vRealize Log Insight Install and Configure – TheSleepyAdmins

In this post we will go through the steps required to enabled Active Directory (AD) Authentication integration and setting up role based access groups.

This will allow for central management by using AD for users to access using there domain accounts and access permission to be based of AD group membership.

First step is to configure the AD authentication integration.

Logon to the log insight management console > Administration

Once under Administration go to integration > Authentication Configuration > Active Directory

Add in the AD details, I would generally create a AD service account for each LDAP service as it allows me to manage what account are being used for what service (The account should only need domain users rights and be set to deny interactive log for security).

I would also use Require SSL to encrypt the LDAP connection if your DC has a SSL cert that can be used, if not use standard port 389.

Next we need to go to Administration > Management > Access Control

To view Roles click on the role tab

The below are the default User roles, The default roles are fine for me so I wont be create any custom roles just assign the current roles using AD groups.

Below is each role and the description

OptionDescription
UserUsers can access the full functionality of vRealize Log Insight. You can view log events, run queries to search and filter logs, import content packs into their own user space, add alert queries, and manage your own user accounts to change a password or email address. Users do not have access to the administration options, cannot share content with other users, cannot modify the accounts of other users, and cannot install a content pack from the Marketplace. However, you can import a content pack into your own user space which is visible only to you.
Dashboard UserDashboard users can only use the Dashboards page of vRealize Log Insight.
View Only AdminView Admin users can view Admin information, have full User access, and can edit Shared content.
Super AdminSuper Admin users can access the full functionality of vRealize Log Insight, can administer vRealize Log Insight, and can manage the accounts of all other users.

Next we need to create groups in AD that will be used to allow access. I have create an Admin, Dashboard and Read only groups.

Last step is to add the group to vRLI, Go back to Administration > Management > Access Control and click on New Group.

Add in the group name and select the role to be assigned.

Once all groups are added we can test by adding a user to the group and confirming there access.

This image has an empty alt attribute; its file name is image-177.png

Open a new browser session and open the vRLI web management address and select Active Directory as the identify source.

The user account should be able to logon but only have a limited view compared to a full Admin.

Dashboards:

Administration:

In the next post we will go through querying logs and creating a dashboards.