Azure Application Proxy SSO Integrated Windows Authentication

Today I was setting up Integrated Windows Authentication single sign on for an Azure Application proxy that connects to an internal Apache web application.

We had already configured the application for SSO internally.

Below is the link to the Kerberos SSO for Azure App Proxy

Kerberos-based single sign-on (SSO) in Azure Active Directory with Application Proxy | Microsoft Docs

Prerequisites

Before you get started with single sign-on for IWA applications, make sure your environment is ready with the following settings and configurations:

  • Your apps, like SharePoint Web apps, are set to use Integrated Windows Authentication. For more information, see Enable Support for Kerberos Authentication.
  • All your apps have Service Principal Names.
  • The server running the Connector and the server running the app are domain joined and part of the same domain or trusting domains.
  • The server running the Connector has access to read the TokenGroupsGlobalAndUniversal attribute for users.

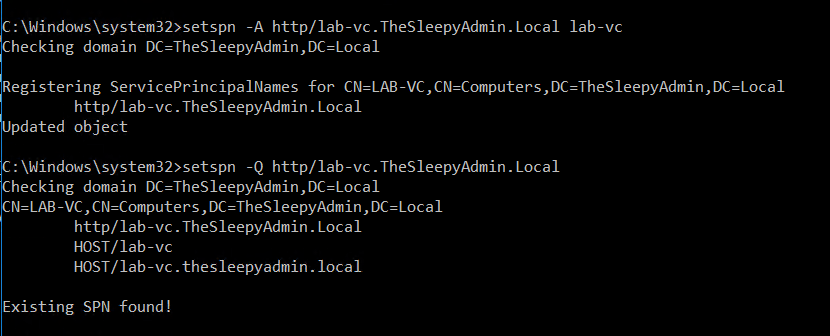
First step was to confirm that there was an SPN configured for the Application. Since this is a web application we will use http for the serviceclass.

setspn -Q http/webapp.domain.local

If the SPN isn’t configured use setspn to register.

setspn -A http/webapp.domain.local computername

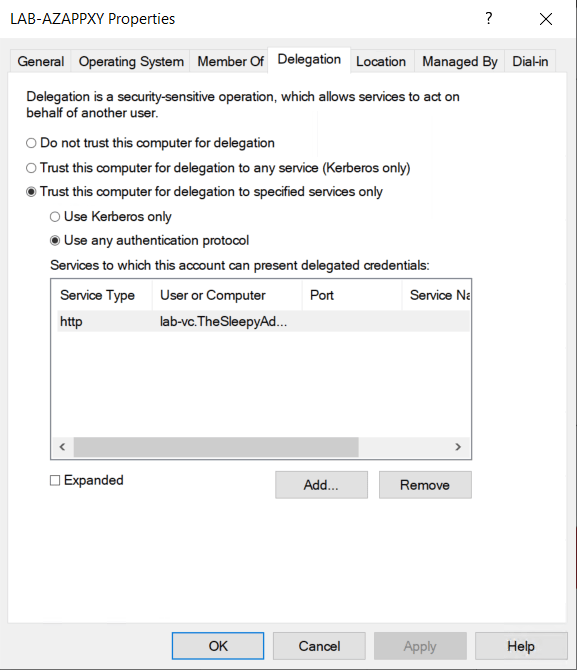
The next step is to configure the delegation on the Azure application proxy connector server.

Go to the server object in AD, open the properties and go to delegation.

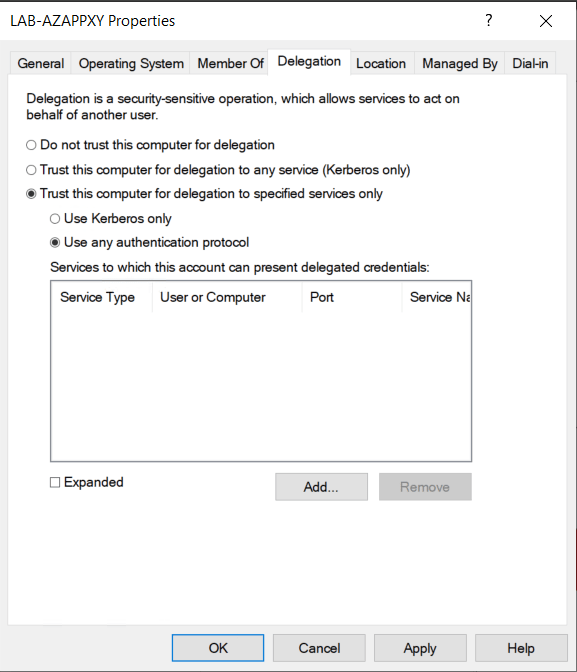
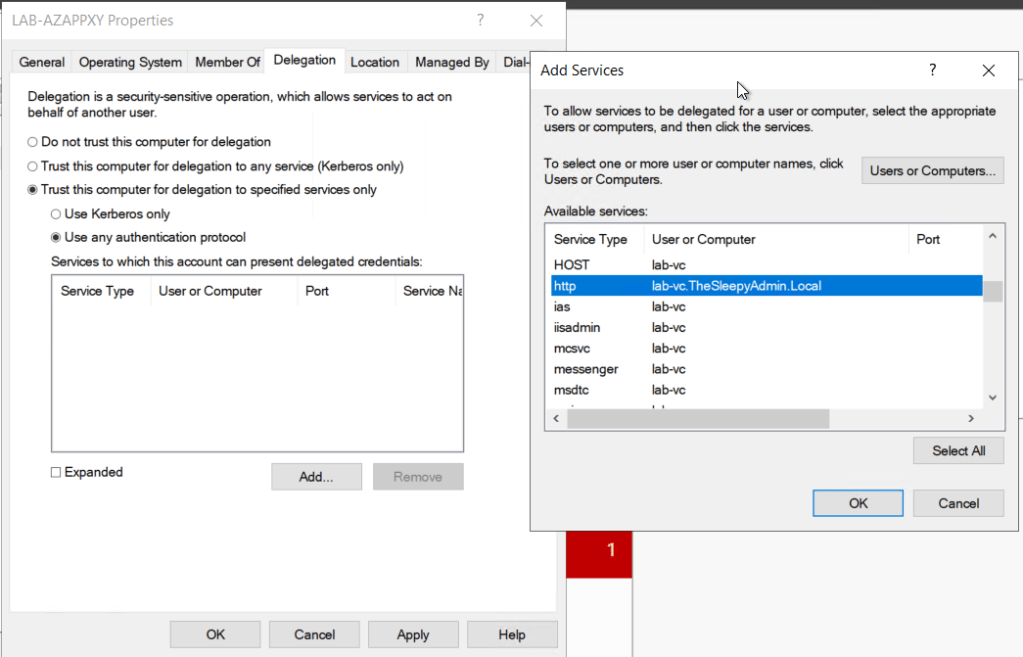
Click add and select the computer or user account that has the SPN that will be used and select the service.

The last step that I had to do was add the server to Windows Authorization Access Group so that the connector could have read access to TokenGroupsGlobalAndUniversal users attribute in AD.

When I didn’t have the server in this group I was getting SPN issues.

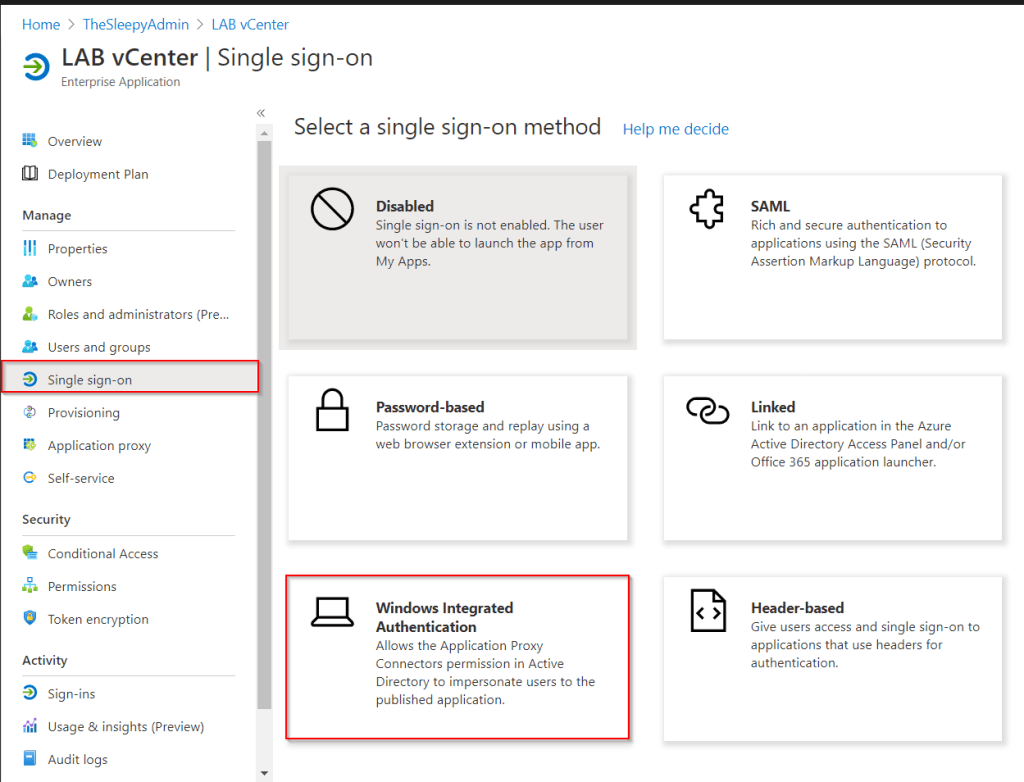
Next we need to configure SSO in Azure Enterprise app. Logon to Azure

Azure Active Directory > Enterprise applications > App

Select Single sign-on and Windows Integrated Authentication

Put in the internal SPN that was configured earlier and set the delegated login, Our app uses samaccount name so I used On-premises SAM account name.

Once the above is completed close all open session to Office 365 / Azure AD and re-signed in to the external URL for the application proxy and the application should now signed in using SSO without have put in credentials a second time.

VMware 6.7 External PSC to Embedded PSC migration

VMware have recently deprecated using external platform service controller (PSC) with vCenter 6.5 Update2 and 6.7

Deprecation of the external Platform Services Controller deployment model (60229) (vmware.com)

Since we where upgrading from Windows vCenter and PSC to appliance’s we had to migrate to new external PSC and then convert the external PSC after the migration.

In this post we will be going through the process of converting and decommissioning an external PSC.

In vCenter 6.7 there is a conversion tool built in to the vCenter web console that allow the PSC to be converted from an external to embedded PSC.

vCenter Server Converge Tool Enhancements in vSphere 6.7 Update 2 – VMware vSphere Blog

The conversion tool is available under Administration > deployments > system configuration

Select the vCenter server that has the external PSC and click converge to embedded

Enter in the logon details for the existing PSC SSO domain and select Join AD if you want to also join the vCenter appliance to AD (use this if the existing PSC has domain joined).

This image has an empty alt attribute; its file name is image-39.png

The converge tools will start and and it will require vCenter servers services to restart, this will cause an outage to vCenter while the service restart.

This image has an empty alt attribute; its file name is image-40.png

Once all the vCenter services have restarted, vCenter should now show as an having an embedded PSC.

The last step is to decommission the old PSC.

Select the old PSC from in the System configuration and use the decommission PSC action.

Click on porceed.

Enter the SSO logon details, view thumbprint and accept the acknowledgment tickbox.

Click decommission and the PSC will start to be removed.

Once completed vCenter will now be running an embedded PSC and the external PSC will be powered off and can be deleted.

If there are other vCenter in enhanced linked mode follow the same process for each additional vCenter

Using Microsoft Graph PowerShell SDK

In a previous post we went over connecting to Microsoft GraphApi using PowerShell and Graph Rest API.

In this post we will be going through using the PowerShell SDK as I am more familiar with this method of connecting as it is similar to the current PowerShell modules uses by Exchange online, Azure AD….. and this will make creating scripts and querying data easier.

First step to use the Graph SDK is to install the PowerShell Module.

Open an admin PowerShell Window and run the below command.

Install-Module Microsoft.Graph

Once the module is installed we can now connect to graph.

I only want to query user information so I will use User.Read.All as the scoped permission.

Below is a link to the Microsoft document on graph permissions.

Microsoft Graph permissions reference – Microsoft Graph | Microsoft Docs

Connect-MgGraph -Scopes "User.Read.All"

Go to the URL in the PowerShell response and enter the code.

Accept the permission request.

Once accepted, PowerShell should now be connected.

All command’s in the Graph Module use MG in the name which can be used to find commands needed.

To get all users we can use Get-mguser.

By default the Graph SDK will use API v1.0 to change to the beta version which has more information and is the default one that I use.

To set the profile run the below.

Select-MgProfile -Name "beta"

Now if we look at the user type it now returns guest or member value since the change to the beta version.

This image has an empty alt attribute; its file name is image-33.png

We can also use filters to only return required users, the below will only return guest users.

Using connect-msgraph with a user account requires manual steps to connect so it’s not great for automation.

We can use a certificate and app registration to automate the connection.

Use app-only authentication with the Microsoft Graph PowerShell SDK – Microsoft Graph | Microsoft Docs

We covered the app registration in a previous post so we wont go over creating the app registration again.

First step is to create the cert that will be used, we will be using self signed cert but you can use a cert issue from an internal CA also.

To create the self signed cert I used the below command

New-SelfSignedCertificate -DnsName TennatDomainName -CertStoreLocation "Cert:\CurrentUser\My" -FriendlyName "Graph_SDK"

Once the cert has been created, export the cert so that it can be uploaded to the App registration.

Get-ChildItem Cert:\CurrentUser\my\CertThumbprint | Export-Certificate -FilePath C:\temp\Graph_SDK_Cert_Test.cer

Logon to Azure portal > Azure Active Directory > App registrations > graph app registration

Select the exported certificate

Once uploaded the cert detail will show under certificates.

Now that the cert is uploaded we can use either the thumbprint or the certificate name, ApplicationID and TenantID to automate connections to Microsoft Graph.

Connect-MgGraph -CertificateThumbprint Thumbprint -ClientID YOUR_APP_ID -TenantId YOUR_TENANT_ID

I used the below to automate checking for Guest users and there sign-in logs.

$Cert = "Thumbprint"
$AppID = "YOUR_APP_ID "
$TenantID = "YOUR_TENANT_ID"

Connect-MgGraph -CertificateThumbprint $Cert -ClientId $AppID -TenantId  $TenantID

$GuestUsers = Get-MgUser -Filter "usertype eq 'Guest'"

foreach ($Guest in $GuestUsers) {
Write-Warning "Checking Guest User $($Guest.DisplayName) SignIn Logs"
Get-MgAuditLogSignIn -Filter "UserId  eq '$($Guest.ID)'" | 
Select-Object UserDisplayName,UserPrincipalName,IPAddress,AppDisplayName,ResourceDisplayName,ClientAppUsed
}

Windows 10 20H2 Feature Update Error 0xC1900208 ConfigMgr

Recently we have been testing Windows 10 20H2 Feature update deployment using ConfigMgr. When the update was applying it was failing and the error in software center was 0xC1900208.

To check what the code means I usually use the below Microsoft Doc but unfortunately the below code was not showing.

Windows Update error code list by component – Windows Deployment | Microsoft Docs

The error is listed under below Windows 10 upgrade errors doc

Get help with Windows 10 upgrade and installation errors (microsoft.com)

Since the error was relating to incompatible app next I checked the feature update logs these are located under a hidden folder on the root of the C drive C:\$WINDOWS.~BT\Sources\Panther

I checked the Setupact.log and the compatdata XML.

In the compatdata XML there was an incompatibility with the version of McAfee DLP installed on the device. This device was not getting the latest version of DLP.

To try fix the issue I updated the version to the latest release which support Windows 1020H2 and tried the update again but it continued to fail with a different error code 0x80240020.

To get the update to work correctly I had to remove the following folders

C:\Windows\ccmcache

C:\$WINDOWS.~BT\

And delete all the files and folders under

C:\Windows\SoftwareDistribution\Download

I also ran the below three action from the configuration manager agent in the control panel:

Machine policy retrieval and evaluation cycle, Software updates deployment evaluation cycle and software updates scan cycle.

I waited around 5 minutes for the scan’s to complete and tried the feature update again and it installed without issue this time.

ConfigMgr query all devices software update install status

During a recent audit we need to get a list of all update and there install status on every device.

We use Configmgr for applying software update but I was not getting the information (well that I could find) using the out of the box reports.

I decided to write a SQL query to all devices, applicable updates and some device information.

To get the compliance status I used the Microsoft doc for the v_UpdateComplianceStatus SQL view.

SMS_UpdateComplianceStatus Class – Configuration Manager | Microsoft Docs

Below is the full SQL query

select rsys.name0 AS 'Computername',
 os.Caption0 AS 'Operating System',
 os.BuildNumber0 AS 'Build Number',
 ui.ArticleID AS 'Update ID',
 ui.Title,
 ui.Description,
 --Set Install Status
 Case
 when ucs.Status='0' then 'Detection state unknown'
 When ucs.Status='1' then 'Update is not required'
 when ucs.Status='2' then 'Update is required'
 When ucs.Status='3' then 'Update is installed'
 End As 'Install Status',
 --Set client Activity
 Case
 When ch.ClientActiveStatus='1' then 'Active'
 When ch.ClientActiveStatus='0' then 'Inactive'
 End As 'Client Active Status',
 ui.InfoURL,
 ui.DatePosted
 from v_updateinfo ui
 join v_UpdateComplianceStatus ucs on ucs.ci_id=ui.ci_id
 join v_CICategories_All catall on catall.CI_ID=UCS.CI_ID
 join v_CategoryInfo catinfo on catall.CategoryInstance_UniqueID = catinfo.CategoryInstance_UniqueID and catinfo.CategoryTypeName='UpdateClassification'
 join v_R_System rsys on rsys.resourceid=ucs.resourceid
 join v_GS_OPERATING_SYSTEM os on os.ResourceID = ucs.ResourceID
 join v_CH_ClientSummary ch on ch.resourceID = ucs.ResourceID
 order by rsys.name0

This is what the output should look like.