Migrating User Data Using USMT: MECM OSD Deployment

We have been doing migration’s from some old Windows 8.1 devices to Windows 10, We couldn’t do a direct upgrade as the devices where going from 32 to 64bit and needed to reformat the disk to UEFI.

We needed to migrate the users data as to limit the manual work for each device so decided to use User State Migration Tool (USMT).

It’s been a few years since I had to use USMT so thought it would be good to do a post on using USMT.

First I went through the Microsoft USMT documentation.

https://docs.microsoft.com/en-us/mem/configmgr/osd/deploy-use/refresh-an-existing-computer-with-a-new-version-of-windows

https://docs.microsoft.com/en-us/windows/deployment/usmt/usmt-technical-reference

https://docs.microsoft.com/en-us/windows/deployment/usmt/understanding-migration-xml-files

We are using MECM 2002 and have installed ADK 1903 which has USMT version 10.

Since the disk is going to be wiped and reformatted we wont be able to save the state to a local partition so we will need to use the state migration point to save content too.

First step is to install and configure state migration point in MECM.

Open the MECM console and go to Administration > site configuration > server and site system roles and select or add the server that will be used as the state migration point

Set the max free space in MB, GB or percentage. we also need to set the boundary group that this state migration point will be associated with.

This slideshow requires JavaScript.

Once the role has been installed we can start to create the task sequence to wipe and reload the device.

We won’t go through creating the TS from scratch in this post.

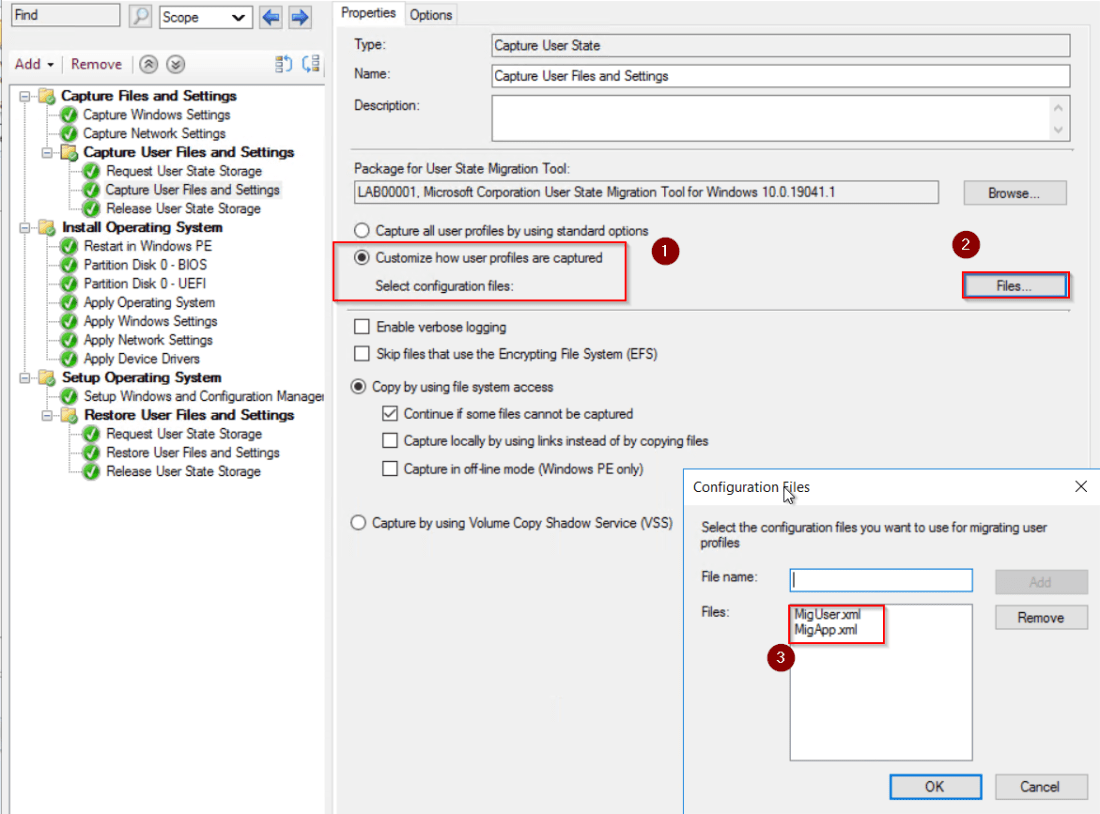
First step is to check is the capture state task. USMT6By default USMT will use the MigApp.xml and MigDocs.xml to set what will be copied.

To view the xml files you can go to the Windows ADK install location the default location is:

C:\Program Files (x86)\Windows Kits\10\Assessment and Deployment Kit\User State Migration Tool\amd64

USMT8

USMT16We will be using the default xml but you can create custom xml’s to customize what files and setting need to be copied and restored.

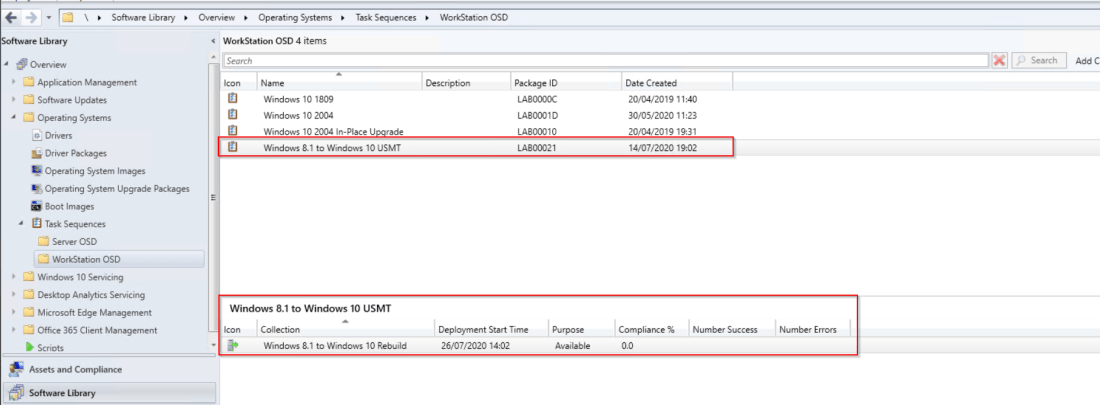
To set the custom xml select customize how user profiles are captured and click on the files button to add in the xml files. USMT7Once the TS is setup we just need to deploy to a collection so that devices can be added and pick up the wipe and reload TS. USMT9Once deployed either wait for the TS to be picked up or run the client action machine policy and app deployment evaluation. USMT10USMT11We can check the smsts.log file to view what is happening we can see below that the files are being downloaded for the USMT package. USMT12Once the scanstate kicks off you can see the xml files that are used in the log. USMT13USMT14We can check the USMT folder on the state migration point to see if data is being copied. USMT15Once the image is applied, we can check the restore state task in the smsts log. The command will call the loadstate and cause use the default or custom xml files. USMT19USMT20USMT18When the TS has fully finished we can logon to Windows we should see that the devices is running Windows 10 and also has the file and settings migrated.USMT17


MBAM Policy Error code: -2147217402 on Windows 10 1903

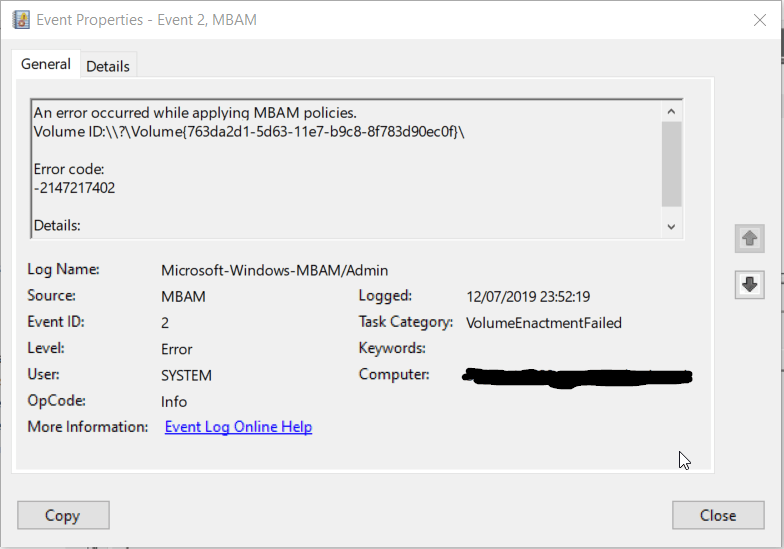
Recently I was installing MBAM 2.5 SP1 client on Windows 10 1903 during a ConfigMgr task sequence. Once the device was built and the user tried to put in a pin and start the encryption it would fail.

The below error was showing in the MBAM event logs. fail1We currently install MBAM successfully on Windows 1809 so it didn’t look like a MBAM server issue or connection issue. I checked and there was a newer servicing release from May 2019

https://support.microsoft.com/en-us/help/4505175/may-2019-servicing-release-for-microsoft-desktop-optimization-pack

This update adds support for Windows 10 1903. I applied this update and can now encrypt successfully. Hopefully this helps if anyone else runs in to the same error.

Surface Pro 6 1TB Disk 0 not found SCCM OSD

We recently started to build the new surface pro 6 1TB using SCCM. When imaging the task sequence kept failing at the format and partitioning step. When I checked the SMSTS log I could see the below errors

Invalid disk number specified: 0

OSDDiskPart.exe failed: 0x80070490

error1

From the error the problem was that there was no disk 0 available, I usually only see this when there are driver issues with the storage controller.

To check and see what disk where available, we can open a command prompt in the task sequence (As long as it’s enabled on the boot image) with F8 and run diskpart, once diskpart has opened use the list disk command to view available disk.

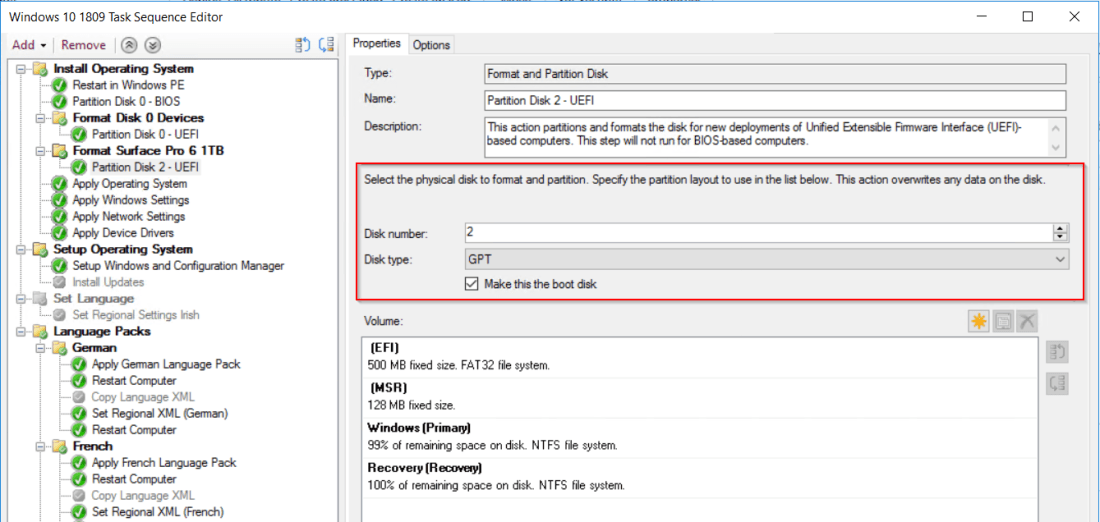
On the surface pro there was no disk 0 or 1 but instead the 1TB disk shows as disk 2 which is the reason the format is failing as by default the disk that is to be formatted and partitioned is disk 0.

I had a look online and the reason seems to be that the 1TB disk in the Surface Pro 6 is actually 2 x 512GB disk mirrored using Storage Spaces technology. See support KB below.

https://support.microsoft.com/en-us/help/4046108/disk0-not-found-when-you-deploy-windows-on-surface

This is why the disk shows as 2 and the default disk number is set to 0.

error2

The support KB says to change the format task to use disk 2 but this would require a second task sequence which is not ideal as it means more management overhead.

To work around this I have created an additional format and partition step in my existing task sequence and use WMI query’s to apply the specific format step for the Surface Pro 6 1TB.

WMI query to exclude device with no disk 0

Disk index: SELECT * FROM Win32_DiskDrive WHERE Index = “0”error3

WMI query for surface pro 6 1TB

Disk index: SELECT * FROM Win32_DiskDrive WHERE Index = “2”

Select surface pro device: SELECT * from Win32_ComputerSystem WHERE Model LIKE “%Surface Pro 6%”error4

Once the query is set on the format and partition disk step in the task sequence, set the disk number to 2.error5Now I can image the surface pro 6 1TB model successfully.

Create Windows 10 Answer file

In a previous post we went through creating and deploying language packs there was an additional step to create a Windows 10 answer file, I though it might be helpful to do a post on creating a basic answer file using Windows System Image Manager (SIM).

First step is to install Windows Assessment and deployment kit (ADK). To download the latest ADK use the below link:

https://go.microsoft.com/fwlink/?linkid=2086042

UASelect deployment tools. UA2Once the install has finished, go to the start menu and down to Windows Kits and open Windows System Image Manager .

UA4

First step is to select a Windows image file, to get the image file just need to extra the required Windows ISO to a folder.UA5Below is the extracted ISO.UA12Go to Sources > install.wim.UA6Select the version.UA7Next create a new answer file.UA8Go to Windows Image

UA13

Select Components, on the components below is the different type and examples

amd_64 =64bit components, only used on x64 installs

wow_64 = 32bit components or support components for 32bit installed on x64, only used on x64 installs

x86 = 32bit components installed on x86, only used on x86 installs

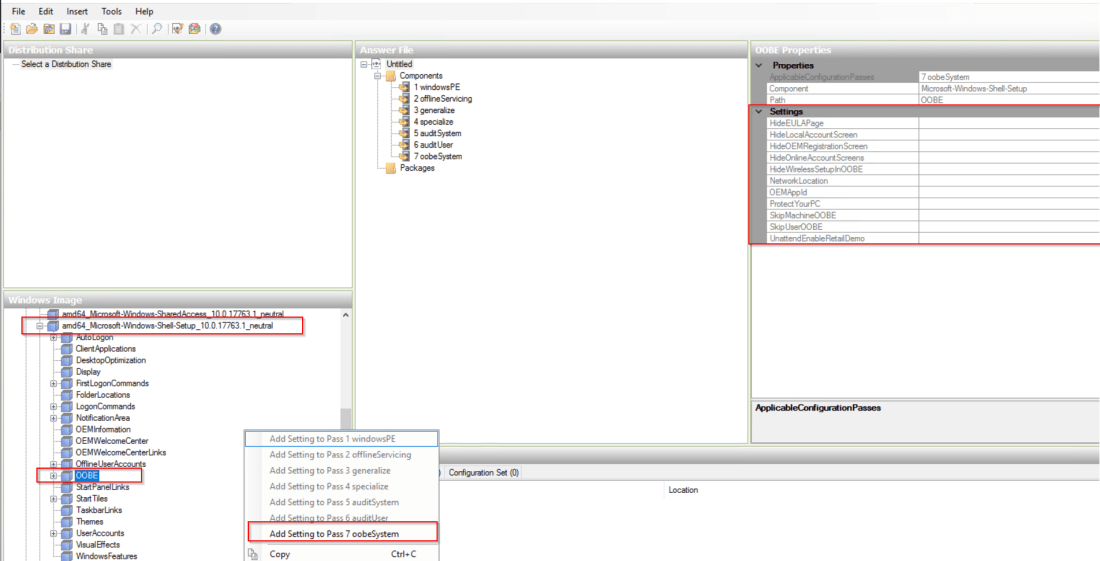
I used “amd64_Microsoft-Windows-Shell-Setup_10.0.17763.1_neutral” > “OOBE” and click Add settings to Pass 7 oobeSystem.

UA9.pngEdit “amd64_Microsoft-Windows-Shell-Setup__neutral” to add in Register Owner and any other details as required.UA11Next edit the required OOBE settings.UA10Once all the settings have been added save the answer file.UA14Last step is to create a package for the answer file and apply the answer file in the SCCM task sequence.UA15

Below is the content of the XML file.

<?xml version=”1.0″ encoding=”utf-8″?>
<unattend xmlns=”urn:schemas-microsoft-com:unattend”>
<settings pass=”oobeSystem”>
<component name=”Microsoft-Windows-Shell-Setup” processorArchitecture=”amd64″ publicKeyToken=”31bf3856ad364e35″ language=”neutral” versionScope=”nonSxS” xmlns:wcm=”http://schemas.microsoft.com/WMIConfig/2002/State&#8221; xmlns:xsi=”http://www.w3.org/2001/XMLSchema-instance”&gt;
<OOBE>
<HideEULAPage>true</HideEULAPage>
<HideLocalAccountScreen>true</HideLocalAccountScreen>
<HideOEMRegistrationScreen>true</HideOEMRegistrationScreen>
<HideOnlineAccountScreens>true</HideOnlineAccountScreens>
<HideWirelessSetupInOOBE>true</HideWirelessSetupInOOBE>
<ProtectYourPC>3</ProtectYourPC>
<SkipMachineOOBE>true</SkipMachineOOBE>
<SkipUserOOBE>true</SkipUserOOBE>
</OOBE>
<RegisteredOwner>TheSleepyAdmin</RegisteredOwner>
</component>
</settings>
<cpi:offlineImage cpi:source=”” xmlns:cpi=”urn:schemas-microsoft-com:cpi” />
</unattend>


SCCM Task Sequence Windows 10 Language Pack’s Install

On a recent project there was a requirement to install different language pack’s and configure regional / keyboard settings. I was having issue getting this working so I though I would do a post on how I ended up getting it working correctly.

To skip the OOBE initial setup screen we can use a unattended XML answer file. I have done a different post for creating a basic answer file see link below.

https://thesleepyadmins.com/2019/05/31/create-windows-10-answer-file/

If this is not setup you will be prompted to complete the initial Windows 10 setup along with selecting the language settings.

The next problem I had was trying to find the language packs I ended up downloading the language pack ISO from the Microsoft visual studio site.

lp

Once downloaded I need to mount the ISO and copy the required lp3

Once all the required language packs where copied. Create a new packages for each packlp4lp5lp6lp7lp8

The next step is to configure the XML file’s that will be used to configure the regional and keyboard settings for each language pack. I used this support how to as a reference for the XML:

https://support.microsoft.com/en-ie/help/2764405/how-to-automate-regional-and-language-settings-in-windows-vista-window

Below is the XML file that was used for the German language pack:

lp11

Below is the export from the above XML file: (Check double quotes if coping as the format can change when coping and that will cause issues)

<gs:GlobalizationServices xmlns:gs=”urn:longhornGlobalizationUnattend”>

<!– user list –>
<gs:UserList>
<gs:User UserID=”Current” CopySettingsToDefaultUserAcct=”true” CopySettingsToSystemAcct=”true”/>
</gs:UserList>

<!– system locale –>
<gs:SystemLocale Name=”de-DE”/>

<!–User Locale–>
<gs:UserLocale>
<gs:Locale Name=”de-DE” SetAsCurrent=”true” ResetAllSettings=”false”/>
</gs:UserLocale>

<!–location–>
<gs:LocationPreferences>
<gs:GeoID Value=”94″/>
</gs:LocationPreferences>

<!– input preferences –>
<gs:InputPreferences>
<gs:InputLanguageID Action=”add” ID=”0407:00000407″ Default=”true”/>
<gs:InputLanguageID Action=”remove” ID=”0409:00000409″/>
</gs:InputPreferences>

</gs:GlobalizationServices>

I used the below sites to get the GEO ID & the Input Locales

GEO ID : https://docs.microsoft.com/en-ie/windows/desktop/Intl/table-of-geographical-locations

Input Locales: https://docs.microsoft.com/en-us/windows-hardware/manufacture/desktop/default-input-locales-for-windows-language-packs

Once we have all the language packs completed create a single package with all the XML’s file’s or add the XML’s to the Language packages created above. I went with one package for all the XML’slp15

Next step is to add the steps to the Windows 10 task sequence

Add a run command line task, use the command below and replace with the required language pack .cab file. Select the corresponding package.

Below is for the german .cab

dism.exe /norestart /online /add-package /packagepath:.\Microsoft-Windows-Client-Language-Pack_x64_de-de(German).cablp10

After this step add a restart task lp12

Next step is to apply the XML file’s to set the regional / Keyboard settings. Below is the command line I used

rundll32.exe shell32,Control_RunDLL intl.cpl,,/f:”.\German.xml”

When copying the command above check that the double quotes are in the correct format or the command could fail to apply the xml fileLP13

After this step do another restart, the last step I did was to configure time zone for each region. I used the below site to get the time zone values

Time Zone Values: https://support.microsoft.com/en-us/help/973627/microsoft-time-zone-index-values

Below is the command line to set the time zones

cmd.exe /c tzutil.exe /s “W. Europe Standard Time”lp14

Below is the finished task sequence with all languages addedlp17

Last step was to set a condition to apply each package. I used host name as the condition to apply the language packs as each country has its own naming convention this was the easiest way for melp16

Once this is competed I tested and all packages were applied without error.

lp1lp2