Using VMware PowerCli Part 1

Since VMware 6.0 I have started to use VMware PowerCli module to automate task and checks that I do daily or for large task that would take a long time to do manually. I am going to go through installing PowerCli and some of the useful command and script that can be use to check VMware.

To install PowerCli there are some pre-req’s

OS Type
64-Bit
Server
  • Windows Server 2012 R2
  • Windows Server 2008 R2 Service Pack 1
Workstation
  • Windows 10
  • Windows 8.1
  • Windows 7 Service Pack 1
  • Windows PowerShell 3.0, 4.0, 5.0, or 5.1
  • .NET Framework 4.5, 4.5.x, 4.6, or 4.6.x

I would recommend installing the latest version of PowerShell which is currently 5.1

To check current version of PowerShell run $PSVersionTablePcli

To install the latest version install the latest Windows Management Framework 5.1 link to download page is below.

https://www.microsoft.com/en-us/download/details.aspx?id=54616

Step 1 is to install PowerCli

The old PowerCli was a PowerShell snap in and required downloading an exe to install, the new version is module based and can be installed directly from the PowerShell console. To install run the below command.

Install-Module VMware.PowerCliPcli1

If you need to update the module to a new release run

Update-Module VMWare.PowerCliPcli2

If a path is not specified the default location that the module files will be placed in is

C:\Program Files\WindowsPowerShell\Modules

Once the install has finished to verify that PowerCli is installed run the below commandPcli3

Step 2 is to connect to vCenter

To connect to vCenter open an elevated PowerShell console and import the VMware Module

Import-Module VMware.PowerCliPcli4

Connect-VIServer lab-VC vCenterServerPcli5

Once connected we can now start to run command against vCenter.

To get host information run

Get-VMHost

Pcli6

To find all VM’s that have snapshots over a certain date. I want to get all snapshots older than 1 day to change this just edit the $date variable.

$date = (Get-Date).AddDays(-1)
$Snapshot = get-vm | get-snapshot
$Snapshot | where {$_.Created -lt $date}Pcli7

To check datastores you can run

Get-Datastore

Pcli8

To get additional info you can do some math’s and use arrays to get % free space of the datastores. The below will get all datastores that have less than 25% free space.

Get-Datastore | select Name,@{N=”UsedSpaceGB”;E={[math]::Round(($_.CapacityGB),2)}},
@{N=”FreeSpaceGB”;E={[math]::Round(($_.FreeSpaceGB),2)}},
@{N=”%Free”;E={[math]::Round(($_.FreeSpaceGB)/($_.CapacityGB)*100,2)}} |
where %Free -lt “25”
Pcli9

Add secondary IP to Network Adapter Windows

A web developer was adding IP’s to some existing web server and once these were added we started having routing issue on the servers where the sites would not respond and the server could not talk back to the production network from the DMZ.

I checked the server and I was getting inconsistent results as I could ping a device sometimes but not others so it looked like a network issue.

I ran the below command to check what traffic was being sent and I saw that there where multiple IP’s being used as local address for traffic.

Get-NetTCPConnection -LocalAddress 192.168.0.*

I decided to check the skipasSource on the interface as this was the cause of a similar issue that happened before.

This command’s will return all IP’s the interface name and whether the IP is set to skipassource the new IP should have this set to true.

CMD:                                                                                                                                               

Netsh int ipv4 show ipaddresses level=verbose

PowerShell:                                                                                                                                       

Get-NetIPAddress | Select-Object IPAddress, InterfaceAlias, SkipAsSource

When I checked the new IP was set to false which meant both the orignal and new IP where being used. To set the IP to false I either need to remove the IP and set it using cmd or PowerShell  to set skip as source to true or Set to true using PowerShell.

If you don’t want to remove and re-add the address use the below command

Set-NetIPAddress -IPAddress "192.168.0.200" -InterfaceAlias "LAN" -SkipAsSource $false
IP3

second option is to remove the IP from the network settings and  re-add the IP using command line below is using CMD and PowerShell.

CMD:           

Netsh int ipv4 add address “Interface Name” “IP Address” “Netmask” skipassource=True                                                                                                                                 

Below is a full example:

Netsh int ipv4 add address "LAN" 192.168.0.200 255.255.255.0 skipassource=true
IP2

PowerShell:                                                                                                                                     New-NetIPAddress –IPAddress “IPAddress”  –InterfaceAlias “Interface Name” –SkipAsSource $True

Below is a full example:

New-NetIPAddress –IPAddress 192.168.0.200 -PrefixLength 24 -InterfaceAlias "LAN" –SkipAsSource $True
IP1

Once skip as source was set to true there was no connection issues.

Windows Updates Fail Error Code 0x800F0831 Server 2012 R2

I recently had an issue installing Windows updates on some servers running Windows Server 2012 R2. The server would install most updates but not the monthly update rollups or the security only updates.

I checked the event logs and saw event 0x800F0831Up2

This didn’t give much information on why the update was failing so I checked the CBS log under C:\Windows\Logs\CBS and found the below error. This pointed to a missing or corrupted update for KB4343898 which in my case was the August 2018 monthly update rollup. Up3

CBS Failed to resolve package ‘Package_1101_for_KB4343898~31bf3856ad364e35~amd64~~6.3.1.9’ [HRESULT = 0x800f0831 – CBS_E_STORE_CORRUPTION]

CBS Mark store corruption flag because of package: Package_1101_for_KB4343898~31bf3856ad364e35~amd64~~6.3.1.9. [HRESULT = 0x800f0831 – CBS_E_STORE_CORRUPTION]

Next step was to check to see if the update was showing on the server so I used the PowerShell command Get-hotfix to search for the update.

Get-hotfix | where {$_.hotfixid -like “KB4343898”}Up4

If I check the package folder C:\Windows\servicing\Packages  I can see the update is referenced but not the package showing the error in the CBS log. UP6

I had this issue a few years back and the fix was to add the update using Dism and the update cab file. To extract the update run expand updatefile /f:* exportpath

expand C:\temp\windows8.1-kb4343898-x64.msu /f:* C:\temp\KB4343898Up5
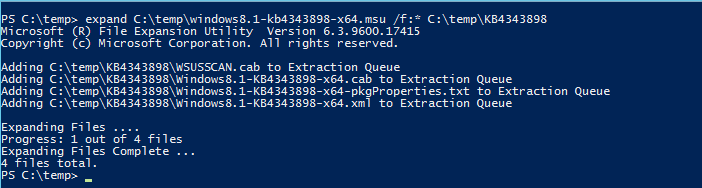
Once the update is extracted use Dism to add the problematic update this should install the missing files.

Dism /online /Add-package:C:\temp\KB4343898\Windows8.1-KB4343898-x64.cabUp7

Once completed reboot the server if required, then try the update again, it should now install without issue.

Adding Multiple Devices To SCCM Collection PowerShell

I recently needed to add a few hundred devices to a collection in SCCM. I couldn’t use a query to achieve this as there where no attributes that I could use. So it would have to be a direct query and I didn’t really want to manually add hundreds of servers as this would take a long time and PowerShell is a much easier and faster option. I decided to write a quick script to get a list of device from a txt file and do a loop to add each device to the specified collection.

First I need to open a PowerShell connect to SCCM I prefer to use Powershell ISE as I can edit and test my script while in one console. To connect go to the SCCM console On the blue drop down icon on the top left, click it and then choose Connect via Windows PowerShell ISE.

Coll1

Once PowerShell ISE is open you should see the connection script.  Just click run script at top of ISE to connect to SCCM. Coll2

Once in ISE copy the script below and change the collectioname, computers and logpath variables to the correct location and collection that you want to added to.  Below is what the script should look like when it run.

Coll3

$collectionname = “RDS Deploy Collection”
$Computers = Get-content “c:\temp\Server_List.txt”
$logpath = “c:\temp”
foreach($computer in $computers) {
try {
Write-Host “Adding $computer to $collectionname” -ForegroundColor Green
Add-CMDeviceCollectionDirectMembershipRule -CollectionName $collectionname -ResourceId (get-cmdevice -Name $computer).ResourceID
}
catch {
Write-Warning “Cannot add client $computer object may not exist”
$computer | Out-File “$logpath\$collectionname-invalid.log” -Append
$Error[0].Exception | Out-File “$logpath\$collectionname-invalid.log” -Append
}
}

There is also a log file that will be export to give devices that have not been added and the error exception generated by PowerShell.

Coll4