In this post we will be going through using different filter types in Microsoft Graph SDK. Using filters is useful when trying to return specific results or subset of data.
To check if a command supports filtering we can look up the command on the Microsoft Learn page or try -Filter.
There a few different operators we can use for filtering below is the full list.
eq
not ne
startswith
endswith
in
le
ge
not and endswith
not and startswith
not and eq
not and in contains
has
Once we know the command supports filtering, we need find a property to filter on for users we will use display name.
Get-MgUser -Filter "DisplayName eq 'Name'"
To find all displaynames that start P we can use startsWith(DisplayName, ‘value’)
Get-MgUser -Filter "startsWith(DisplayName, 'P')"
To filter using a variable we can create a new variable with a value and call that in side the filter. This can be use when doing foreach loops to go through each object in an array.
We can also use filtering to return objects by date, the date has to be formatted in a specific way or the filter will error out.
The data has to be yyyy-MM-ddT00:00:00Z To get the correct date format we can use ToString and the format.
$date = (Get-Date).AddDays(-30).ToString('yyyy-MM-ddT00:00:00Z')
Get-MgAuditLogSignIn -Filter "AppDisplayName eq 'OfficeHome' and CreatedDateTime ge $($date)" | Select-Object AppDisplayName,CreatedDateTime
Filtering is an import to learn when using Microsoft Graph without it, it can be difficulty to find the right data or objects.
Filtering also helps improve performance and reduce the amount of data retrieved from Microsoft Graph.
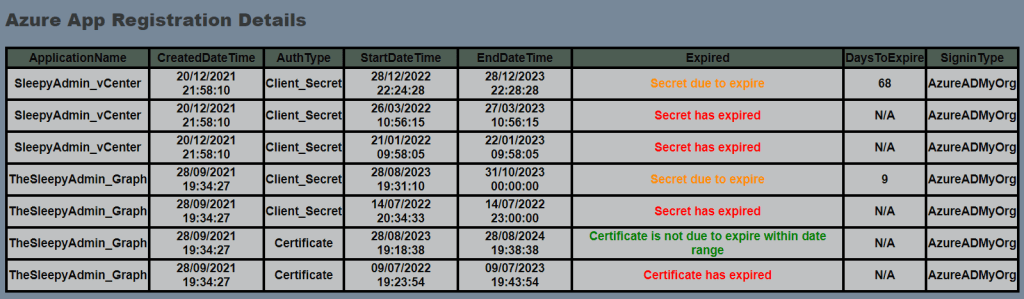
In this post we will be going through creating a HTML report for Microsoft Entra ID App registration to export a list of expired and expiring client secrets and certificates.
I wanted to create a HTML report that would highlight cert / secrets that where expired or due to expire and make it quicker to check what is due to expire.
This report will use the existing PowerShell script I created last year to export Azure App registration details to a CSV file, just updated to use an embedded CSS style sheet to format the html output.
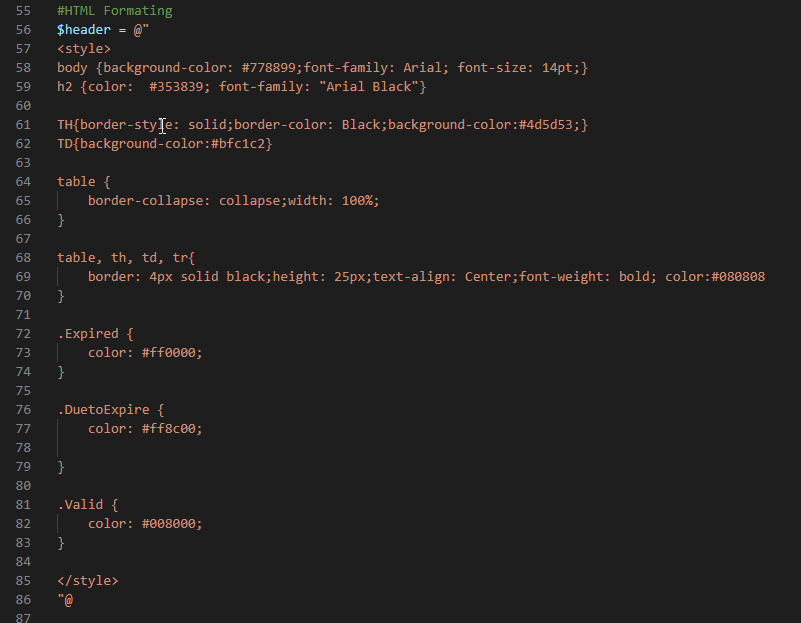
First I needed to create a HTML style sheet, below is the HTML code I use for the HMTL formatting.
The last step was update the rows to set each row to green, orange or red depending on the status of the cert / secret.
To run the script I will be using a certificate and app registration as this allow for better automation and certificate are recommend over client secrets for security. If you need to know how to set this up I have done a previous post on this.
If you’re an Azure administrator, you’re likely familiar with the concept of service principals.
These are application identities that are used to manage access to Azure resources. Service principals are an important part of Azure security, but managing them can be a challenge.
In this blog post, we’ll go through listing service principals and exporting details and group membership.
First we need to connect to Azure using Microsoft GraphSDK, the two permission required are Group.Read.All and Application.Read.All
Next we can use to list all service principal
Get-MgServicePrincipal -All: $true
We can use the Filter parameter to select only the principal that we want to check.
Next I wanted to check what groups the principal was a member off. To do this we can use the ID property and the below command.
We can then use the ID to get the group display name
Get-MgGroup -GroupId
Now that we have the service principal and groups we can create the report script. We will be exporting the Displayname, ServicePrincipaltype, AccountEnabled, AppId, createddatetime and groups.
There are three parameters in the script, ServicePrincipals is used to specify the name or names of the service principals to check.
The ConsoleOnly returns results directly to PowerShell console
If using the reportexport parameter the results will be exported to CSV
The script can be run against one or multiple service principals to report on more than one.
To search more than one use , between the names.
The full script can be downloaded from the below GitHub link.
Support for both Azure AD and MSOL modules have been extended to allow the updating of scripts and I would presume due to some command not existing in Graph yet. The modules will be deprecated in June 30th 2023 so any scripts using command with either of these modules should be updated as soon as possible.
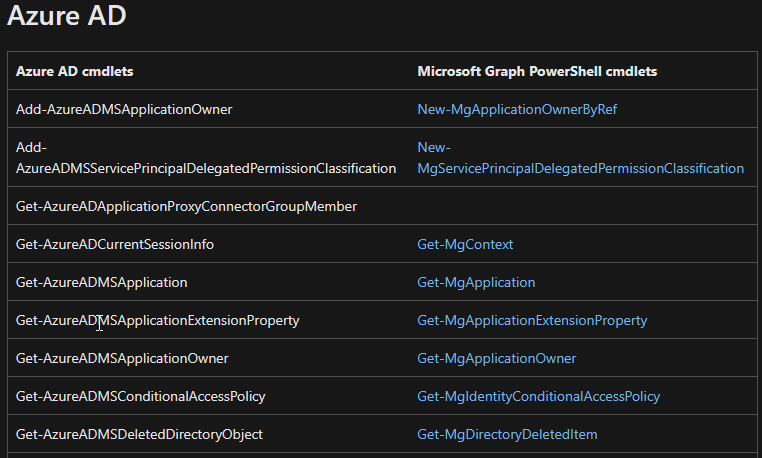
In this post we will be going through some common commands that use either the Azure AD or MSOL PowerShell modules and how to find commands that will replace them in Graph and using the scope roles to set required API permissions.
First stop I usually do is to check if the commands have direct replacements, we can use the below learn page to check. The page will have tables with the Azure AD / MSOL command and then the replacement command if one exist in the second row.
For the below reference we will be using Get-MsolUser if we check the document that command is replaced by Get-MgUser.
Now when connecting to Azure AD or MSOL all commands and permission are based on the role of the account you sign-in with.
If we connect with MSOL we can query users once we have the required role.
For Graph the way to connect is slightly different if we don’t specify a scope when connecting, we can connect but we don’t automatically have the require API permission assigned so if we run the Get-MgUser command we will get an error for insufficient privilege’s
If we add the -scope User.Read.All
If we want to check what permission are available for a command we can use Find-MgGraphCommand with the command we want to check. We can also use the apiversioni (v1.0 or beta)
Depending on what task we are trying to do we can select the required permission, one example is if I just want to get back information on account’s I would just use User.Read.All. If I wanted to change a users settings I would use the User.ReadWirte.All.
Another difference between modules is that in Graph there is no -userprinicpalname parameter and uses UserID instead
To get licenses assigned to a user we can use.
Get-MgUserLicenseDetail -UserId UPN
As we can see Microsoft Graph has a few differences and instead of having most data under single objects like Get-MsolUser we have to now use multiple commands to return the same data which can be a bit more difficult when starting out.
In this post we will be going through setting up a conditional access policy to allow connection’s to a Microsoft App Registration that will be used for calling Microsoft GraphAPI from only certain countries / public IP’s.
Microsoft has a preview feature in Conditional Access for workload identities. A workload identity is an identity which allows an application or service principal access to resources.
When an App Registration is created, it will create a service principal. This service principal is what we will use in the conditional access policy.
First we need to create the named location to define where we want to allow the access from.
To create a named location go to endpoint management admin page.
Once in Conditional access, go to Named location and add the required countries locations and or IP ranges.
Named locations
To add as single IP use /32 bit subnet mask.
IP range
Once we have the named locations we can create the Conditional access policy.
Go to the policies tab and click on new policy.
Policies page
Give the policy a name and set the assignment to workload identities.
Conditional access policy
Next select the service principal for the Graph App registration.
Users or workload selection
Next on Cloud apps or actions select, All cloud apps
Cloud apps or actions selection
Next we need to specify which location will be included, which we set to any location as we will use the exclude to allow access from the named location we will connect from.
Conditions selection
Next select the location that will be excluded from the policy in my case it will be the public IP we added earlier to the named location.
Excluded Locations
Next we set the access, I will be blocking access as I only want to allow access from the one public IP we specified in the excluded location.
Access selection
With any conditional access policy I would recommend setting the policy to Report-only to confirm that only the access that we excepted to be blocked is.
Policy settings enabled section
To check if the policy is applying correctly against the service principal we can check the sign-in logs.
First connect using Graph query and then go to sign-in logs.
MEM Admin Blade
Select service principal sign-ins.
Sign-in logs
Click on the request ID and look at the Report-only tab to see if the access would have been blocked or allowed.
Sign-in logs
Once we confirm that the policy is applying the correct access, the conditional access can be set to on.
Now once we try to connect from an IP or location not on the excluded list, it will be blocked from accessing.
Graph Connection
When we connect from an allowed location, we will get back the access token and be allowed to connect.
Graph Connection Token
When creating App registration we should look at access controls for these as this can be over looked and lead to a security risk, most application do not need access from any location and should be limited to only the require location or IP address to give greater access control.
Recently we have been reviewing some of our old Exchange Web Service mailbox connections and updating these to use Microsoft Graph. We wanted to restrict what mailbox’s the Azure App registration used for Microsoft Graph could connect to.
To set this up in Exchange Online we can use an Application Access Policy. In this post we will be going through setting up and confirming the mailbox’s access.
I have gone through setting up Azure App registration for Microsoft Graph before so we wont be going through that in this post.
I will also be using certificate and Microsoft MSAL PowerShell Module to get the Graph access token.
See post below if you need to know how to connect using MSAL with certificate base authentication.
Once we have the app registration setup and certificate issued and uploaded to the app registration, we can then assign the GaphApi permission to access mailboxes.
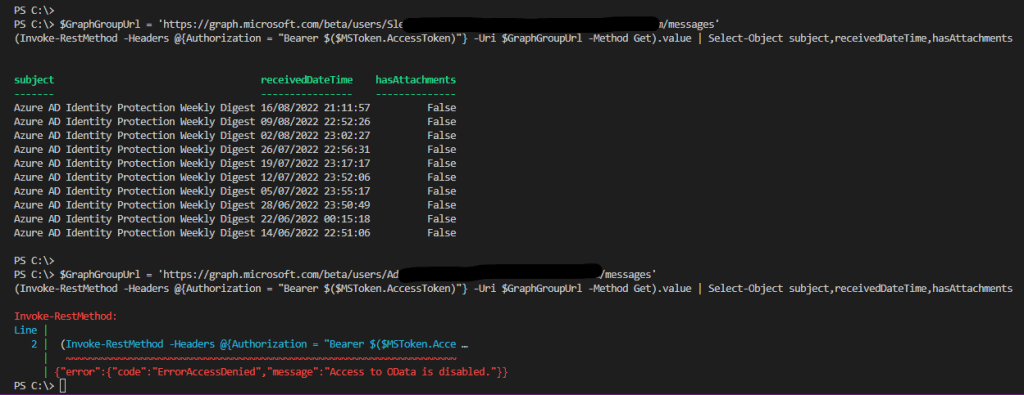
If we don’t apply the permission we will get access denied.
Graph Message Access Error
I will be giving Mail.Read API permission, this will give access to view all mailboxes.
Graph API Permissions
Grant admin consent for the API permission.
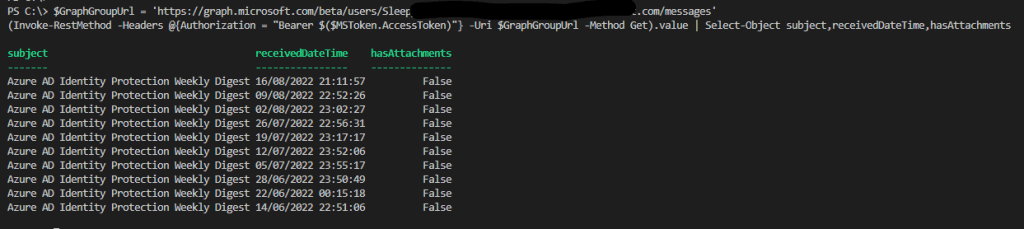
Now if we try to query the mailbox we should now be able to see the messages.
Graph Message Response
At this stage we can use the App registration to read messages from any mailboxes.
To lock this down so that the Graph query is only able to view certain mailboxes we can use
New-ApplicationAccessPolicy
to create an application access policy. The policy can be applied to a group or a single users.
To run the command, we will need Application ID of the app registration, mailbox or mail enabled security group and description. Using a group is useful if there are multiple mailboxes that they will need to allow access.
New-ApplicationAccessPolicy -AppId ApplicationID -PolicyScopeGroupId "user_group@domain.com" -AccessRight RestrictAccess -Description "Restrict this app to view mailbox or security group."
To run the command we need to connect to Exchange Online
Connect-ExchangeOnline
Then run the command to create the application access policy.
We can test what mailboxes the app registration can access using.
Now once we try to query the mailbox we have give access to we will see the message returned, if we try query any other mailbox we will an error message.
Applying the application access policy is a good idea for security as allowing an application to read mailboxes that it doesn’t need access to can be a risk if the app was ever compromised or there is sensitive data in mailboxes that no other users or application should have access to.
In this post we will be looking at creating a report to show what Azure App registrations have expiring client secret / certificate in the specified amount of days.
There is currently no in built way to report on expiring App registrations in the Azure portal other than checking the app registration, so we will be using Microsoft Graph SDK to automate the reporting.
First to automate the report we need to create an app registration to use for the Microsoft Graph connection. I have gone through this in a previous post.
The specific Microsoft GraphApi application permission required is Application.Read.All, this needs to be added to the App Registration that we use for Microsoft Graph.
App Registration API Permission
Next we need to connect to Microsoft Graph using.
Connect-MgGraph
To list the app registration use
Get-MgApplication
Microsoft Graph Applications
Once we have the list of apps we can use PasswordCredentials to view client secret details
(Get-MgApplication).PasswordCredentials
Application Secrets Properties
and KeyCredentials to view the certificates details
Application Certificate Properties
Once we have the required properties, we can create the script to export the app registration details.
App Registration Report
There are two parameters Reportonly which returns just the result to PowerShell window and ReportExport which will export the report to the specific folder specified.
In this post we will be going through creating an automate report to list all assigned Azure roles and user/group assignments using Microsoft Graph SDK.
This can be useful for environments that haven’t implemented Microsoft privileged identity management for roles management. This can be used to keep track of roles assignments in Azure.
I will be using Microsoft Graph SDK, if you haven’t used this before I have done a previous post on installing and getting start with the Graph SDK.
I will be using a app registration in Azure AD with certificate authentication (I covered this in one of my previous posts) so I don’t have to use any username or password with the script. We will need to add the required API permission.
To find the specific commands that I needed to use, I generally search for them on the Graph module reference document link below as there are a lot of commands in the Graph SDK module.
Select the Graph registration that was previously created. Under the API permissions select add permissions and add the the required application permissions to run the command.
In this case we will be using the rolemanagment.read.all
Once the API permission is added we can start to create the script.
To get the list of directory roles that are currently in use use
Get-MgDirectoryRole
Then to get the assigned objects use the below command and copy the ID to view details.
During a recent audit we have been trying to automate a report on what Guest account’s are active in the last 30 days and to find what groups these guest account are members of so they can be removed if they are no longer required.
We could use AzureAD PowerShell for getting guest account and group membership but it was not that easy to automate this.
We decided to use Microsoft Graph as we have a few task already automated using Microsoft Graph and certificates so there is no need to hard code any password or application secret in my script.
I have done a previous post on the getting the access token and using certificate based authentication so if you need to know how to setup you can check that post.
In this query we will be using three different Microsoft Graph url’s. First is to get a list of guest users, second will be to get sign-in logs and the last will be to get the guest users group membership.
To get guest users we will filtering using userType attribute
First step as with any Graph query is to create the token request that will be used to access the different Graph Url’s. We will be using MSAL module and a certificate to generate.
To filer results using Graph we can put in ?filter= and then use a supported filter attribute. In this case we will be using usertype.
We will also create a blank array variable that will be used to output to later and a date variable to filer the sign-in logs.
This first filter will get all guest users. Currently usertype is only available when using the beta Graph version so we will be using that.
Once we have the Guest users we will loop through each one, use a second filter that uses the mail address to filter the guest user sign-in logs and use a date variable to show only sign-in over the last 30 days.
"https://graph.microsoft.com/beta/auditLogs/signIns/?filter=userPrincipalName eq '$($User.mail)' and createdDateTime ge $Date"
The next filter is going to use the user ID to get the memberof for the user and we will use the group-object to put all groups display names in to one object so it easier to call to the console windows or export to a CSV.
Once we have all the information returned from the Graph queries we need to format the results. For this we will use a hash table and an if statement to output user with or without sign-in logs to the correct hash table and add the values to the results variable.
This script is only going to return the latest sign-in log as I only really want to have a report that the users has been active in the last 30 day that’s why I am using [0] to select the latest object in the $logins variable.
The last part of the script just outputs the results and use select-object to format the order.
Now that we have the full script the below is what the result should look like.
To make the script more reusable there are three variable for TenantId , ClientId and CertThumprint.
To export the result to a csv instead of the console windows there is an -Exportpath parameter that just needs to have the path specified.
The full script can be download from my Github repository
To filter on other attributes we can use the same process as above just change the Graph url and check the document for that url to view what is a valid filter attribute. Filtering results in the the Graph url speeds up the script and mean we don’t do addtional filtering after returning all data.
I had a recently gotten some question’s on how to connect to Microsoft GraphApi using certificate instead of an app secret. I have set this up before using the Microsoft Graph PowerShell SDK but I wanted to test this using Invoke-RestMethod.
There is a PowerShell module that has been created that allow for much easier creation of authentication tokens using Microsoft Authentication Library.
The Microsoft Authentication Library (MSAL) enables developers to acquire tokens from the Microsoft identity platform in order to authenticate users and access secured web APIs. It can be used to provide secure access to Microsoft Graph, other Microsoft APIs, third-party web APIs, or your own web API. MSAL supports many different application architectures and platforms including .NET, JavaScript, Java, Python, Android, and iOS.
MSAL gives you many ways to get tokens, with a consistent API for a number of platforms. Using MSAL provides the following benefits:
No need to directly use the OAuth libraries or code against the protocol in your application.
Acquires tokens on behalf of a user or on behalf of an application (when applicable to the platform).
Maintains a token cache and refreshes tokens for you when they are close to expire. You don’t need to handle token expiration on your own.
Helps you specify which audience you want your application to sign in (your org, several orgs, work, and school and Microsoft personal accounts, social identities with Azure AD B2C, users in sovereign, and national clouds).
Helps you set up your application from configuration files.
Helps you troubleshoot your app by exposing actionable exceptions, logging, and telemetry.
The PowerShell module that can be used to create tokens is called MSAL.PS and the latest version as of today is 4.21.0.1.
In this post we will be going through installing and using this module to generate an authentication token using a self signed certificate and using that token to connect to Microsoft Gaph.
The first step is to install the MSAL.PS module
Once the module is installed we can generate the certificate that will be used to connect to Microsoft Graph
To create the self signed cert I used the below command. There was a error when trying to generated the token when I didn’t use -KeySpec when generating the cert. The fix to use -KeySpec was on the GitHub issue page.
Once the cert is exported we can upload to the app registration that we created before. See previous post if app registration hasn’t been created in Azure yet for Microsoft Graph.
To add the cert open the Azure portal > Azure Active Directory > App registrations and select the Graph app and go to certificates & secrets
Select upload certificate
Click add to apply the cert
After the cert is upload we should now be able to connect. We will need the TenantId, clientId and certificate
The tenantID and ClientId can be gotten from the app registration overview page and the cert can be gotten using Get-Item and the cert location / thumbprint.
If you want to use the same cert for any users on the device we can export and import the cert under localmachine cert store with the private key and update the $clientCert to use localmachine instead of currentuser.
Get-Item "Cert:\localmachine\my\CertThumbprint"
Once we have the token, it’s now the same process as we have used before to connect using invoke-restmethod but using the $MSToken.AccessToken we generated using the Get-MsalToken and our certificate.
Using MSAL.PS module provides a much quicker and easier way to generate access tokens for Microsoft Graph with the added security of using a certificate over having to put in any application secret.