Windows Admin Center

I setup a Windows 2019 Core server and wanted to see how well the new Windows Admin Center works. This can be installed on server core itself as it is all Web-based so I used the core server to host the WAC.

I downloaded the WAC and server Core from

https://www.microsoft.com/en-us/software-download/windowsinsiderpreviewserver

This needs an account that has signed up to windows insider program.

Once the install file is downloaded, log on to the server core console and run powershell.exe.

To copy the install to the local OS I ran

Copy-Item -Path \\serverShare\WindowsAdminCenterPreview1808.msi -Destination C:\Users\Administrator\desktop\

To install run: msiexec /i WindowsAdminCenterPreview1808.msi /qn /L*v log.txt SME_PORT=6516 SSL_CERTIFICATE_OPTION=generate or msiexec /i WindowsAdminCenterPreview1808.msi to do an interactive install. 2
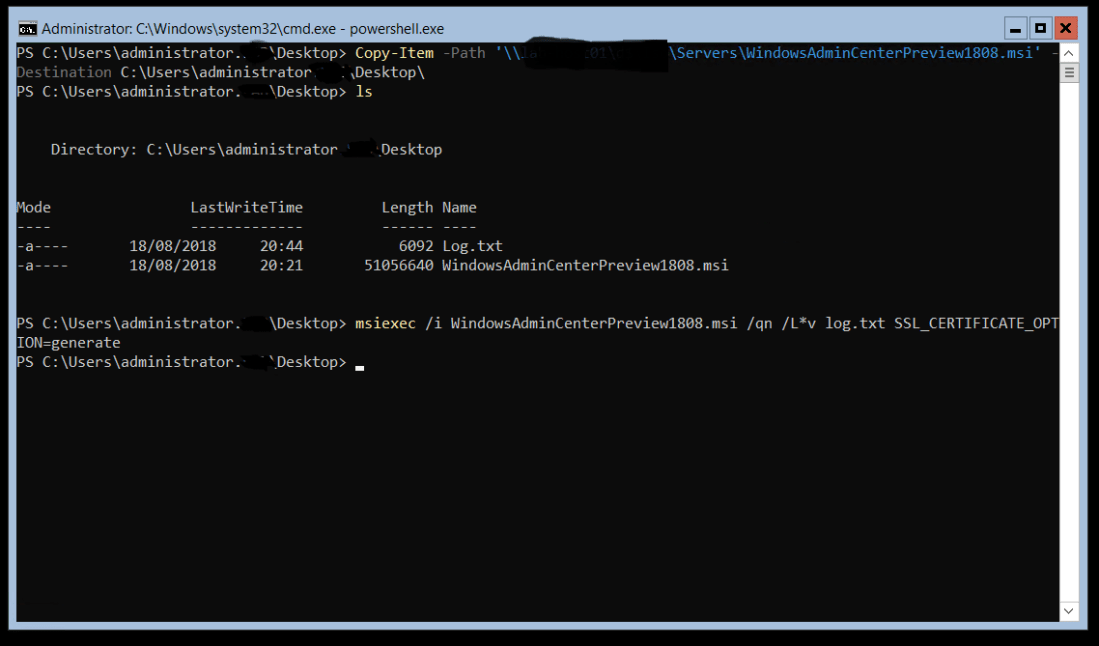
Once the install has completed you can browse to either the IP or host name of the server.3

Select the server you want to manage this will then bring up all the management tools and features for that server. 4

Configuring server core 2019 TP

With newer version of Windows server, Microsoft is trying to move away from desktop style management and moving to a command line setup that is managed remotely using Windows Admin Center. I was setting up a new Windows Server 2019 Technical Preview server for testing and decided to do a post on how to set up and domain join server core.

The overall install process is the same as previous version of Windows. Once the OS is installed you will be prompted with a command prompt window.First screen

This is to set the local admin password for the server. SecondScreen

Once the password has been set you will be brought to a standard command prompt screen. Type sconfig to start the server configuration screen. This is where you will configure most of the initial setup options like Server Name, domain join, Static IP …….6th

Select option 2 to set the server name.7th

Select option 1 to domain join the server. Restart server after the domain join completes 9th

Next I enabled remote management so I could install feature remote. Select option 4 to configure remote management. 11th

If you want to leave the server on DHCP you can. I decided to add a static IP to do this select option 8.

Select the adapter that will have the static IP assigned. Net1Net2

Select option 2 to set DNS servers. Net3Net4

To manage the server either install Windows Admin Center or go to another 2012 / 2016 server and add to server manager. Once there you can right click on the server to add roles / Features and other management tools. 12th

Event ID 2213: Active Directory DFS Replication stopped

I have been seeing intermitent issues with DFS replication on multiple DC’s across our diffrent forest. This has lead to issue with group policy replication below is a copy of the event log.

The DFS Replication service stopped replication on volume C:. This occurs when a DFSR JET database is not shut down cleanly and Auto Recovery is disabled. To resolve this issue, back up the files in the affected replicated folders, and then use the ResumeReplication WMI method to resume replication. 

Additional Information: 

Volume: C: 

GUID:

Recovery Steps 

1. Back up the files in all replicated folders on the volume. Failure to do so may result in data loss due to unexpected conflict resolution during the recovery of the replicated folders. 

2. To resume the replication for this volume, use the WMI method ResumeReplication of the DfsrVolumeConfig class. For example, from an elevated command prompt, type the following command: 

wmic /namespace:\\root\microsoftdfs path dfsrVolumeConfig where volumeGuid=”GUID” call ResumeReplication


To fix the issue we have had to logon to each DC and run the above wmic command to re-eneable, this is time consuming and also requires some form of alerting to know that the replication has stopped. I decided to see if I could script this and came up with a script to search each domain and then run remote Get-wmiobject and call the resume command method. The script is set to automatically run using a schedualed task. Link to technet script is below.

DFS script on Technet

Technet is being retired and content deleted,  so I have moved this script to github.

https://github.com/TheSleepyAdmin/Scripts/tree/master/ActiveDirectory/DFS_Replication

Scan Annoymus FTP Script

I needed to scan all my subnets for FTP’s that had annoymus FTP access enabled. Below is the script I used this requires nmap.

Nmap can be downloaded from this site: https://nmap.org/download.html

I useally add nmap as a system variable so I can call the exe without specifying path.

  1. From the desktop, right click on This PC and then click “properties”.
  2. In the System Properties window, click the “Advanced” tab.
  3. Click the “Environment Variables” button.
  4. Choose path from the system variables section, then hit edit.
  5. Add a semi-colon and then your Nmap directory (e.g. C:\Program Files (x86)\Nmap) to the end of the value.

You can add or remove subnets ranges by changing the subnets variable (which is marked as red in the script below). The range can be specified by setting the range variable this can be set from 1 to 254 to restrict the scan. Below are two examples:

Example for a Single range
.\FTPCheck.ps1 -exportpath c:\temp -Range 20 -subnets 192.168.0.
Example for Multiple ranges
.\FTPCheck.ps1 -exportpath c:\temp -Range 254 -subnets 192.168.0.,10.10.10.
<#
.SYNOPSIS
Scan for Open FTP sites on subnets
.DESCRIPTION
The script will run through each address on the specified subnets
and scan for any open FTP sites and output any sites to a csv files
.PARAMETER exportpath
The export parameter is used to specify the export path location.
.PARAMETER Range
This parameter is used to set the scan range this can be set from 1 to 254 depending of
how much of the subnet range needs to be scanned.
.PARAMETER Subnets
This parameter is used to specify the subnets to be scanned.
.EXAMPLE
.\FTPCheck.ps1 -exportpath c:\temp -Range 20 -subnets 192.168.0.
.\FTPCheck.ps1 -exportpath c:\temp -Range 20 -subnets 192.168.0.,10.10.10.
Scan-FTP -exportpath c:\temp\export -Range 254
.NOTES
This script requires nmap to check for Open FTP sites
#>
param (
[parameter(Mandatory = $true)]
[String]$exportpath,
[parameter(Mandatory = $true)]
[String]$Range,
[parameter(Mandatory = $true)]
[string[]]$subnets
)
if(Test-Path $exportpath){
foreach($subnet in $subnets){
$i = 1
while($i -le $Range){
$results = $subnet + $i
foreach ($result in $results)
{
$report = @()
Write-Host “Checking IP” $result -ForegroundColor DarkGreen
$Scan = nmap -p 21 -v –open –script ftp-anon $result -A
$report1 = $Scan | Select-String -Pattern “Nmap scan report for “
$report2 = $Scan | Select-String -Pattern “21/tcp open ftp”
$report3 = $Scan | Select-String -Pattern “(FTP code 230)”
$report4 = $Scan | Select-String -Pattern “MAC Address:”
$Properties = @{
“FTP Site” = $report1
“FTP Site Responses” = $report2
“FTP Site Access” = $report3
“FTP MAC” = $report4
}
$report += New-Object psobject -Property $properties
if ($report1 -ne $null){
$report | select “FTP Site”,”FTP Site Responses”,”FTP Site Access”,”FTP MAC” | Export-Csv “$exportpath\FTPScan.csv” -Append -NoClobber -NoTypeInformation
Write-Warning “FTP site responded”
}
$i++
}
}
}
}
else{
Write-Warning “Path does not exist”
exit
}