To access internal applications we can use Azure Application proxy to integrate with Azure AD and allow remote access to internal resources.
To use Azure Application Proxy requires Azure AD basic, Premium P1 or Premium P2 subscription.
An Account with Global administrator rights
The Azure application proxy connector requires Windows Server 2012 R2 or later
Below are pre-req ports and URL’s
See link below to Microsoft documentation
https://docs.microsoft.com/en-us/azure/active-directory/manage-apps/application-proxy
| Port number |
How it’s used |
| 80 |
Downloading certificate revocation lists (CRLs) while validating the SSL certificate |
| 443 |
All outbound communication with the Application Proxy service |
| URL |
How it’s used |
*.msappproxy.net
*.servicebus.windows.net |
Communication between the connector and the Application Proxy cloud service |
mscrl.microsoft.com:80
crl.microsoft.com:80
ocsp.msocsp.com:80
http://www.microsoft.com:80 |
Azure uses these URLs to verify certificates |
login.windows.net
login.microsoftonline.com |
The connector uses these URLs during the registration process. |
The following diagram shows how Azure AD and Application Proxy work together to provide single sign-on to on-premises applications.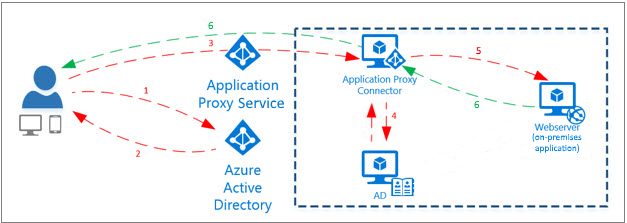
To start we need to download and configure the proxy connector
Login to Azure
Go to Azure Active Directory (AAD)
Once in AAD go to Application proxy

Click Download connector service
Once downloaded run the MSI on the server that will be used as the application proxy connector (I used a server in a DMZ zone). It will prompt for an Azure account with Global admins rights.
Once configured the server should now show in the application proxy tab
Once connected and active next step is to configure application
Go to AAD and Enterprise applications

Once in Enterprise applications click on New application 
Click on On-premises application
Below is a description for each field and option available in the application proxy
Name:
The name of the application that will appear on the access panel and in the Azure portal.
Internal URL:
The URL for accessing the application from inside your private network. You can provide a specific path on the backend server to publish, while the rest of the server is unpublished. In this way, you can publish different sites on the same server as different apps, and give each one its own name and access rules.
If you publish a path, make sure that it includes all the necessary images, scripts, and style sheets for your application. For example, if your app is at https://yourapp/app and uses images located at https://yourapp/media, then you should publish https://yourapp/ as the path. This internal URL doesn’t have to be the landing page your users see. For more information, see Set a custom home page for published apps.
External URL:
The address for users to access the app from outside your network. If you don’t want to use the default Application Proxy domain, read about custom domains in Azure AD Application Proxy.
Pre Authentication:
How Application Proxy verifies users before giving them access to your application.
Azure Active Directory – Application Proxy redirects users to sign in with Azure AD, which authenticates their permissions for the directory and application. Microsoft recommend keeping this option as the default, so that you can take advantage of Azure AD security features like conditional access and Multi-Factor Authentication. Azure Active Directory is required for monitoring the application with Microsoft Cloud Application Security.
Passthrough – Users don’t have to authenticate against Azure Active Directory to access the application. You can still set up authentication requirements on the backend.
Connector Group:
Connectors process the remote access to your application, and connector groups help you organize connectors and apps by region, network, or purpose. If you don’t have any connector groups created yet, your app is assigned to Default.
If your application uses WebSockets to connect, all connectors in the group must be version 1.5.612.0 or later.
Fill out the details required. I am using passthrough for pre authentication for the web site but this can be changed to AAD which then requires authentication before the site can be accessed.
(I created a basic IIS page on an internal web server to test with)
Next step copy the external URL and try to access the site. There should be no prompt and the site should load
(Yay my lovely test site is available 🙂 )
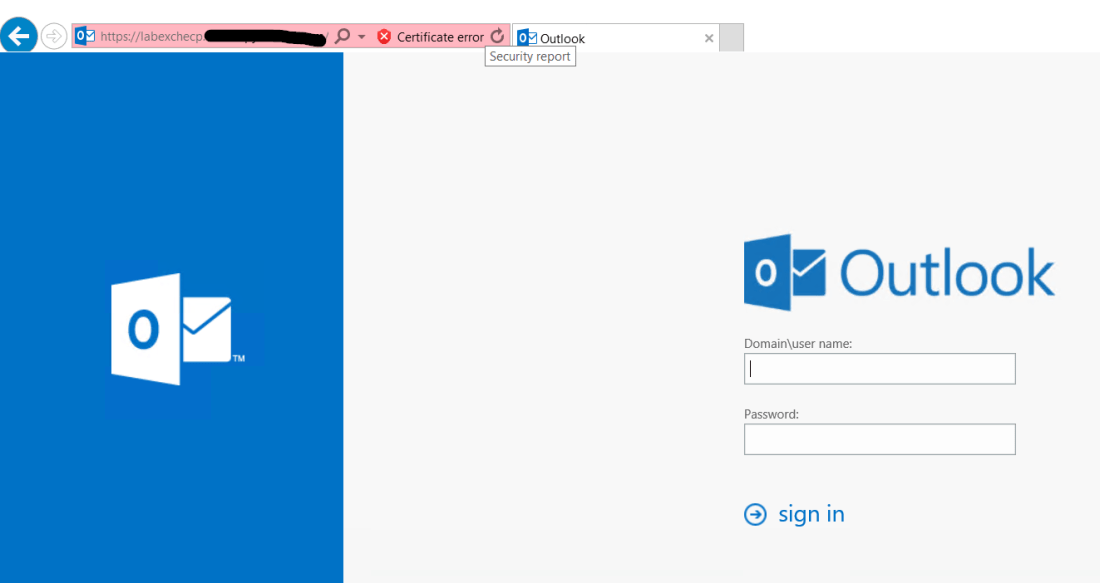
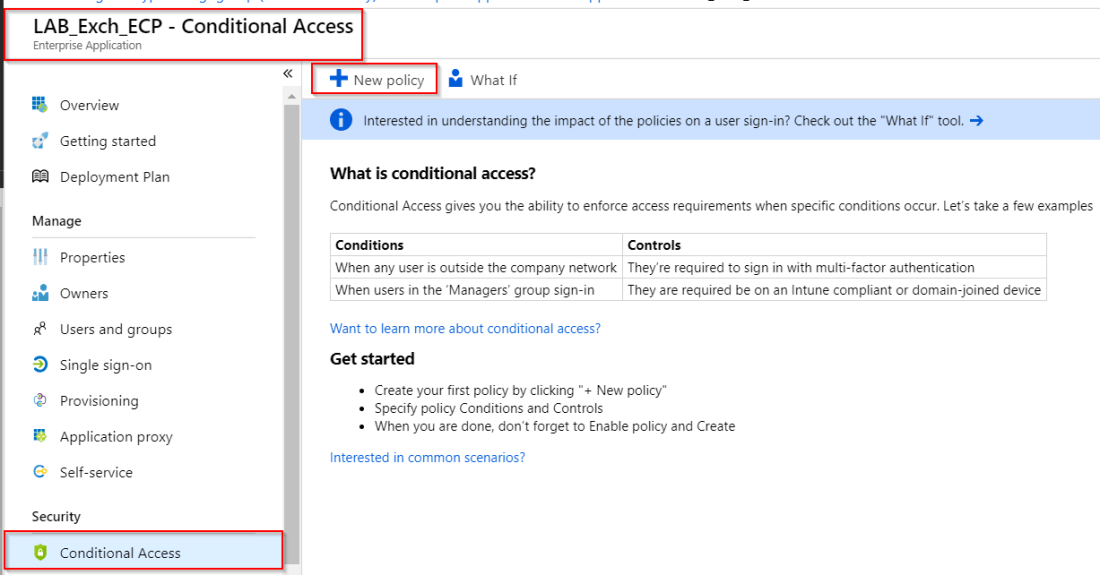
I decided to also allow access to my internal Exchange server and to also test the AAD pre-authentication.
First create a second application proxy and set the Pre Authentication to Azure Active Directory
I wanted to use a custom domain name for the second application proxy so I changed the external URL to the custom domain name in Azure.
Once a custom domain is selected we can add a certificate to match the URL.
There will be a warning that a CNAME entry will be required to point from the custom URL to the msappproxy.net address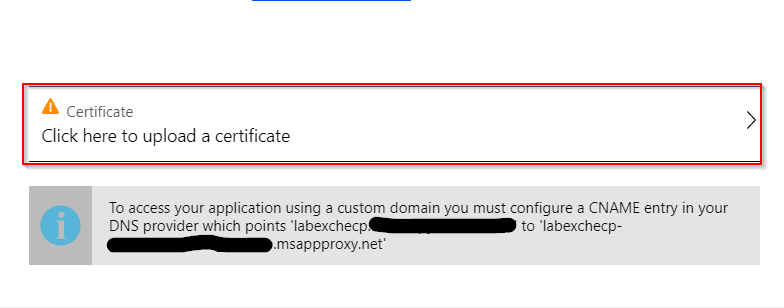
(This will require a CNAME record to be created on public DNS server that will map the application proxy to msappproxy.net)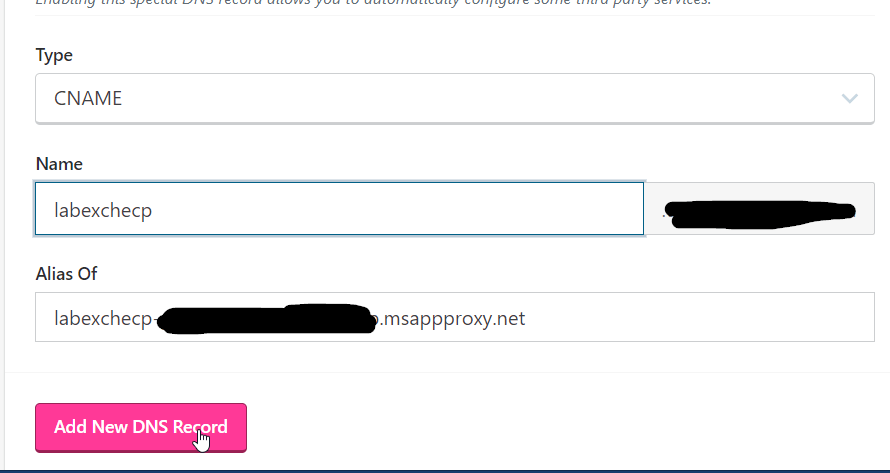
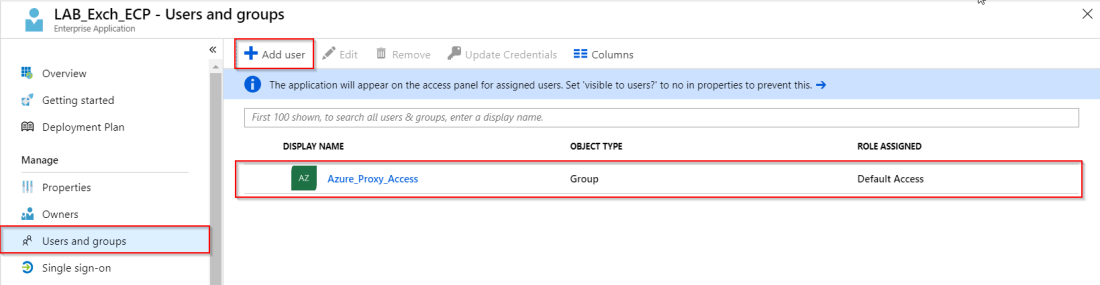
Once configured we need to add a user or group to allow access.
Go to the application proxy, select the required application proxy and click on Users and groups, Add user and select either the user or group that will be allowed access
Copy the link for the application proxy.
Unless a valid cert was also uploaded you will receive a cert error click continue to site.
It should now prompt for AAD authentication. Use an account that has access right to the proxy
Once logged in the ECP page should now show.