Microsoft Graph: Restrict Exchange Online Mailbox Access

Recently we have been reviewing some of our old Exchange Web Service mailbox connections and updating these to use Microsoft Graph. We wanted to restrict what mailbox’s the Azure App registration used for Microsoft Graph could connect to.

To set this up in Exchange Online we can use an Application Access Policy. In this post we will be going through setting up and confirming the mailbox’s access.

I have gone through setting up Azure App registration for Microsoft Graph before so we wont be going through that in this post.

I will also be using certificate and Microsoft MSAL PowerShell Module to get the Graph access token.

See post below if you need to know how to connect using MSAL with certificate base authentication.

Once we have the app registration setup and certificate issued and uploaded to the app registration, we can then assign the GaphApi permission to access mailboxes.

If we don’t apply the permission we will get access denied.

Graph Message Access Error

I will be giving Mail.Read API permission, this will give access to view all mailboxes.

Graph API Permissions

Grant admin consent for the API permission.

Now if we try to query the mailbox we should now be able to see the messages.

Graph Message Response

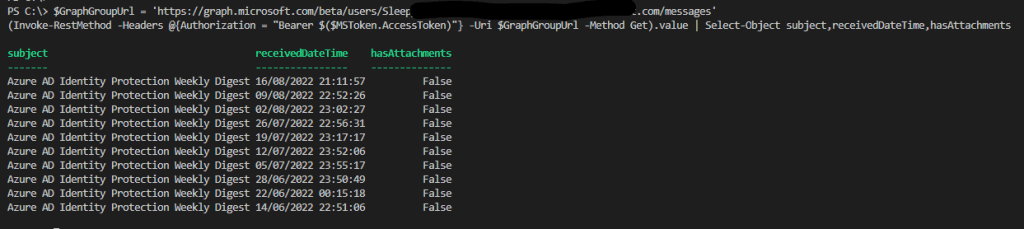
At this stage we can use the App registration to read messages from any mailboxes.

To lock this down so that the Graph query is only able to view certain mailboxes we can use

New-ApplicationAccessPolicy

to create an application access policy. The policy can be applied to a group or a single users.

To run the command, we will need Application ID of the app registration, mailbox or mail enabled security group and description. Using a group is useful if there are multiple mailboxes that they will need to allow access.

New-ApplicationAccessPolicy -AppId ApplicationID -PolicyScopeGroupId "user_group@domain.com" -AccessRight RestrictAccess -Description "Restrict this app to view mailbox or security group."

To run the command we need to connect to Exchange Online

Connect-ExchangeOnline

Then run the command to create the application access policy.

We can test what mailboxes the app registration can access using.

Test-ApplicationAccessPolicy -AppId ApplicationID -Identity user_group@domain.local

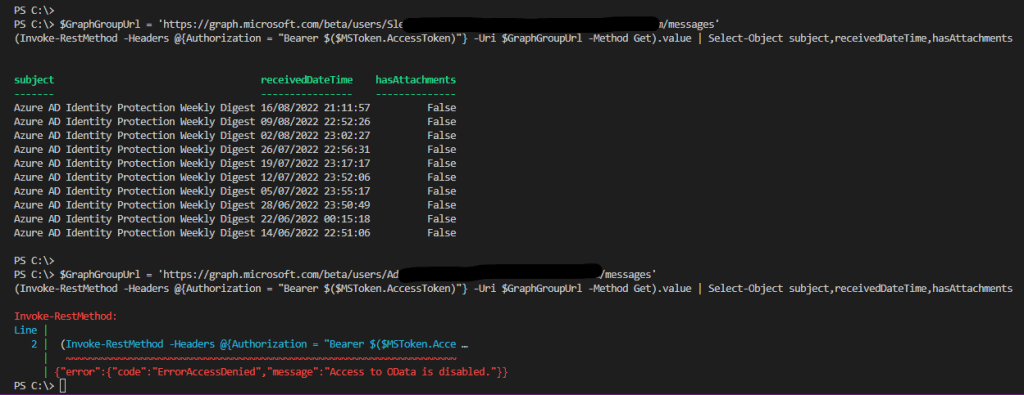
Now once we try to query the mailbox we have give access to we will see the message returned, if we try query any other mailbox we will an error message.

Applying the application access policy is a good idea for security as allowing an application to read mailboxes that it doesn’t need access to can be a risk if the app was ever compromised or there is sensitive data in mailboxes that no other users or application should have access to.

Report on users MFA status in Office 365 using PowerShell

During a recent audit we wanted to confirm what users had MFA enabled in Office 365. We use conditional access policy to enforce MFA.

We wanted to check each users to see if they had setup MFA and had a method configured. We also wanted to get information on licensing status and assigned licenses.

The only pre-req for using the script is that the MSOnline Powershell module is installed.

To install the MSOline module open and admin PowerShell windows and run

Install-Module -Name MSOnline

To confirm the module is installed run the below command.

Get-Module -ListAvailable MSOnline
This image has an empty alt attribute; its file name is image-26.png

First we need to connect to MS Online to do this run

Connect-MsolService 

Once connected to check the MFA status I will be using the StrongAuthenticationMethods properties as if MFA is configured for the user there will be a default method set.

For users that haven’t configured MFA no StrongAuthenticationMethods is set.

Below are the 4 methods available for MFA.

OneWaySMS
TwoWayVoiceMobile
PhoneAppOTP
PhoneAppNotification

In the script I only want to return the default method.

There is only one mandatory parameter for the export path where the report will be exported to.

The below is an example of how to run the report.

.\Office365_MFA_Report.ps1 -ExportPath C:\temp

Below is what the output will look like.

The full script can be downloaded from the below link.

Scripts/Office365_MFA_Report.ps1 at master · TheSleepyAdmin/Scripts (github.com)

Manage Calendar Permissions in Office 365 PowerShell

I had been asked to update all users calendar permission to allow a certain application to be able to edit users calendar so it can automate adding days off and other calendar items.

Currently the only way this can be done that I know off is either using PowerShell or using MS Graph.

In this post we will be going through how to report calendar permission for all users and how to bulk update. We will be using the exchange online PowerShell module.

https://docs.microsoft.com/en-us/powershell/exchange/exchange-online-powershell-v2?view=exchange-ps#install-the-exo-v2-module

Install-Module -Name ExchangeOnlineManagement

To get the list of mailboxes and permissions we will use two command Get-Mailbox and Get-MailboxFolderPermission. Then we will be formatting the results for export out to a CSV.

To get calendar permission we will need to add :\Calendar to after the UserPrincipalName.

First step is that we need to connect to Exchange Online using PowerShell.

Connect-ExchangeOnline

To get a single user’s permission use

Get-MailboxFolderPermission -Identity user@domain.com:\calendar 

To check for a specific users permission we can add the -user parameter.

To get all users permission we need to get a list of all users using Get-Mailbox and then loop through each user to get the permission.

## Get all users mailboxes
$Mailboxes = Get-Mailbox -ResultSize Unlimited | Select-Object UserPrincipalName

## Loop through each mailbox
foreach ($mailbox in $Mailboxes) {

## Get default user calendar permissions
Write-Warning "Checking Permission on $($mailbox.UserPrincipalName)"
Get-MailboxFolderPermission -Identity "$($mailbox.UserPrincipalName):\Calendar" | 
Select-Object @{Name="UserPrincipalName";E={$mailbox.UserPrincipalName}},FolderName,User,AccessRights |
Export-Csv C:\temp\Office_365_Export\Calendar_Report\CalenarPermissionReport.csv -NoTypeInformation -Append
}

The export should look like the below.

Once I had a report of the current users calendar permission, I needed to add the user account that the application would use to add the calendar items.

To add calendar permission we use the Add-MailboxFolderPermission,

The roles that are available, along with the permissions that they assign are below.

  • Author: CreateItems, DeleteOwnedItems, EditOwnedItems, FolderVisible, ReadItems
  • Contributor: CreateItems, FolderVisible
  • Editor: CreateItems, DeleteAllItems, DeleteOwnedItems, EditAllItems, EditOwnedItems, FolderVisible, ReadItems
  • None: FolderVisible
  • NonEditingAuthor: CreateItems, FolderVisible, ReadItems
  • Owner: CreateItems, CreateSubfolders, DeleteAllItems, DeleteOwnedItems, EditAllItems, EditOwnedItems, FolderContact, FolderOwner, FolderVisible, ReadItems
  • PublishingEditor: CreateItems, CreateSubfolders, DeleteAllItems, DeleteOwnedItems, EditAllItems, EditOwnedItems, FolderVisible, ReadItems
  • PublishingAuthor: CreateItems, CreateSubfolders, DeleteOwnedItems, EditOwnedItems, FolderVisible, ReadItems
  • Reviewer: FolderVisible, ReadItems

To add a single user use the command below.

Add-MailboxFolderPermission -Identity user@domain.com:\calendar -User "Account to be added" -AccessRights Editor 

I also wanted to be able to run this script again and not have to modify users that already have the correct permission as this will return an error, so we will be using a if statement to only apply to users who don’t have the permission.

Below is the full script.

## Calendar Permission Variable
$Account = "Account to be added"
## Get all users mailboxes
$Mailboxes = Get-Mailbox -ResultSize Unlimited | Select-Object UserPrincipalName

## Loop through each mailbox
foreach ($mailbox in $Mailboxes) {

## Get default user calendar permissions
$permission = Get-MailboxFolderPermission -Identity "$($mailbox.UserPrincipalName):\Calendar"

## Report on Users without correct calendar permissions and set permissions
if ($permission.User.DisplayName  -notcontains $Account) {
Write-Warning "Calender permission not set on $($mailbox.UserPrincipalName) adding Permission"
Add-MailboxFolderPermission -Identity "$($mailbox.UserPrincipalName):\Calendar" -User $Account -AccessRights Editor | Out-Null
} 

## calendar permission are correct
else {Write-Host "Calender Permission are set on $($mailbox.UserPrincipalName)" -ForegroundColor Green}

}

Exchange Online PowerShell Basic Authentication Connection Issue

Today I ran in to an issue where I couldn’t connect to Exchange Online PowerShell. I could connect to other service without issue (Office 365, Azure AD….).

When trying to connect to Exchange online I was getting an warning about basic auth.

At first I thought this was to do with Microsoft deprecating basic authentication

Exchange Online deprecating Basic Authentication – Microsoft Lifecycle | Microsoft Docs

but after reading the document it says that this doesn’t affect Exchange ActiveSync (EAS), IMAP, POP, and Remote PowerShell.

I then read the Exchange Online v2 module prerequisites

https://docs.microsoft.com/en-us/powershell/exchange/exchange-online-powershell-v2?view=exchange-ps#prerequisites-for-the-exo-v2-module

In this there is a part that winrm needs to be enabled for basic authentication even though the module uses modern authentication.

This had been working for a long time without issue so I didn’t know what exactly had changed so I decided to check the winrm config

To check the winrm configuration run the below command

winrm get winrm/config/client/auth

In my case it was being set by a GPO. We had recently applied the Windows 10 2004 baseline policy to all our Windows 10 devices so I decided to check the setting in that GPO.

Security baseline (FINAL): Windows 10 and Windows Server, version 2004 – Microsoft Tech Community

There is a spreadsheet in the document folder that has all the policy settings. In the computer policy we can see that Allow basic authentication is set to disabled.

Since this is a security risk (there is no encryption with basic authentication) and only a few device really need to connect, We decided to create a new policy that enabled this for only admins that will need to use Exchange Online PowerShell and use security filtering to only apply to a security group with the required devices.

Once basic authentication was re-enabled I was able to connect without issue.

If you have this issue and apply either the CIS or the Windows 10 baseline policy this could be the cause.

Bulk add and remove Office 365 Licences

I recently had a to move around a few thousand EMS licences to enable MFA for Office 365 and Azure, I decided to do two quick scripts to remove and add back the licences to the required users. I thought I would do a quick post on how I moved the licences.

As always any scripts should be tested on a subset of users before running on larger groups to test that they work as expected.

For this script we need the Office365 PowerShell module installed.

To check if the module is installed run

Get-Module -ListAvailable MSOnlineBulkAdd

First step is to get the AccountSKU to do this run

Import-Module MSonline and then Connect-MsolServiceBulkAdd2

Get-MsolAccountSku | Select-Object AccountSkuIdBulkAdd3

To make things easier and more repeatable in case I need to remove or add other licence I am using Out-GridView -PassThru to select the CSV file and also the licence SKU.

First Out-GridView is for the Csv file with UserPrincipalName (UPN)BulkAdd4

The second is to select the SKU to be removedBulkAdd5

Once the two items are selected the script will then runBulkAdd6

 
The full remove license script is below. The only part that needs to be updated is the $csv variable to point to the correct folder where the csv files will be kept.
## Bulk Remove licenses ##
## Select Csv file
$csv = Get-ChildItem -Path C:\temp\Office365Licence\Remove\ -File | Out-GridView -PassThru

## Import Csv
$users = Import-Csv $csv.FullName

## Select Account SKU to be removed
$accountSKU  = Get-MsolAccountSku | Select-Object AccountSkuId | Out-GridView -PassThru

## Loop through each user in the Csv
foreach($user in $users){
Write-Host "Removing $($accountSKU.AccountSkuId) licence from $($user.UserPrincipalName)" -ForegroundColor Yellow

## Remove licence
Set-MsolUserLicense -UserPrincipalName $user.UserPrincipalName -RemoveLicenses $accountSKU.AccountSkuId
}

The add script is the same only I added a check to confirm if the user requires the licence. The only part that needs to be updated is the $csv variable to point to the correct folder where the csv files will be kept.

Just a note on this I was applying the licence to existing users who where already setup with a usage location so if this is not set the script will error out. 

## Bulk Add licences ##
## Select Csv file
$csv = Get-ChildItem -Path C:\temp\Office365Licence\Add\ -File | Out-GridView -PassThru

## Import Csv
$users = Import-Csv $csv.FullName

## Select Account SKU to be removed
$accountSKU  = Get-MsolAccountSku | Select-Object AccountSkuId | Out-GridView -PassThru

## Loop through each user in the Csv
foreach ($user in $users) {

## Check if Licence is already applied
$check = Get-MsolUser -UserPrincipalName $user.UserPrincipalName | Select-Object UserPrincipalName,Licenses
Write-Warning "checking for $($accountsku.AccountSkuId) on $($user.UserPrincipalName)"
if ($check.Licenses.AccountSkuId -notcontains $accountsku.AccountSkuId){

## Add licence
Write-Warning "Adding $($accountSKU.AccountSkuId) licence to $($users.UserPrincipalName)"
Set-MsolUserLicense -UserPrincipalName $user.UserPrincipalName -AddLicenses $accountSKU.AccountSkuId

}
else
{
## Licence already applied
Write-Host "$($user.UserPrincipalName) has $($accountsku.AccountSkuId) licence assigned" -ForegroundColor Green

}
}