Checking Sign-in logs in Azure AD using Microsoft Graph API

In a previous post we went through configuring and connecting to Microsoft Graph API.

In this post we will going through querying sign-in logs.

Connecting to Microsoft GraphAPI Using PowerShell – TheSleepyAdmins

We have been trying to audit guest account activity and sign-in logs are the only way I have been able to find if these account’s have been active for the last 30 days. Instead of manually filtering sign-in logs from Azure AD I want to automate this using Graph.

To query sign-in logs the below API permission are required. since we are using client secret we only require Application permission.

Below is the link to the Microsoft doc I used for getting info on listing sign-ins.

List signIns – Microsoft Graph v1.0 | Microsoft Docs

Permission typePermissions (from least to most privileged)
Delegated (work or school account)AuditLog.Read.All and Directory.Read.All
Delegated (personal Microsoft account)Not supported
ApplicationAuditLog.Read.All and Directory.Read.All

Next step was to run the command to get to the access token for connecting to Microsoft Graph this is covered in the previous post so we won’t be going over that here.

To connect to the sign-in Graph use the below Url

https://graph.microsoft.com/v1.0/auditLogs/signIns

Below is the command to connect and view all sign-in logs data

$LoginUrl = "https://graph.microsoft.com/v1.0/auditLogs/signIns"
(Invoke-RestMethod -Headers @{Authorization = "Bearer $($token)"} -Uri $LoginUrl -Method Get).value

This will return all the default values for each sign-in log.

This image has an empty alt attribute; its file name is image-58.png

We only wanted to have Displayname,UPN,IP,App used and date the log was created. We also wanted to only have Logs that where created in the last 30 days.

$LoginUrl = "https://graph.microsoft.com/v1.0/auditLogs/signIns"(Invoke-RestMethod -Headers @{Authorization = "Bearer $($token)"} -Uri $LoginUrl -Method Get).value | Select-Object userDisplayName,userPrincipalName,ipAddress,clientAppUsed,createdDateTime | Where-Object {$_.userPrincipalName -notlike "*DomainName.com" -and $_.createdDateTime -gt "2020-09-29"}

Below is the results from the above query.

Now that we have the query, we can either run the query manually or in my case I will be setting up a script to run in a scheduled task to export this data.

Connecting to Microsoft GraphAPI Using PowerShell

Recently I have been looking to use Microsoft Graph to query specific information for Microsoft 365 services.

Microsoft Graph is an development tool that connects to multiple Microsoft 365 services to allow querying data and automate tasks.

There are a few steps required to start using Graph which involves creating a app registration on Azure to issue authentication tokens and API permission to view data.

Use the Microsoft Graph API – Microsoft Graph | Microsoft Docs

I also used a blog post by AlexAsplund on adamtheautomator as this was very good at explaining the process and goes more in depth.

Using the Microsoft Graph API with PowerShell (adamtheautomator.com)

In this post we will be going through configuring the app registration and query some data from Azure AD.

First step is to logon to the Azure portal > Azure AD > App registration and click on New registration.

Give the app a name and specify the support account type in this case we only want account from our tenant.

Once completed, we should now see the app has been created.

Next step we need to configure the API permissions, depending on the type of access required we will use either delegated or application permission as some data can only be access by either permission types.

below is a extract from the Microsft Docs on permission types

Microsoft identity platform developer glossary | Microsoft Docs

permissions

client application gains access to a resource server by declaring permission requests. Two types are available:

  • “Delegated” permissions, which specify scope-based access using delegated authorization from the signed-in resource owner, are presented to the resource at run-time as “scp” claims in the client’s access token.
  • “Application” permissions, which specify role-based access using the client application’s credentials/identity, are presented to the resource at run-time as “roles” claims in the client’s access token.

To assign permission go to the app registration we created earlier and go to API permissions > Add a permission and select Microsoft Graph.

To check which permissions are required I used the below Microsoft Docs .

Microsoft Graph permissions reference – Microsoft Graph | Microsoft Docs

Select the permission type and the required permission in this case I want to be able to read groups, users and directory so.

Once the required permissions are added if they required admin permission those will need to be granted using the grant admin consent option below.

There are many different way’s to connect to Microsoft Graph but in this post we will be using client secret.

We will need the application ID

We will create a client secret

Give the client secret a name and set the expire in this case we will use 1 year.

There should now be client secret and the value is used to authenticate. (Take note of the value and save in secure location like a password vault or Azure Key vault as once you leave the app blade the value will be hidden and if you lose, it will have to be recreated.)

Once we have the above configured we can connect to GraphApi to generate a token. We will used Invoke-RestMethod.

The secret can be hardcoded but I decided to use read-host so that I could add the secret manually, as it’s not recommend to have any password/secret hardcoded in script.

Below is the command I used to get the token.

$ApplicationID = ""
$TenatDomainName = ""
$AccessSecret = Read-Host "Enter Secret"


$Body = @{    
Grant_Type    = "client_credentials"
Scope         = "https://graph.microsoft.com/.default"
client_Id     = $ApplicationID
Client_Secret = $AccessSecret


$ConnectGraph = Invoke-RestMethod -Uri "https://login.microsoftonline.com/$TenatDomainName/oauth2/v2.0/token" `
-Method POST -Body $Body

$token = $ConnectGraph.access_token

To verify we have a token run the variable $ConnectGraph to view.

Now that we have a token we can run a queries against GraphAPI.

Below we will be running a query for Azure AD groups and selecting display name.

$GrapGroupUrl = 'https://graph.microsoft.com/v1.0/Groups/'
(Invoke-RestMethod -Headers @{Authorization = "Bearer $($token)"} -Uri $GrapGroupUrl -Method Get).value.displayName

To view some examples we can use Graph Explorer.

Graph Explorer – Microsoft Graph

In a future post we will be going through more query’s and automating tasks using GraphAPI.

Create Azure conditional access policy with named location

In this post we will be going through creating an Azure conditional access policy to restrict logging on to Azure / Office 365 from specific locations.

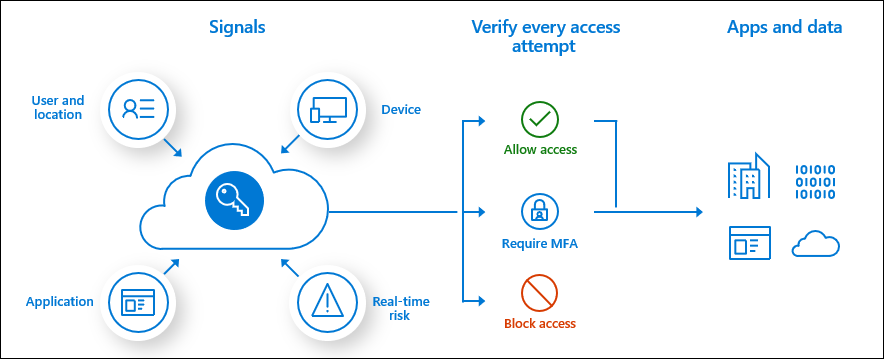
Conditional access policies are used to set requirements for accessing Azure or Office 365 resource, when using Named locations we can then set based on IP range, Trusted locations or Countries and regions.

Below diagram is from Microsoft on how conditionals access works.

What is Conditional Access in Azure Active Directory? | Microsoft Docs

Conceptual Conditional Access process flow

First step is to logon to Azure and go to Azure AD conditional access

Create a named location that will be used to restrict access.

Once in named location we can either create a location based on IP range or countries / regions. In this case we will be using a country.

Next we will create the conditional policy

Give the policy a name, we will be using a group to apply the policy but this could be change to all users or by directory role. (We can use select users or groups to apply the policy to a specific group as if applied to all users there could be a risk of locking yourself out of Azure portal)

Next we can apply the policy to specific apps or all apps. (If applying to all apps there will be a warning to not lock yourself out)

Next we set the conditions in this case we will be using location, I will be applying the policy to any location.

We can then set the named location as excluded in the policy so that it wont be applied if the access is coming from a country that is on the allowed named location.

This image has an empty alt attribute; its file name is image-26.png

Next we can set the access control settings, in this case we will block access but this could be changed to require MFA or other settings below.

Last step is to set session options to use conditional access app control, force sign-in frequency, Persistent browser session. We wont be setting any of the session settings as this policy is to block access.

There are three options report-only, on or off. To test the policy and check what will be blocked without running the risk of blocking real users set to report-only (This would be recommend for testing policy before rolling out to all users.)

Click create and the policy should now show and the state should be report-only.

To test if the policy is going to be applied we can check a users sign-ins, click on a signing log and go to Report-only, click on the three dots and show details.

This will show what part of the policy has been satisfied and not satisfied. Since the location has not been satisfied (as we are connecting from a excluded location) and the policy is not applied.

This image has an empty alt attribute; its file name is image-31.png

When the users tries to access from a country that is not in the allowed location, the result will be a failure and the users would be blocked from accessing.

Once testing has been completed and there are no unexpected blocks we can then go back to the conditional access policy and change the state to on, to apply the policy to users.

Now when a restricted user try’s to access an Azure / Office 365 resource from country not in the named location they will receive a message like the below.

Deploy MSI Application using Intune / MEM

In this post we will go over how to deploy an MSI application using Intune / MEM to a Windows 10 managed endpoint.

The below KB from Microsoft goes through deploying a line of business application

Add a Windows line-of-business app to Microsoft Intune | Microsoft Docs

To logon to the Microsoft Endpoint Manager admin center go to

https://endpoint.microsoft.com

Once in the MEM console go to Apps

Click on Add

Select app type: other > Line-of-business app

Once the wizard starts select app package and go to the MSI that is going to be deployed. We will be using Firefox in this post.

Next we can fill in the application details. The mandatory fields are Name, description and publisher.

Next we set the application deployment type either an install (required or available) or uninstall and deploy this to a certain group or all users / devices. We will be settings this deployment as available.

Last step is to review and create the app deployment

The application should now show in the Windows app blade.

Once the managed Windows device syncs with MEM the application should then show as available to install in the company portal.

If the application doesn’t show we can run a sync in MEM admin center or directly on the Windows 10 device.

To start the install click on the application.

This image has an empty alt attribute; its file name is image-13.png

Once installed we can check the application in MEM admin center to view compliance for the application deployment.