Deploy and Configure Azure Application Gateway

Azure Application Gateway is a service provided by Microsoft Azure that allows you to build a scalable and secure web traffic routing solution. It acts as a reverse proxy service, providing features like load balancing, SSL termination, URL-based routing, session affinity, and application-level security.

Designed to optimize web application delivery, Azure Application Gateway enhances the performance, availability, and security of your web applications. It plays a crucial role in managing and distributing traffic to backend servers, ensuring high availability and seamless user experience.

In this post we will be going through deploying and configuring an Azure Application Gateway and present an internal website.

Prerequisites for Deploying Azure Application Gateway:

  • Azure Subscription: You need an active Azure subscription to create and deploy Azure Application Gateway.
  • Resource Group: A resource group .
  • Virtual Network: Set up a virtual network (VNET) where you’ll deploy the Azure Application Gateway. The VNET should have at least one subnet for the gateway and will be dedicated for the gateway.
  • Backend Servers: Prepare the backend servers or resources that will handle the web traffic forwarded by the Application Gateway.
  • SSL Certificate: If you want to enable SSL termination, obtain an SSL certificate and private key for your domain.
  • Public IP Address: Public IP address for the Azure Application Gateway. If you want to expose your application to the internet, a public IP is required.
  • DNS Configuration: If you plan to use a custom domain name, set up the DNS records to point to the public IP address of the Application Gateway.
  • Application Gateway SKU: Choose the appropriate Application Gateway SKU based on your performance and scalability requirements.

Once all prerequisites are met we can start to deploy the Application gateway.

To start the deployment go to the load balancing blade or search for application gateway and click create.

Select the resource group

set the name, region and tier, instance count, if using WAF2 create a firewall policy and set the VNET to be used(this is recommend to be a /24 subnet mask).

Set frontend IP.

Set the backend target (this can be through IP /FQDN, VM or App Services). I used VM

We need to add a routing rule listener and backend targets.

Set tags and then review configuration and deploy.

The Application Gateway will take a little while to deploy. Once the deployment has finished the gateway should now be showing.

Once deployed we can check to see if the site is contactable by using the public IP for the Application Gateway.

Next we will enable the application gateway logs to send to a log workspace.

Go to Application Gateway and select the diagnostic settings and add diagnostic settings.

Enabled all logs and select log workspace.

We can also add rules to the WAF policy to restrict access to the site. I will be adding a rule to only allow access from my public IP.

To add the rule go the Web Application Firewall policies (WAF) blade and select the policy we created earlier.

Go to custom rules and select add custom rule.

Give the rule a name, enabled, set priority and set the conditions.

Once the rule is added, click save to apply.

We can test accessing the site from the allowed IP and then from a different IP to check the block is working.

We can confirm using the log workspace we configure in the diagnostic setting earlier using a KQL query .

I used the below query.

AzureDiagnostics 
| where ResourceProvider == "MICROSOFT.NETWORK" and Category == "ApplicationGatewayFirewallLog" 
| 
project TimeGenerated, clientIp_s, hostname_s, ruleSetType_s, ruleId_s, action_s

This was a quick run through of deploying and configuring an Application Gateway.

Create Azure VNETs Using Az PowerShell

In this post we will go over creating VNETs and subnets using PowerShell, we will also be create a script to use a CSV to deploy multiple VNETs / subnets.

Azure PowerShell is a command-line tool that allows you to manage and deploy Azure resources using the PowerShell scripting language.

Azure VNETs provide a secure and isolated network environment within Azure. Subnets allow you to divide a VNET into smaller, logical segments to control network traffic and provide network segregation.

To deploy Azure VNET and subnets using Azure PowerShell, we first either need to create a resource group or use a pre existing one.

We can create a resource group using Az PowerShell

First connect to Azure PowerShell using

Connect-AzAccount

Once connected if there is multiple subscription make sure to select the correct one before creating the resource group or any other resource.

Next we will create the resource group this requires a name and a location.

New-AzResourceGroup -Name 'resource group name' -Location northeurope

Next we can create a VNET and subnet will be using splatting to specifying the parameters.

$vnet = @{
  Name              = 'vnet name'
  ResourceGroupName = 'resource group'
  Location          = 'northeurope'
  AddressPrefix     = '172.17.0.0/22'
}
New-AzVirtualNetwork @vnet

Once we have a VNET created we can create the subnets.

$vnet = Get-AzVirtualNetwork -Name "vnet name" -ResourceGroupName "resource group name"
$subnet = @{
  Name           = 'subnet name'
  VirtualNetwork = $vnet
  AddressPrefix  = '172.17.1.0/24'
}
Add-AzVirtualNetworkSubnetConfig @subnet

If we check the subnet wont be showing under the VNET.

The last step is to set virtual network config using

 $vnet | Set-AzVirtualNetwork

Now if we check the subnets we can see the subnet.

Now that we have the command we can use these to create the script to run using a CSV.

First create the CSV file for the script I used the below headings.

Below is the full script I added some error handling incase the VNET doesn’t exist or the subnet has an error when being created.

Below is the scripts running to create two new subnets.

If we check Azure VNET we can see the new subnets.

Below shows the error handling

Azure Network Watcher NSG Flow Logs: Review NSG Traffic

Azure NSG flow logs are a feature of Azure Network Security Group (NSG) that allows administrators to track and monitor network traffic flowing through their Azure virtual network.

The flow logs provide detailed information on the source and destination of the traffic, as well as the protocol and port being used. This information can be used to identify trends and patterns in network usage, as well as to detect and troubleshoot potential security threats.

Azure NSG flow logs provide a valuable tool for administrators to maintain visibility and control over their Azure network environment.

To set the NSG flow logs to be sent to Log workspace we can use Traffic Analytics.

In this post we will be going through enabling NSG Flow Logs, enabling Traffic Analytics and reviewing the logs for allowed and denied traffic using Azure Log Analytics Workspace.

There will be a cost for using the Azure Storage, workspace and Traffic Analytics so confirm these before proceeding as the more data sent the more it will cost.

When creating a new deployment in Azure it is good security practice to restrict access between subnets to the required ports only. This can sometimes be a bit difficulty if the application communication is not fully documented.

This is where NSG Flow can be used as we can use this to review the traffic between the subnets going over the NSG’s. There are some prerequisite for this

  • Storage account in the same region as the NSG
  • Log Analytic workspace
  • Network Watcher (this should be created automatically once a vNet is created)
  • Network Security group
  • VM running in two network and have an NSG assigned

Once all the above are ready we can start to enabled the logging. NSG flow can be either enabled from NSG directly or through Network Watcher. We will be doing this in Network Watcher.

First step is to go to Network Watcher > NSG Flow

Select the required Subscription, the required NSG’s, storage account and retention (0 on retention means the logs are kept forever) since this is a test environment I will only keep the logs for 5 days.

On configuration select version 2 and enabled traffic analytics. On traffic analytics set the process interval to either 1 hour or 10 mins, select the subscription and workspace.

Apply tags if in use, then review and create.

The deployment should only take a minute or so and then the NSG flow should show as succeeded.

Once enabled it can take little bit for data to start showing. We can check that the container has been create on the storage account.

Open the storage account and go to Containers there should be a new insight-logs container.

If we navigate down the folder structure there will be a JSON file that has all the NSG access requests, we could use the JSON file it self but it pretty difficult to read.

To check that data is going to the workspace, go to Log Analytics Workspace. Select the workspace we used earlier.

We will use the AzureNetworkAnalytics_CL table and flowlog to view the data. I used the below Learn article to help understand the table / fields and create the queries.

https://learn.microsoft.com/en-us/azure/network-watcher/traffic-analytics-schema

We can run the below KQL query this will return

AzureNetworkAnalytics_CL
| where SubType_s == "FlowLog"
| project FlowType_s, FlowEndTime_t, SrcIP_s, DestIP_s, DestPort_d, L4Protocol_s, L7Protocol_s

Now that we have confirmed data is being shipped to the log workspace, we can start to create the KQL query that will show all traffic between the specific IP of the servers.

The below query will return inbound and outbound request for specified source and destination IP

AzureNetworkAnalytics_CL
| where SubType_s == "FlowLog"
| extend Direction = case(FlowDirection_s == 'O', 'Outbound', FlowDirection_s == 'I','Inbound', FlowDirection_s)
| extend Access = case(FlowStatus_s == 'A', 'Allowed', FlowStatus_s == 'D', 'Denied', FlowStatus_s )
| extend Protocol = case(L4Protocol_s == 'T', "TCP", L4Protocol_s == 'U', "UDP", L4Protocol_s)
| project TimeGenerated, Direction, Access, SrcIP_s, DestIP_s, DestPort_d, Protocol, L7Protocol_s, NSGRule_s
| where SrcIP_s contains "Source IP" and DestIP_s contains "Destination IP"

We can now see all the traffic that is going from one server two the other, we can use this to review and allow the required traffic.

To export we can then export the results and use that to review the required ports.

The last step will be to update the rules on the NSG to only allow the required traffic.

Network Security Group: Restrict Access between Azure Subnets

In this post we will be going through configuring Network Security Group’s to restrict access between subnets under a single vNet.

Routing between subnets happens automatically and is allowed by default.

This can allow resources communicate over any port and there is no network access control.

To make the Azure network more secure this should be restricted as much as possible to only allow the required communication.

Below is a link to the Microsoft network best practice.

https://learn.microsoft.com/en-us/azure/security/fundamentals/network-best-practices?toc=https%3A%2F%2Flearn.microsoft.com%2Fen-us%2Fazure%2Farchitecture%2Ftoc.json&bc=https%3A%2F%2Flearn.microsoft.com%2Fen-us%2Fazure%2Farchitecture%2Fbread%2Ftoc.json#logically-segment-subnets

One way to limit the communication is to use NSG’s.

In this example we will be using a 10.10.1.0/24 address space

Address Space

Then we will be creating multiple subnets with /28 mask.

Subnets

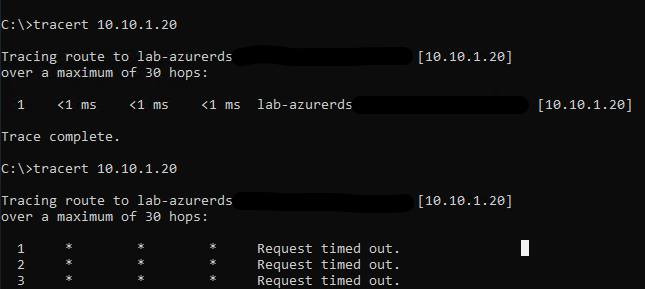
I have added one server to both the Ops and Mgmt subnets. Now if we make a connection between each VM the traffic will be routed directly between both VM’s.

trace route

Next, we will setup the NSG to only allow connection between the subnets for RDP and SMB. In this case we will be creating an NSG per subnet, but this could be done in one NSG.

Network Security Group

Next, we need to create two new inbound rules one to allow the required ports and the second to deny all other access.

Go to inbound rules and select Add.

Add rule

Added in the required details

·       Source: IP Address

·       Source Port: 

·       Destination: IP Address

·       Destination IP Address:

·       Service: Custom

·       Destination Port Ranges:

·       Protocol TCP

·       Action: Allow

·       Priority: 110

·       Name: Allow_Mgmt_Subnet_Access

Allow inbound rule

Next, we will create the deny rule.


Deny inbound rule

I would usually set the deny to a much lower priority, so that if more rules are required in the future there won’t be an issue with the deny rule having a higher priority and blocking the traffic. 

Once saved, the allow and deny rule should show under inbound rules.

Now when we try to run tracert again, this time we won’t be able to connect.


Tracert

If we try open a connection using SMB, we can connect without issue.

To block access back to the other subnet we will need to create the same rules but with the opposition subnet source and destination IP ranges.

After creating both set of NSG rules there will be no access between the subnets on any port other than those specified in the inbound rules.

Enable Accelerated Networking on existing Azure VM’s

In this post we will go over the different methods to enabled accelerated networking in an existing Azure VM.

Accelerated networking improves performance as it allows the network interfaces of Azure VM to bypass the host.

Screen shot from Microsoft documentation

Below are some of the benefits of using accelerated network.

Lower Latency / Higher packets per second

Reduced jitter,

Decreased CPU utilization

Accelerated networking is only supported on VM that have 2 or more CPU’s. If the VM’s are in a availability set all VM’s in the set need to be powered off before updating.

There are three way’s to enabled accelerated networking on existing VMs use either AZ PowerShell Module or the AZ CLI and directly in the Azure portal.

To enable in the Azure portal go to Virtual machines > Networking and select the required network interface.

To enable first Power off the VM,

Select the network interface and click on the name. This will bring you to the network interface configuration page.

Click on enable accelerated networking

You will have to confirm you have validate that your operating system is supported.

Once completed the network interface should now show have accelerated networking enabled.

Enabling in the console is fine for one or two interfaces but if there are a few to update doing PowerShell or AZ CLI will be a quicker method.

To update using the AZ PowerShell Module, first we need to install the module.

To install run the below command

Set-ExecutionPolicy -ExecutionPolicy RemoteSigned -Scope CurrentUser
Install-Module -Name Az -Scope CurrentUser -Repository PSGallery -Force

Once installed use the below to connect, you will be prompted to put in Azure account details.

Connect-AzAccount

Once connected, we can check if the network interfaces have accelerated networking using the below command.

Get-AzNetworkInterface -ResourceGroupName RGName | Select-Object Name,EnableAcceleratedNetworking

To enabled accelerated networking the VM needs to be stopped and deallocated so either power off from the Azure console or use stop-azvm

Stop-AzVM  -Name VMName -ResourceGroupName RGName

To enable we need to get the network adapter information into a variable and then set the enabledacceleratednetworking property to true.

$networkacc = Get-AzNetworkInterface -ResourceGroupName RGName-Name nicname
$networkacc.EnableAcceleratedNetworking = $true
$networkacc | Set-AzNetworkInterface

Once the command completes, we can run the command to check the network interfaces again and one should now have enabledaccleratednetworking set to true.

If there were multiple network interfaces in the resource group to enable, we could get the list and loop through each, but each VM would need to be supported or they would error out.

$networkaccs = Get-AzNetworkInterface -ResourceGroupName RGName
foreach ($networkacc in $networkaccs){

$networkacc.EnableAcceleratedNetworking = $true
$networkacc | Set-AzNetworkInterface

}

Last step is to power back on the VM either from the Azure portal or using AZ PowerShell.

Start-AzVM  -Name VMName -ResourceGroupName RGName

That is the process for setting using AZ Powershell.

To set using the Azure CLI, first we need to install the go to the below and download the MSI installer.

https://docs.microsoft.com/en-us/cli/azure/install-azure-cli-windows?tabs=azure-cli

Once installed launch PowerShell.

to logon either use az login for an interactive logon process

or use with username and password parameter. (This method will not work with MFA so we will be using the interactive method.)

az login -u <username> -p <password>

When running the az login command you will be brought to the standard login.microsoft.com page.

Once signed in, we can query the resource group for network interfaces to see what has acceleratednetworking enabled

az network nic list --resource-group RGName --query [].[name,enableAcceleratedNetworking] --output table

To update the interfaces the VM needs to be powered off either in the Azure console or using AZ Cli

To use AZ Cli

az vm deallocate --resource-group RGName --name VMName
az network nic update --name NicName --resource-group RGName --accelerated-networking true

Once the command completes run the list command again to confirm that acceleratednetworking is set to true.

last step is to start the VM using either Azure port or Az Cli

az vm start --resource-group RGName --name VMName

The network interfaces should now have accelerated networking enabled.

Azure Configure VNET peering

To allow communication between vNet’s in Azure we can set up peering connections. This is useful if there is a need to have different vNet’s for things like web app’s and backend database zones.

To configure peering we will require two different vNets both must be in the same Azure region.

Currently when I try to ping a VM that is running in a different vNet there is no communication.vNet01

Logon to Azure

Go to All services > Virtual networksvNet04

Once in Virtual networks select the network that will be configure for peeringvNet02

Once the network blade is open go to peering > AddvNet03

Enter a Name, select the Subscription that the other vNet is in. Then Select the Virtual Network. Under configuration select Enabled and the last step tick Allow forwarded trafficvNet05

Below are some details on three options:

Allow forwarded traffic: This setting allows the peer’s forwarded traffic (traffic not originating from inside the peer virtual network) into your virtual network.
Allow gateway transit: Allows the peer virtual network to use your virtual network gateway. The peer virtual network cannot already have a gateway configured, and must select ‘use remote gateway’ in its peering settings.
Use remote gateway: You will need to Select this option if you wish to use your peer’s virtual network gateway. The peer virtual network must have a gateway configured, as well as ‘allow gateway transit’ enabled. Only one peering in this virtual network can have this enabled. You cannot use this setting if you already have a gateway configured in your virtual network.

Once all settings are confirmed click ok to create the peeringvNet06vNet07

Two allow communication both ways, there will need to setup peering on the App network as well.

Once both are enabled we can now see response to ping requestsvNet08

To lock down communication between the networks we can add NSG’s to restricted what inbound and outbound traffic is allowed from the subnet’s.