In a previous post we went through creating and deploying language packs there was an additional step to create a Windows 10 answer file, I though it might be helpful to do a post on creating a basic answer file using Windows System Image Manager (SIM).
First step is to install Windows Assessment and deployment kit (ADK). To download the latest ADK use the below link:
https://go.microsoft.com/fwlink/?linkid=2086042
 Select deployment tools.
  Once the install has finished, go to the start menu and down to Windows Kits and open Windows System Image Manager .

First step is to select a Windows image file, to get the image file just need to extra the required Windows ISO to a folder. Below is the extracted ISO.
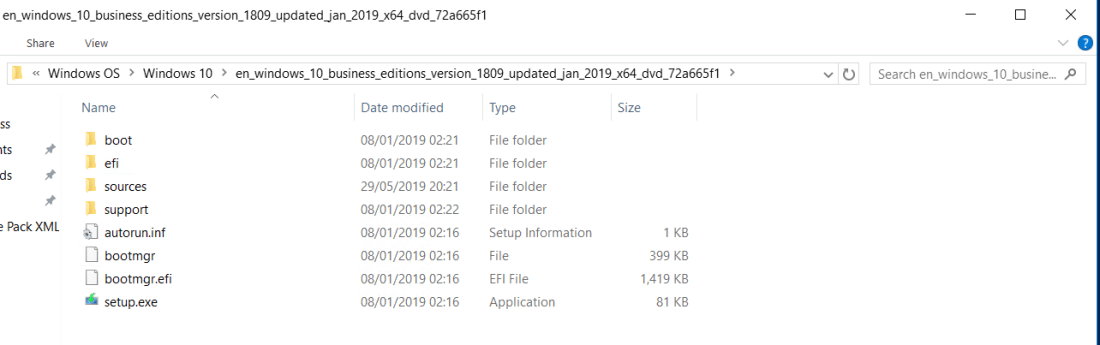 Go to Sources > install.wim.
 Select the version.
 Next create a new answer file.
 Go to Windows Image

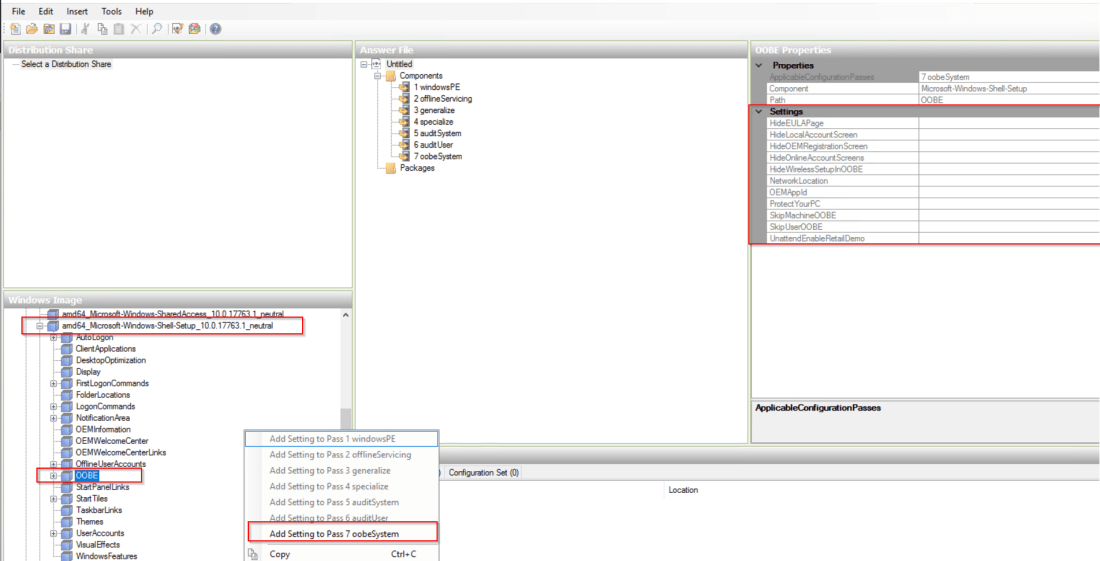
Select Components, on the components below is the different type and examples
amd_64 =64bit components, only used on x64 installs
wow_64 = 32bit components or support components for 32bit installed on x64, only used on x64 installs
x86 = 32bit components installed on x86, only used on x86 installs
I used “amd64_Microsoft-Windows-Shell-Setup_10.0.17763.1_neutral” > “OOBE” and click Add settings to Pass 7 oobeSystem.
 Edit “amd64_Microsoft-Windows-Shell-Setup__neutral” to add in Register Owner and any other details as required.
 Next edit the required OOBE settings.
 Once all the settings have been added save the answer file.
 Last step is to create a package for the answer file and apply the answer file in the SCCM task sequence.
Below is the content of the XML file.
<?xml version=”1.0″ encoding=”utf-8″?>
<unattend xmlns=”urn:schemas-microsoft-com:unattend”>
<settings pass=”oobeSystem”>
<component name=”Microsoft-Windows-Shell-Setup” processorArchitecture=”amd64″ publicKeyToken=”31bf3856ad364e35″ language=”neutral” versionScope=”nonSxS” xmlns:wcm=”http://schemas.microsoft.com/WMIConfig/2002/State” xmlns:xsi=”http://www.w3.org/2001/XMLSchema-instance”>
<OOBE>
<HideEULAPage>true</HideEULAPage>
<HideLocalAccountScreen>true</HideLocalAccountScreen>
<HideOEMRegistrationScreen>true</HideOEMRegistrationScreen>
<HideOnlineAccountScreens>true</HideOnlineAccountScreens>
<HideWirelessSetupInOOBE>true</HideWirelessSetupInOOBE>
<ProtectYourPC>3</ProtectYourPC>
<SkipMachineOOBE>true</SkipMachineOOBE>
<SkipUserOOBE>true</SkipUserOOBE>
</OOBE>
<RegisteredOwner>TheSleepyAdmin</RegisteredOwner>
</component>
</settings>
<cpi:offlineImage cpi:source=”” xmlns:cpi=”urn:schemas-microsoft-com:cpi” />
</unattend>

One thought on “Create Windows 10 Answer file”