In this post we will be going through setting up and using stored access policy with Azure storage account. We can create SAS URL but each time we create one there is no way to revoke without rotating the storage keys.
A stored access policy can be used to control shared access signatures (SAS) on the server side. We can use a stored access policy to change the start time, expiry time, or permissions for a SAS URL that is generated from a storage account. We can also revoke access after it has been issued with out having to rotate the storage keys.
Below are the storage resources that support stored access policies:
- Blob containers
- File shares
- Queues
- Tables
First we will create a new storage account in Azure.
Logon to Azure and go to storage accounts. Click Create and add in the basic details and I left the rest as default.

Once the storage account is deployed, we will be creating a container in the below example its called files.

Go in to the container and create a policy under Access policy.

Give the policy a name, set the required permission and start / end date. Click ok and then save the policy.

Once the policy is create it will show under access policy.

Now that we have the access policy we will need to create a new SAS. There are two ways to create this.
First we can create it directly from Azure storage under Shared access tokens.
Select the Stored access policy. We can also restrict access down to a specific IP.

Next click on Generate SAS token and URL.
We can also use Azure Storage Explorer to create a new SAS.
Azure Storage can be downloaded from:
https://azure.microsoft.com/en-us/features/storage-explorer/
Logon with an account that has access to the storage account.
Select the storage account that we want to create the SAS for.

Select the Access policy, this will then grey out all the options as we are now using the access policy for the SAS.

Click create and this will generate the URL with the SAS key and will also reference the access policy

To test access to the blob we can connect using Storage Explorer.
Click on the connect to Azure Storage and select Blob container.

Select SAS

Give the connection a name and add in the SAS URL generated earlier.

The last screen is a summary of details once all are confirmed, click connect.

We have now connected to the Files container we created with the storage policy and SAS.
To test the policy is working we can try delete the a file as I didn’t apply that permission in the policy I get access denied.

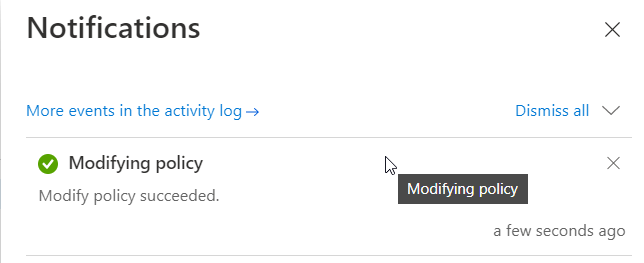
Now we can update the policy and add the delete permission. Click save the policy can take 30 seconds to update.

Now when delete the file it completes without issue.

Using a stored access policy allow granular access control and also means if we need to change a permission or start / expiry time for an application or user that is using the SAS URL, we no longer have to re-issue each time we can just update the storage policy used for the SAS.