Microsoft Graph API Result Size Limit

Recently we have been running some Microsoft Graph API queries and were not getting back all the results expected.

Microsoft Graph seems to have a limit of 1000 results for signin logs, when the limit is reached graph will then start paging the result and adding them to @odata.nextLink property.

There is a Microsoft doc on paging in Graph.

Paging Microsoft Graph data in your app – Microsoft Graph | Microsoft Docs

There are different limits depending on the API.

Below is an extract from the paging doc.

Paging behavior varies across different Microsoft Graph APIs. Consider the following when working with paged data:

  • Different APIs might have different default and maximum page sizes.
  • Different APIs might behave differently if you specify a page size (via the $top query parameter) that exceeds the maximum page size for that API. Depending on the API, the requested page size might be ignored, it might default to the maximum page size for that API, or Microsoft Graph might return an error.
  • Not all resources or relationships support paging. For example, queries against directoryRoles do not support paging. This includes reading role objects themselves as well as role members.

The @odata.nextLink then needs to be called to get the addtional results.

When we run a query and the results are under the limit there will be two objects returned

@odata.context and value

If we run a query that goes over the max results limit of 1000 the value object is changed to @odata.nextLink

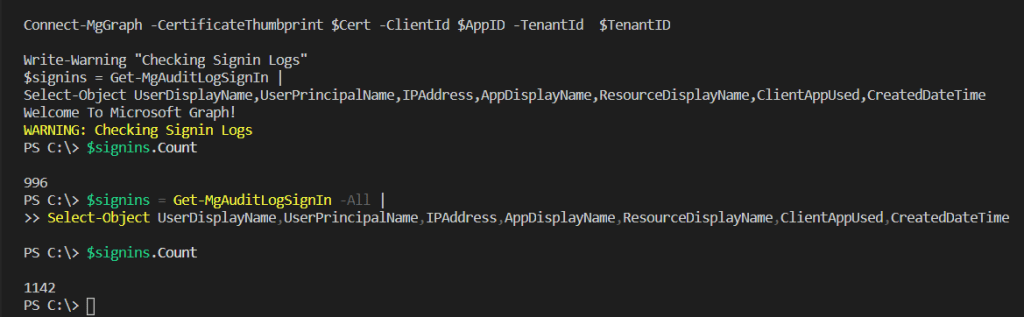
If we use count on the $Results variable it returns 996 items.

To query the addtional results we need to loop through each page to extract the results.

To loop through the results we can create a new variable with the @odata.nextLink and use while loop to go through the variable to get results from the pages.

When we do this the $results count go up to 1142

Below is the full script to get the addtional results.

$ApplicationID = ""
$TenatDomainName = ""
$AccessSecret = Read-Host "Enter Secret"


$Body = @{    
Grant_Type    = "client_credentials"
Scope         = "https://graph.microsoft.com/.default"
client_Id     = $ApplicationID
Client_Secret = $AccessSecret
} 

$ConnectGraph = Invoke-RestMethod -Uri "https://login.microsoftonline.com/$TenatDomainName/oauth2/v2.0/token" `
-Method POST -Body $Body

$token = $ConnectGraph.access_token

$LoginUrl = "https://graph.microsoft.com/v1.0/auditLogs/signIns"
$LoginResults = Invoke-RestMethod -Headers @{Authorization = "Bearer $($Token)" } -Uri $LoginUrl -Method Get

$Results = @()
$Results += $LoginResults.value

$Pages = $LoginResults.'@odata.nextLink'
while($null -ne $Pages) {

Write-Warning "Checking Next page"
$Addtional = Invoke-RestMethod -Headers @{Authorization = "Bearer $($Token)" } -Uri $Pages -Method Get

if ($Pages){
$Pages = $Addtional."@odata.nextLink"
}
$Results += $Addtional.value
}

If using the Microsoft Graph SDK the process is much simpler.

Once connect to using Connect-Mgraph we can then run

Get-MgAuditLogSignIn | 
Select-Object UserDisplayName,UserPrincipalName,IPAddress,AppDisplayName,ResourceDisplayName,ClientAppUsed,CreatedDateTime

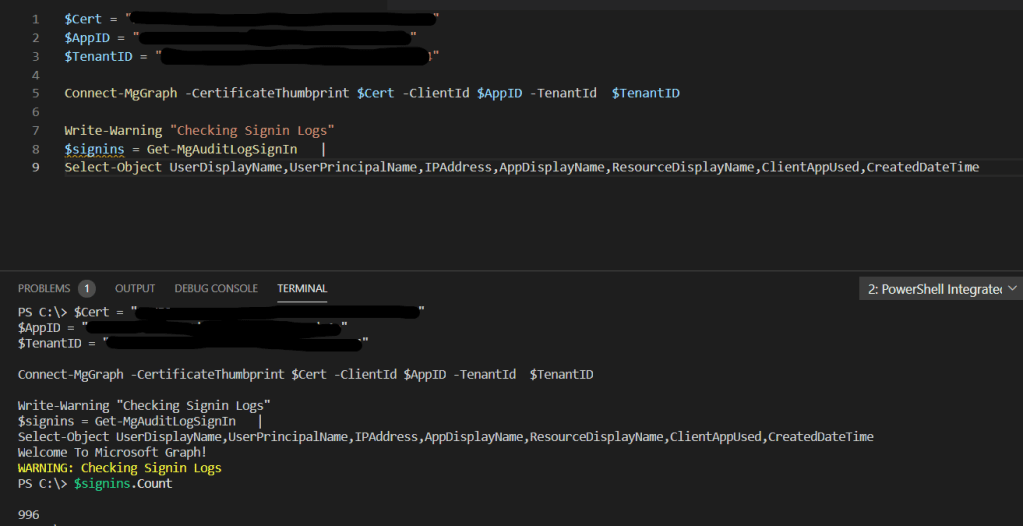
The $signins results variable returns the same 996 results as we got with the above invoke-restmethod graph api query.

To get all the addtional results all we need to do is add the -All parameter and this should then return all results.

This shows the two different method to get the larger results from GraphAPI queries.

Using Microsoft Graph PowerShell SDK

In a previous post we went over connecting to Microsoft GraphApi using PowerShell and Graph Rest API.

In this post we will be going through using the PowerShell SDK as I am more familiar with this method of connecting as it is similar to the current PowerShell modules uses by Exchange online, Azure AD….. and this will make creating scripts and querying data easier.

First step to use the Graph SDK is to install the PowerShell Module.

Open an admin PowerShell Window and run the below command.

Install-Module Microsoft.Graph

Once the module is installed we can now connect to graph.

I only want to query user information so I will use User.Read.All as the scoped permission.

Below is a link to the Microsoft document on graph permissions.

Microsoft Graph permissions reference – Microsoft Graph | Microsoft Docs

Connect-MgGraph -Scopes "User.Read.All"

Go to the URL in the PowerShell response and enter the code.

Accept the permission request.

Once accepted, PowerShell should now be connected.

All command’s in the Graph Module use MG in the name which can be used to find commands needed.

To get all users we can use Get-mguser.

By default the Graph SDK will use API v1.0 to change to the beta version which has more information and is the default one that I use.

To set the profile run the below.

Select-MgProfile -Name "beta"

Now if we look at the user type it now returns guest or member value since the change to the beta version.

This image has an empty alt attribute; its file name is image-33.png

We can also use filters to only return required users, the below will only return guest users.

Using connect-msgraph with a user account requires manual steps to connect so it’s not great for automation.

We can use a certificate and app registration to automate the connection.

Use app-only authentication with the Microsoft Graph PowerShell SDK – Microsoft Graph | Microsoft Docs

We covered the app registration in a previous post so we wont go over creating the app registration again.

First step is to create the cert that will be used, we will be using self signed cert but you can use a cert issue from an internal CA also.

To create the self signed cert I used the below command

New-SelfSignedCertificate -DnsName TennatDomainName -CertStoreLocation "Cert:\CurrentUser\My" -FriendlyName "Graph_SDK"

Once the cert has been created, export the cert so that it can be uploaded to the App registration.

Get-ChildItem Cert:\CurrentUser\my\CertThumbprint | Export-Certificate -FilePath C:\temp\Graph_SDK_Cert_Test.cer

Logon to Azure portal > Azure Active Directory > App registrations > graph app registration

Select the exported certificate

Once uploaded the cert detail will show under certificates.

Now that the cert is uploaded we can use either the thumbprint or the certificate name, ApplicationID and TenantID to automate connections to Microsoft Graph.

Connect-MgGraph -CertificateThumbprint Thumbprint -ClientID YOUR_APP_ID -TenantId YOUR_TENANT_ID

I used the below to automate checking for Guest users and there sign-in logs.

$Cert = "Thumbprint"
$AppID = "YOUR_APP_ID "
$TenantID = "YOUR_TENANT_ID"

Connect-MgGraph -CertificateThumbprint $Cert -ClientId $AppID -TenantId  $TenantID

$GuestUsers = Get-MgUser -Filter "usertype eq 'Guest'"

foreach ($Guest in $GuestUsers) {
Write-Warning "Checking Guest User $($Guest.DisplayName) SignIn Logs"
Get-MgAuditLogSignIn -Filter "UserId  eq '$($Guest.ID)'" | 
Select-Object UserDisplayName,UserPrincipalName,IPAddress,AppDisplayName,ResourceDisplayName,ClientAppUsed
}

Checking Sign-in logs in Azure AD using Microsoft Graph API

In a previous post we went through configuring and connecting to Microsoft Graph API.

In this post we will going through querying sign-in logs.

Connecting to Microsoft GraphAPI Using PowerShell – TheSleepyAdmins

We have been trying to audit guest account activity and sign-in logs are the only way I have been able to find if these account’s have been active for the last 30 days. Instead of manually filtering sign-in logs from Azure AD I want to automate this using Graph.

To query sign-in logs the below API permission are required. since we are using client secret we only require Application permission.

Below is the link to the Microsoft doc I used for getting info on listing sign-ins.

List signIns – Microsoft Graph v1.0 | Microsoft Docs

Permission typePermissions (from least to most privileged)
Delegated (work or school account)AuditLog.Read.All and Directory.Read.All
Delegated (personal Microsoft account)Not supported
ApplicationAuditLog.Read.All and Directory.Read.All

Next step was to run the command to get to the access token for connecting to Microsoft Graph this is covered in the previous post so we won’t be going over that here.

To connect to the sign-in Graph use the below Url

https://graph.microsoft.com/v1.0/auditLogs/signIns

Below is the command to connect and view all sign-in logs data

$LoginUrl = "https://graph.microsoft.com/v1.0/auditLogs/signIns"
(Invoke-RestMethod -Headers @{Authorization = "Bearer $($token)"} -Uri $LoginUrl -Method Get).value

This will return all the default values for each sign-in log.

This image has an empty alt attribute; its file name is image-58.png

We only wanted to have Displayname,UPN,IP,App used and date the log was created. We also wanted to only have Logs that where created in the last 30 days.

$LoginUrl = "https://graph.microsoft.com/v1.0/auditLogs/signIns"(Invoke-RestMethod -Headers @{Authorization = "Bearer $($token)"} -Uri $LoginUrl -Method Get).value | Select-Object userDisplayName,userPrincipalName,ipAddress,clientAppUsed,createdDateTime | Where-Object {$_.userPrincipalName -notlike "*DomainName.com" -and $_.createdDateTime -gt "2020-09-29"}

Below is the results from the above query.

Now that we have the query, we can either run the query manually or in my case I will be setting up a script to run in a scheduled task to export this data.

Connecting to Microsoft GraphAPI Using PowerShell

Recently I have been looking to use Microsoft Graph to query specific information for Microsoft 365 services.

Microsoft Graph is an development tool that connects to multiple Microsoft 365 services to allow querying data and automate tasks.

There are a few steps required to start using Graph which involves creating a app registration on Azure to issue authentication tokens and API permission to view data.

Use the Microsoft Graph API – Microsoft Graph | Microsoft Docs

I also used a blog post by AlexAsplund on adamtheautomator as this was very good at explaining the process and goes more in depth.

Using the Microsoft Graph API with PowerShell (adamtheautomator.com)

In this post we will be going through configuring the app registration and query some data from Azure AD.

First step is to logon to the Azure portal > Azure AD > App registration and click on New registration.

Give the app a name and specify the support account type in this case we only want account from our tenant.

Once completed, we should now see the app has been created.

Next step we need to configure the API permissions, depending on the type of access required we will use either delegated or application permission as some data can only be access by either permission types.

below is a extract from the Microsft Docs on permission types

Microsoft identity platform developer glossary | Microsoft Docs

permissions

client application gains access to a resource server by declaring permission requests. Two types are available:

  • “Delegated” permissions, which specify scope-based access using delegated authorization from the signed-in resource owner, are presented to the resource at run-time as “scp” claims in the client’s access token.
  • “Application” permissions, which specify role-based access using the client application’s credentials/identity, are presented to the resource at run-time as “roles” claims in the client’s access token.

To assign permission go to the app registration we created earlier and go to API permissions > Add a permission and select Microsoft Graph.

To check which permissions are required I used the below Microsoft Docs .

Microsoft Graph permissions reference – Microsoft Graph | Microsoft Docs

Select the permission type and the required permission in this case I want to be able to read groups, users and directory so.

Once the required permissions are added if they required admin permission those will need to be granted using the grant admin consent option below.

There are many different way’s to connect to Microsoft Graph but in this post we will be using client secret.

We will need the application ID

We will create a client secret

Give the client secret a name and set the expire in this case we will use 1 year.

There should now be client secret and the value is used to authenticate. (Take note of the value and save in secure location like a password vault or Azure Key vault as once you leave the app blade the value will be hidden and if you lose, it will have to be recreated.)

Once we have the above configured we can connect to GraphApi to generate a token. We will used Invoke-RestMethod.

The secret can be hardcoded but I decided to use read-host so that I could add the secret manually, as it’s not recommend to have any password/secret hardcoded in script.

Below is the command I used to get the token.

$ApplicationID = ""
$TenatDomainName = ""
$AccessSecret = Read-Host "Enter Secret"


$Body = @{    
Grant_Type    = "client_credentials"
Scope         = "https://graph.microsoft.com/.default"
client_Id     = $ApplicationID
Client_Secret = $AccessSecret


$ConnectGraph = Invoke-RestMethod -Uri "https://login.microsoftonline.com/$TenatDomainName/oauth2/v2.0/token" `
-Method POST -Body $Body

$token = $ConnectGraph.access_token

To verify we have a token run the variable $ConnectGraph to view.

Now that we have a token we can run a queries against GraphAPI.

Below we will be running a query for Azure AD groups and selecting display name.

$GrapGroupUrl = 'https://graph.microsoft.com/v1.0/Groups/'
(Invoke-RestMethod -Headers @{Authorization = "Bearer $($token)"} -Uri $GrapGroupUrl -Method Get).value.displayName

To view some examples we can use Graph Explorer.

Graph Explorer – Microsoft Graph

In a future post we will be going through more query’s and automating tasks using GraphAPI.