Active Directory: Delegated Managed Service Accounts

In this post we will be going over a new account type that has been release in Windows Server 2025. This account is similar to a gMSA which we covered using for scheduled task in a previous post.

dMSAs and gMSAs are two types of managed service accounts that are used to run services and applications in Windows Server. A dMSA is managed by an administrator and is used to run a service or application on a specific server. A gMSA is managed by AD and is used to run a service or application on multiple servers. Both offer improved security and simplified password management.

dMSA allows migration from a standard service account to a machine account with managed and fully randomized keys. Authentication for dMSA is linked to the device identity, which means that only specified machine objects mapped in Active Directory (AD) can access the account.

There are some pre request required before using a dMSA

  • Only currently supported on Windows Server 2025
  • Required at least domain controller running Windows Server 2025
  • Have created a KDS root key

To check if there is a KDS root key run

Get-KdsRootKey

If there is no KDS root key we can create one using the below command. It takes 10 hours before activating.

Add-KdsRootKey -EffectiveImmediately

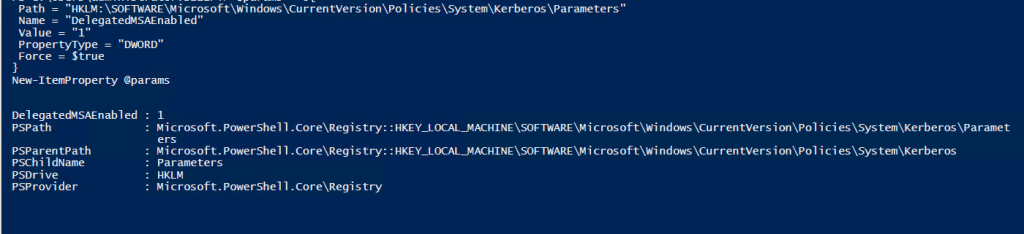
Once the pre-req are confirmed, the next step is going to be adding a registry value for any server that will be using a dMSA.

This can be set either in manually, group policy, or PowerShell. Below is the registry details.

PathHKLM:\SOFTWARE\Microsoft\Windows\CurrentVersion\Policies\System\Kerberos\Parameters
TypeDWORD
NameDelegatedMSAEnabled
Value1

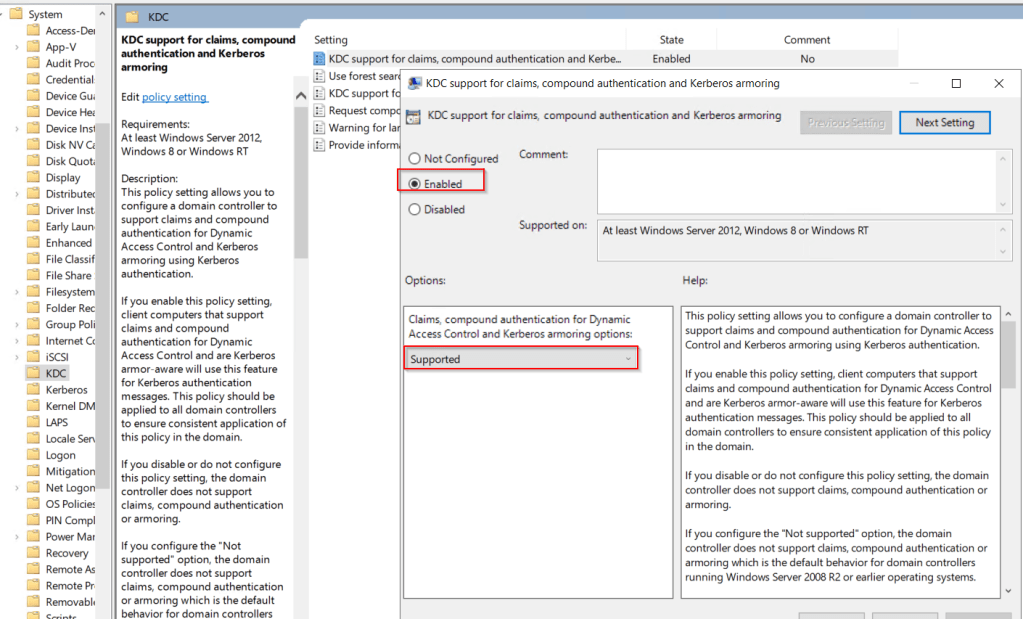
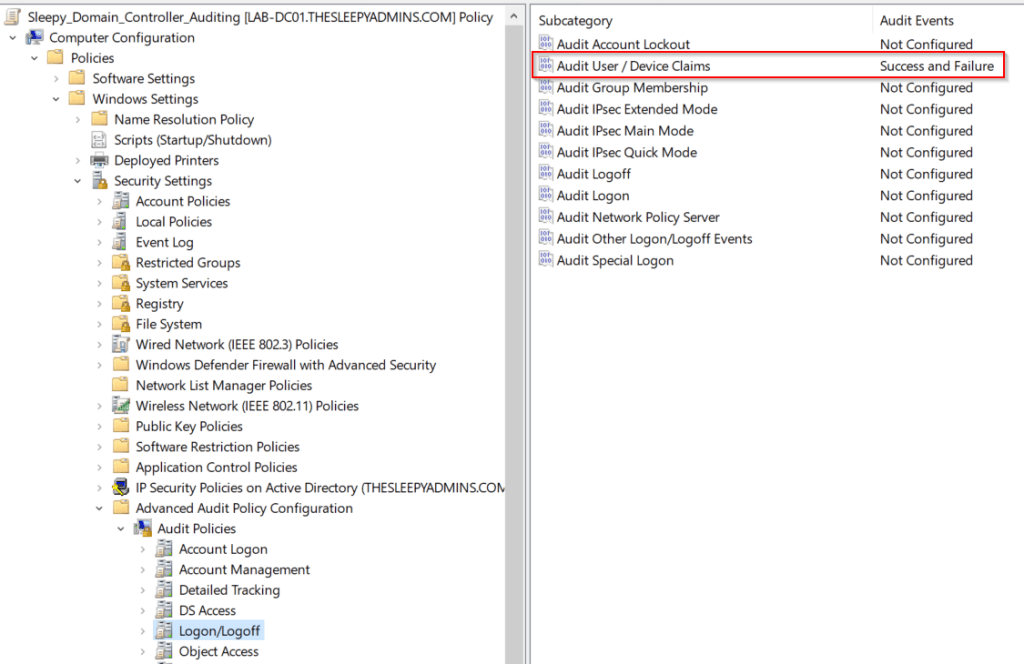
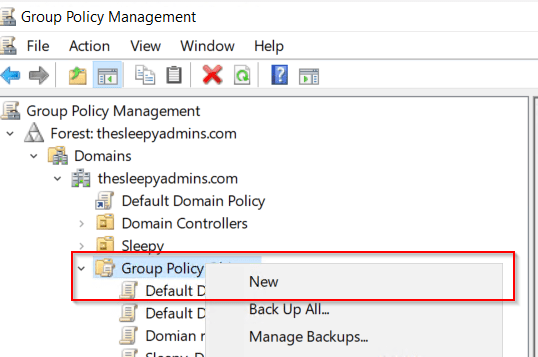
Next we need to Enabled Delegated managed services. This can be done locally on the servers or using groups policy.

The policy setting to enable is below.

Computer Configuration\Administrative Templates\System\Kerberos\Enable Delegated Managed Service Account logons

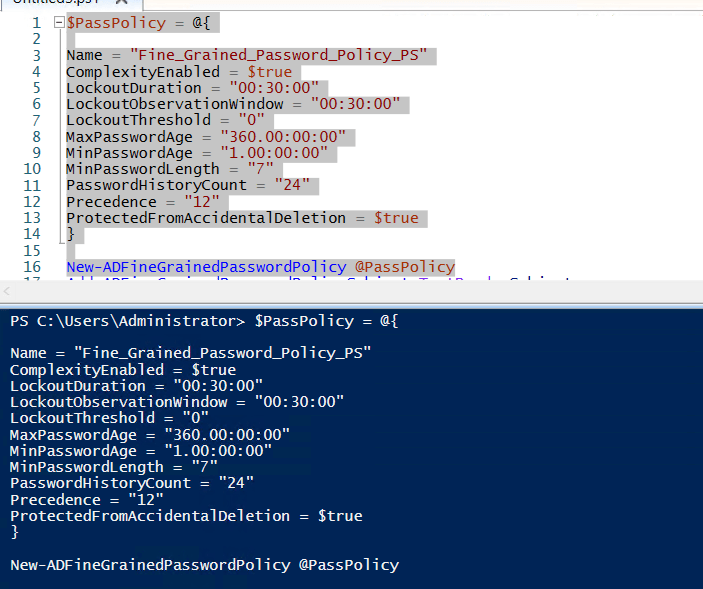
To create the service account we can use PowerShell. (The DNS is required by the command but not needed for running services)

New-ADServiceAccount -Name Accountname -DNSHostName Accountname.domain.local -CreateDelegatedServiceAccount:$true -KerberosEncryptionType AES256

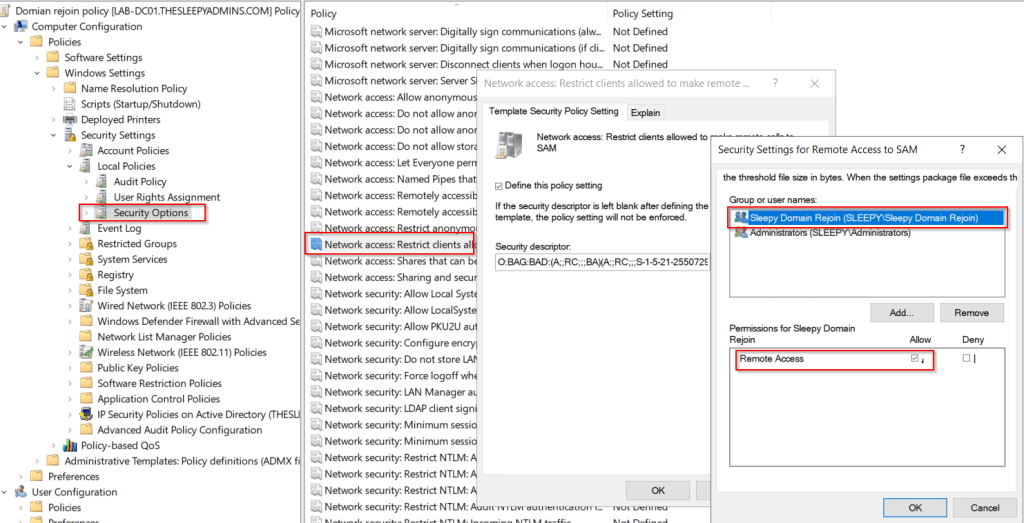
Next we need to grant permission for the device to retrieve the password for the account.

Set-ADServiceAccount -Identity Accountname -PrincipalsAllowedToRetrieveManagedPassword DeviceName$

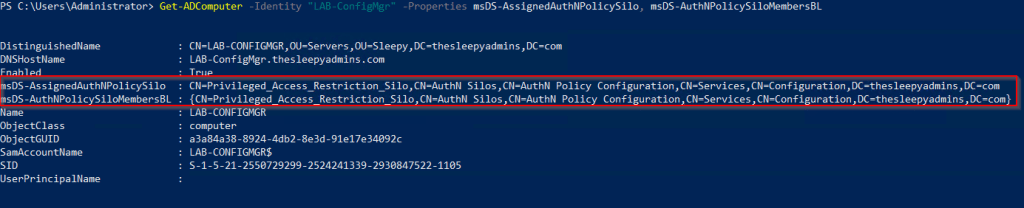
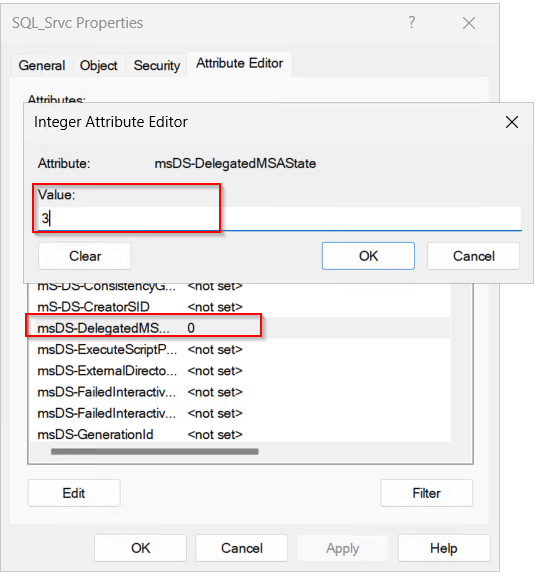
Next we need to set the msDS-DelegatedMSAState, view the current value use

Get-ADServiceAccount -Identity Accountname -Properties "msDS-DelegatedMSAState"

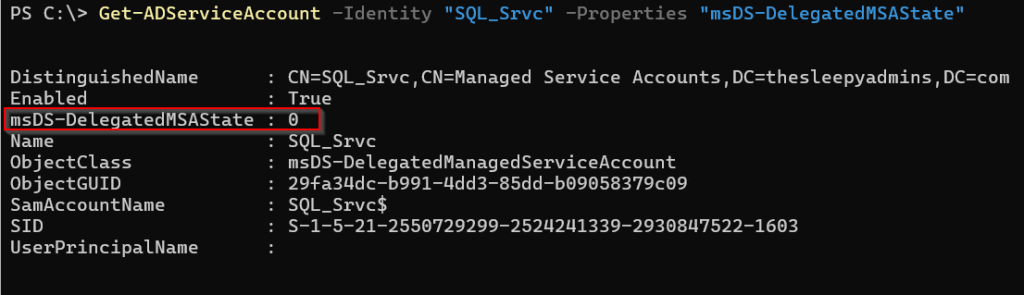
We need to change this value to 3.

Now we are ready to use the dMSA. Select the service that the account is to be used on, in my case its SQL Server (Leave the password blank).

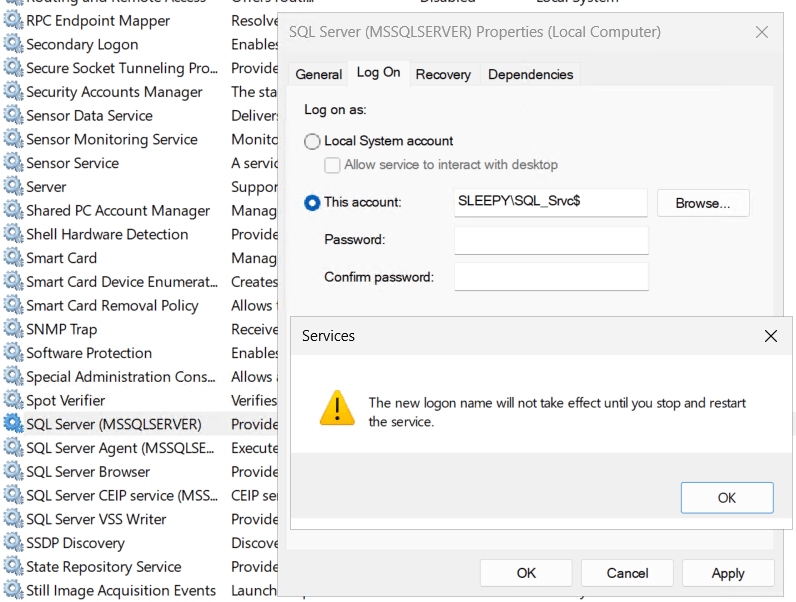
Restart the service and it should now be running using the dMSA account.

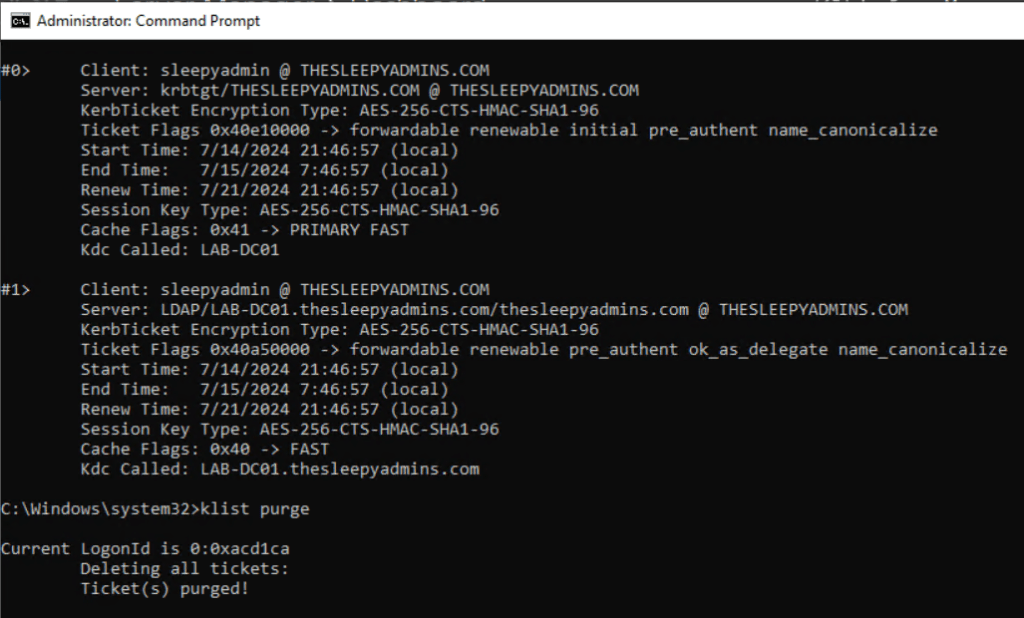
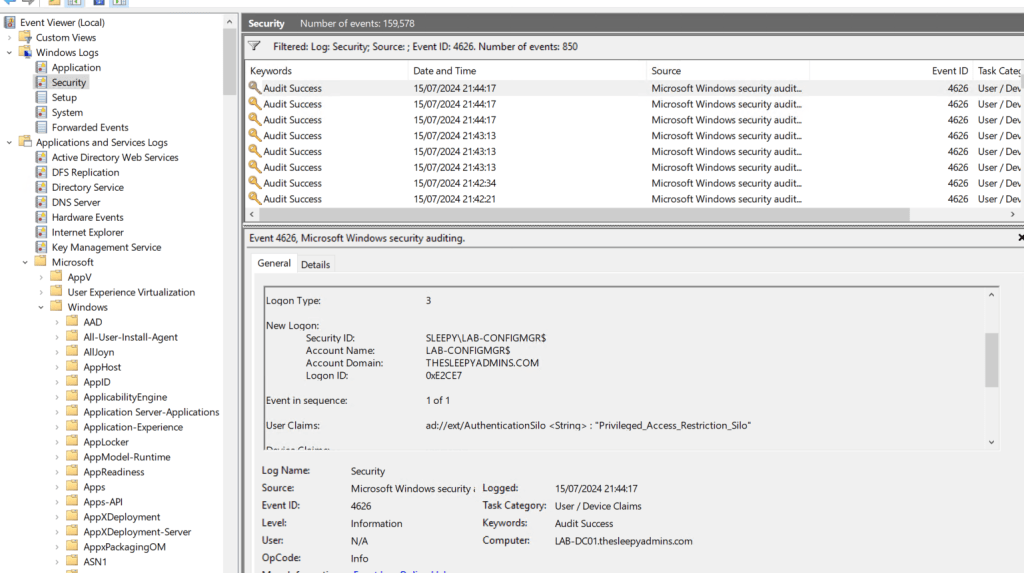
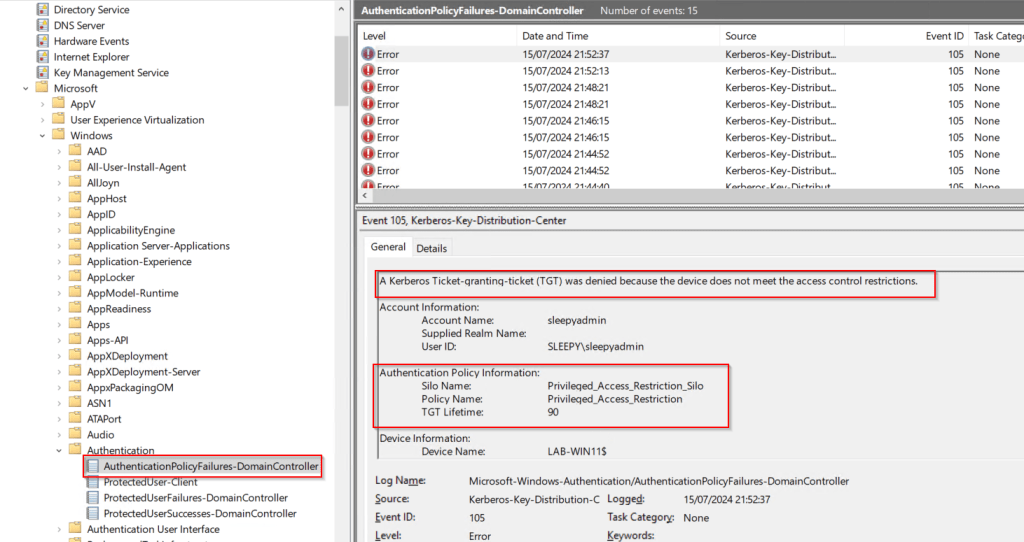
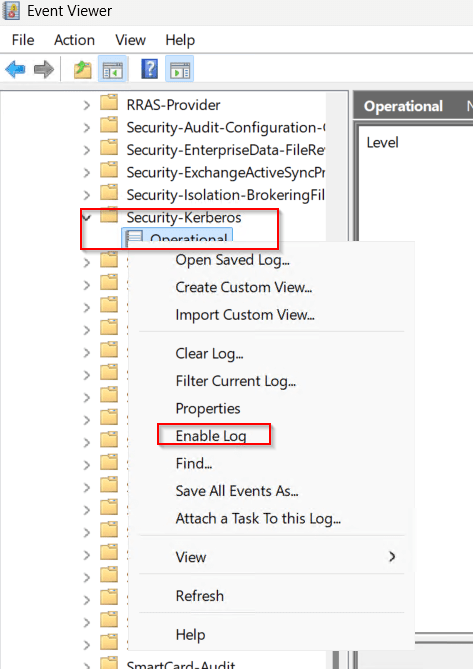
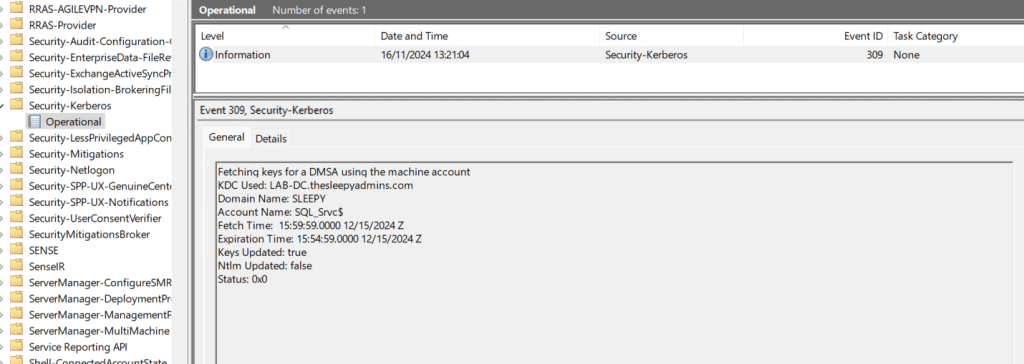
We can enabled Kerberos Event Logging to view events.

Open eventvwr and under Applications and Services Logs > Microsoft > Windows > Kerberos/Operational

Event IDDescription
307dMSA Migration – This event is written for both dMSAs under migration and for ones that migrated. It contains information about the old service account and the new dMSA.
308dMSA Permission Add – This event is logged when a machine attempts to add itself to the principals allowed to retrieve managed password field of a dMSA during migration.
309dMSA Key Fetch – This event is logged when the Kerberos client attempts to fetch keys for a dMSA from the domain controller.

This has been a quick overview of setting up dMSA account. Below link is some of the common question on using dMSAs.

https://learn.microsoft.com/en-us/windows-server/identity/ad-ds/manage/delegated-managed-service-accounts/delegated-managed-service-accounts-faq

Active Directory: Fine-Grained Password Policy

Active Directory usually has a single password policy that is applied to all users. This is will typically be in the default domain policy unless a new group policy is created. 

There are certain scenario where we might want to have a different password policy, Admin users, testing password resets, service accounts…

With fine grained password policies, we can target either specific users or groups and assign them a specific password policy.

In this post we will be going through creating and assigning a fine grained password policy.

To start we need to open ADAC (Active Directory Administrative Center.

ADAC Console

Next we need to add the node to view the password settings container. Select Managed and Add Navigation Nodes.

Add Navigation Node

Select the required domain > System > Password Settings Container and add, the name can be customized I just used Password Settings Container.

Add Password Node

To create the policy select the password node, right click, select new and Password Settings.

ADAC Password Node

The below table shows each setting with a short description of each.

SettingDescription
Policy NameThe name of the fine-grained password policy.
PrecedenceA numerical value that determines the priority. Lower numbers have higher priority.
Password History Length Specifies the number of unique new passwords that must be associated with a user account before an old password can be reused.
Minimum Password AgeThe minimum number of days that a password must be used before the user can change it. Prevents users from frequently changing passwords to bypass history requirements.
Maximum Password AgeThe maximum number of days that a password can be used before the user is required to change it.
Minimum Password LengthThe minimum number of characters a password must contain.
Password Complexity RequirementsSpecifies whether the password must meet complexity requirements, such as including uppercase and lowercase letters, numbers, and special characters.
Store Passwords Using Reversible EncryptionSpecifies if passwords should be stored using reversible encryption, which is less secure but may be required for certain applications.
Account Lockout ThresholdThe number of failed login attempts that will trigger an account lockout.
Account Lockout DurationThe number of minutes that an account remains locked out before it is automatically unlocked.
Reset Account Lockout Counter AfterThe number of minutes that must pass after a failed login attempt before the failed attempts counter is reset to zero.
Applies ToSpecifies the users or groups to which the policy applies.
DescriptionAn optional field to describe the purpose or details of the fine-grained password policy.

Set the required setting values. I would recommend assigned to a test group first to confirm all setting work as expected before applying to standard users .

Fine Grained Password Policy settings

Click ok and policy should now show.

Fine Grained Password Policy

To view if the password policy is applied select a users, right click and select view resultant password settings.

ADAC Password Policy view

If the user doesn’t have policy applied you will receive a warning.

ADAC Policy Warning

We can also create a password policy using PowerShell, this can be usefully if you need to script multiple policy.

We can use the below to create the policy I used PowerShell splatting to make the command shorter and easier to read.

$PassPolicy = @{

Name = "Name"
ComplexityEnabled = $true
LockoutDuration = "00:30:00"
LockoutObservationWindow = "00:30:00"
LockoutThreshold = "0"
MaxPasswordAge = "360.00:00:00"
MinPasswordAge = "1.00:00:00"
MinPasswordLength = "7"
PasswordHistoryCount = "24"
Precedence = "12"
ProtectedFromAccidentalDeletion = $true
}

New-ADFineGrainedPasswordPolicy @PassPolicy
Create Fine Grained Password Policy PowerShell

Next we can run the below command to return the password policies.

Get-ADFineGrainedPasswordPolicy -Filter * | Select-Object Name
List Fine Grained Password Policies

Last step is to apply the policy to either the user or group.

Add-ADFineGrainedPasswordPolicySubject Password_Policy_Name  -Subjects Group

Setting up a fine-grained password policy in Microsoft Active Directory is great way to enhance security by applying custom password and account lockout settings to specific user or groups.

After implementing the policy, it’s important to monitor and review its impact. Reviewing these settings over time can help maintain a balance between strong security and user convenience.

Computer Account Re-Use Domain Join: SAM_DOMAIN_JOIN_POLICY_LEVEL_V2 returned NetStatus:0x5

This is a quick post to go through an issue I ran in to when applying the Active Directory (AD) domain re-use policy. I have a post on setting up the domain re-use policy.

Even though the policy was configured and the user I was attempting to re-join the computer to AD I was still getting the domain error

Account exists and re-use is blocked by policy.

When looking through the netsetup logs under C:\Windows\debug, I was getting the following error.

Active Directory Policy check with SAM_DOMAIN_JOIN_POLICY_LEVEL_V2 returned NetStatus:0x5.

SAM Error

This issue was caused by having the following security option policy set Network access: Restrict clients allowed to make remote calls to SAM

This policy is recommend to improve security in AD, but by default it will only allow members of the administrators group in AD connect remotely to the Security Accounts Manager (SAM) database.

To fix the issue I added the same group used for domain joins to the policy to allow the domain re-join accounts to also be able to make remote calls to SAM.

SAM policy setting

Once the policy is updated on all DC’s the domain join should now work correctly.

Netsetup log

Active Directory: Authentication Policies and Authentication Policy Silos

In this post we will be going through setting up a authentication policies / authentication policy silos.

Microsoft Active Directory (AD) Authentication Policies and Authentication Policy Silos are security features designed to enhance authentication processes and protect sensitive accounts in an Active Directory environment.

  • Authentication Policies provide granular control over authentication methods and restrictions, ensuring that only authorized users and devices can access resources.
  • Authentication Policy Silos, allow administrators to group sensitive accounts and applying specific authentication policies to these groups to mitigate the security risk.

With these policies set it will help with protecting from unauthorized access and reducing the potential impact of security breaches.

https://learn.microsoft.com/en-us/windows-server/security/credentials-protection-and-management/authentication-policies-and-authentication-policy-silos

First to allow the use of these policies we need to enabled the KDC support for claims, compound authentication, and Kerberos armoring on all domain controllers.

The policy setting is under

Computer Configuration > Administrative Templates > System > KDC

This needs to be set to enabled and supported.

KDC Policy

We also need to enabled the Kerberos client support for claims, compound authentication, and Kerberos armoring on clients.

The policy setting is under

Computer Configuration > Administrative Templates > System > Kerberos

Kerberos Policy

We can either apply individually or at the root level of the domain. I applied at the root level of the domain and apply the KDC policy directly on the domain controller OU.

The clients and DC’s will require a reboot for the policy to apply.

Authentication policy and policy silos are configured using Active Directory Administrative center (ADAC).

The polices containers are located under Authentication.

ADAC Authentication

Authentication policies control the following:

  • The ticket granting ticket (TGT) lifetime for the account, which is set to be non-renewable.
  • The criteria that device accounts need to meet to sign in with a password or a certificate.
  • The criteria that users and devices need to meet to authenticate to run services as a specific account.

First step is we need to create a new authentication policy.

ADAC Creating Authentication Policy

Set a policy name, protect from accidental deletion and if the policy is in audit or enforced mode. In production in would use audit and review the event logs to confirm the restrictions work as expect before setting to enforce.

Authentication Policy

Next we need to set what the policy will be applied against. These can be

  • User Accounts
  • Service accounts
  • Computer accounts

In this example we will be using users sign on policy to reduce the ticket granting ticket lifetime (TGT) time to 90 minutes.

User TGT Lifetime

Next we will configure the Authentication Policy Silos,

ADAC Authentication Policy Silo

Give the Silo a

  • Name
  • Set to audit or enforce
  • Add the permitted accounts
  • Set the authentication policy
Create Authentication Policy Silo

Next we need to set the silo policy on the accounts. This can be done by selecting the accounts from ADAC and going to silo.

Then select the required silo policy to apply.

Setting Authentication Policy Silo

We can checked the msDS-AssignedAuthNPolicySilo & msDS-AuthNPolicySiloMembersBL attributes on the accounts that have the silo applied to confirm.

msDS attributes

Last step is to go back to the authentication policy and update the user sign on condition.


Access Conditions

Set to AuthenticationSilo, equals and set the silo name to the one we created.

Create control conditions
Access Conditions

The DC may also need to have the kerbros ticket purged before the policies will apply this can be done by using klist purge

List Kerberos tickets

Now when we try to logon to the server in the silo it should be allowed. We can also use whoami /claims to see if the claims is applied.

Whoami claims

If we try logon to another devices with the same account outside of the silo we should be blocked.

Windows 11 client blocking access

To troubleshoot or audit, we can enabled Audit user / device claims using group policy. The policy is setting is under Policies > Windows Settings > Security Settings > Advanced Auditing Policy Configuration > Logon/Logoff

Advanced Audit Policy

We can check under the security logs on the DC for Eventid 4626

Claims Event logs

We can also enabled Authentication policy failures and success, this will need to be done on all DC’s. The logs are under
Microsoft > Windows >Authentication/AuthenticationPolicyFailures-DomainController

This will then log the accounts that are failing to be issue a TGT.

Authentication User event logs

This has been a quick overview of creating an authentication silo, setting this up can be a bit tricky.

I did have issue getting the policy silo to work due to existing TGT but once configured it can really help with locking down access to tier 0 devices.

Azure Migrate VMware (Agentless) Replication ErrorID 181009

During a recent migration we have been having issues with Azure Migrate VMware (Agentless) where the replication would start failing intermittently with ErrorID 181009 and Error Message:

ErrorCode: ‘1028’ VM: ‘ServerName’. Appliance: ‘ApplianceName’. Disk Id: ”. Disk path: ‘vmdk’. Error: The operation VirtualDiskSnapshotOpen failed with the error ‘Unknown error’ [Unknown error]

Replication failures
  • We had checked all the correct permission had been applied.
  • Also confirmed that we were running the VDDK 7.0 for vSphere 7.
  • Confirm the password for the account didn’t contain unsupported special characters.

We used the troubleshooting link below but there was no issue listed that matched our issues.

https://learn.microsoft.com/en-us/azure/migrate/vmware/troubleshoot-changed-block-tracking-replication?context=%2Fazure%2Fmigrate%2Fcontext%2Fvmware-context#an-internal-error-occurred

During troubleshooting with VMware / Azure support we end up having to download the VMware VDDK 8.0, delete the existing VDDK from “C:\Program Files\VMware\VMware Virtual Disk Development\” and updating this with the VDDK 8.0 version.

The link to the VMware VDDK is https://developer.broadcom.com/sdks/vmware-virtual-disk-development-kit-vddk/latest/

This fixed the replication issues.

Active Directory: Computer Account Re-Use Domain Join Policy

During a recent hardware refresh we have been running in to issue with domain rejoins, this happens for all users even the owner and domain admins.

During the build process we use a service account with delegated permission on the specific OU to do the domain join step.

If there was any issue or we need to re-join the device to AD we where getting the below error.

An account with the same name exists in Active Directory. Re-using the account was blocked by security policy.

This issue is from a update that was applied by Microsoft last year to harden domain joins.

https://support.microsoft.com/en-us/topic/kb5020276-netjoin-domain-join-hardening-changes-2b65a0f3-1f4c-42ef-ac0f-1caaf421baf8

This change isn’t suppose to effect users who are members of any of the below groups as they are exempt from the ownership check

  • Administrators
  • Enterprise Administrators
  • Built-in Administrators groups

but we found that this was not the case as even with a domain admin I couldn’t rejoin. To view the domain join log go to C:\Windows\debug\NetSetup.LOG.

There is a registry workaround that can be applied but this is due to be removed in August 2024 so we wont go over that here.

To fix this issue Microsoft now recommend using a new GPO setting, we have to apply the specific policy setting to all domain controllers to set what accounts can re-join the devices to the domain.

We can set this to be either a single users or a security group but its recommend to use a group. This group should have as few users a possible this is to reduce the risk the hardening was introduced for.

To make the GPO setting available we need to install the September 12, 2023 or later updates on all member computers and domain controllers. 

First we will create a new security group

Next we can add the specific user or users to the group.

Next we can either create or re-use an existing policy, I will be creating new policy

Give the policy a name.

Next edit the policy and go to  Computer Configuration\Policies\Windows Settings\Security Settings\Local Policies\Security Options, double-click Domain controller: Allow computer account re-use during domain join.

If the policy is missing it most likely that the pre-req update has been installed yet.

Select the policy setting and click edit, add users or groups of trusted computer account creators and owners to the Allow permission.

Do not add the user account that performs the domain join.

Apply the new policy to the domain controllers OU.

Then run gpudpate /force on each DC or wait for about 15 minutes for the policy to apply.

To confirm if the setting is applied we can check the below registry value.

PathHKEY_LOCAL_MACHINE\SYSTEM\CurrentControlSet\Control\SAM
TypeREG_SZ
Namecomputeraccountreuseallowlist
ValueEquals what is in the group policy setting.
Re-use registry setting

Once confirmed the setting is on the Domain Controllers,

Next we tried to re-join to the domain again with a domain admin account and now the join is successful.

and if we check the log we can now see the attempt was permitted.

Now that domain admins are able to re-join I wanted to test the lower privileged account in the re-join group we created earlier.

This was also successful.

Last test was to try an account that wasn’t part of the re-join group and confirm it would be blocked from re-joining which it was.

I have tested this on a Windows 10, Windows Server 2019 & 2022 without issue.

I have run in to issues on Windows 11 as it doesn’t seem to honor the policy setting not sure why might be a bug.

Windows 11 policy failure

The only way I was able to get Windows 11 to re-join was to use the legacy reg value workaround and then delete after re-joining to AD.

PathHKLM\System\CurrentControlSet\Control\LSA
TypeREG_DWORD
NameNetJoinLegacyAccountReuse
Value1
Legacy reuse registry value

Using the group policy is a easier method than having to use the registry value and hopefully Windows 11 will be fixed in a later update.

Windows Defender Install – ERROR_SXS_ASSEMBLY_MISSING

During a recent Windows Defender deployment we ran in to an issue with the onboarding script where the Windows Defender feature would fail to install with Enable-WindowsOptionalFeature : The referenced assembly could not be found.

When checking the the CBS log under C:\Windows\Logs\CBS\CBS.log we found that the issue was related to a missing package for a previously installed update.

CBS Failed to pin deployment while resolving Update: Package_8092_for_KB5005043~31bf3856ad364e35~amd64~~10.0.1.3.5005043-16635_neutral from file: (null) [HRESULT = 0x80073701 – ERROR_SXS_ASSEMBLY_MISSING]

After a bit of troubleshooting there where two fixes to this issues, if the update that is missing is available, we can download the update MSU / CAB file from the Microsoft update catalog using the KB ID. I have covered this in a previous blog post so wont go over that fix on this post use the below link to view that post.

In some of our cases the update file was not available to download anymore, in this case we need to modify the registry to set the package values that are corrupted to be ignored.

First we need to get the list of packages that are showing in the CBS logs as corrupted. The below script will go through the CBS log and get the packages and format the results.

$cbsLog = "c:\windows\logs\cbs\cbs.log"
$results = @()

Write-Host "Checking CBS logs for SXS Assembly Errors" -ForegroundColor Green
$checkingfailure = Get-Content $cbsLog | Select-String "ERROR_SXS_ASSEMBLY_MISSING"

$cbsresults = Get-Content $cbsLog  | Select-String "Resolving Package:"


if ($cbsresults) {

    foreach ($cbsresult in $cbsresults) {

        $packageresult = ($cbsresult | Out-String).Split(":").trim().Split(',')| Select-String "Package_"

        $results += $packageresult
    }
}

$results | Select-Object -Unique

Now that we have the list we need to set the local administrators group as the owner of the component registry key in order to be able to update the effect packages current state so they wont be checked.

Open regedit and go to

HKEY_LOCAL_MACHINE\SOFTWARE\Microsoft\Windows\CurrentVersion\Component Based Servicing

Select Administrators as the owner and replace owner on subcontainters and objects.

Last step is to set the local administrators with full control of the registry key.

Now that we have the permissions set we can modify the registry values. This can be either scripted or manually done.

The current value needs to be change to 0 to set.

Set each of the corrupted package to 0

Then revert the permission back so Administrators have read access and trusted installer (NT Service\TrustedInstaller) is the owner of the components registry key and subkeys.

Now when we try and run the onboarding script again the Windows Defender feature enables without issue.

PowerShell Beginner’s Guide – Creating Functions

In this post we will be going through creating a functions in PowerShell.

PowerShell functions are reusable code created to perform specific tasks. Functions can accept inputs (parameters), process data, and produce outputs (return data).

PowerShell functions make code readability and efficiency better and allows easier automate of tasks.

Functions can be either saved in script file (.ps1), then called as part of the script or saved as modules (.psm1) and these can then be imported using the import-module command or added to a PowerShell profile so they load each time PowerShell is launched.

First we will go through creating a basic function, this can be made up of existing PowerShell commands, standard command line or we can add .Net Name spaces and classes.

Functions

To create a new function we type function and set a name. Then a script block to contain the code that will be run. When naming a functions it can be called anything but it is a good idea to keep the same Verb-Noun that is used by other PowerShell commands.

The below example will create a new command called Check-Logfiles and when its run it will use get-childitem to look in the specific logs folder

function Check-Logfiles {

Get-ChildItem C:\temp\Logs

}
Function

This can be useful if you have a repeatable tasks as you can create a new command and instead of having to add all the parameter each time to an existing command, you can just set in the function and run each time to check logs, services or any other specific checks.

Parameters

Most PowerShell commands, such as cmdlets, functions and scripts, rely on parameters to allow users to select options or provide inputs.

Parameters can be set to either required or not required by adding mandatory.

When setting parameters we need to use a type, the most common type I use is string but there are many additional like Boolean or date.

String: This can either be hardcoded text or a variable. This can then be passed to the command in the function.

Bool: Set the script to use $True, $False, 1 or 0.

Parameters can be set to either be required or not required by adding mandatory.

The below is the update Check-Logfiles function above and replaces the path with a $path variable and a confirm parameter to run the script.

 function Check-Logfiles {

    [CmdletBinding()]
    param (
        [Parameter(Mandatory = $true)] 
        [string]$path,
        [bool]$Confrim
    )

    Get-ChildItem $path
    }
Function with parameters

Next we an add in the Boolean to put in true or false requirement to run the script.

function Check-Logfiles {

    [CmdletBinding()]
    param (
        [Parameter(Mandatory = $true)] 
        [string]$path,

        [bool]$Confrim
    )

    if($Confrim -eq "True"){
    Get-ChildItem $path
    }

    else {
        Write-Warning "Confirm not set to true"
    }
    
    }
Function with Boolean

Parameter Validation

We an add validation to parameters to set what values will be accept by the parameter. To use validation we will add ValidateSet to the parameter.

For the below example we will only be accepting two paths in the Check-Logfiles function. If a users set a path outside other than the set paths the function will fail immediately and output the reason to the PowerShell console.

function Check-Logfiles {

    [CmdletBinding()]
    param (
        [Parameter(Mandatory = $true)] 
        [ValidateSet('C:\temp\Logs','C:\temp\Logs2')]
        [string]$path
    )

    Get-ChildItem $path
    
    }

The above are just a few examples of the different ways to use a function. Functions are great way to create reusable code / commands and give structure to your scripts. Functions should be kept a small as possible and set to do only a single task this will allow easier troubleshooting.

Multiple functions can be combined in a single script to complete more complex tasks.

PowerShell Beginner’s Guide – PowerShell Remoting

In this we will be going through PowerShell remoting (PSRemoting).

PowerShell remoting is a feature that enables administrators to manage multiple computers remotely using PowerShell commands. It allows us to execute commands, run scripts, and manage configurations on one or more remote computers from a single console.

With PSremoting, we can run administrative tasks, automate processes, and manage Windows and Linux without needing to access each machine through RDP or direct console.

PowerShell Remoting User Rights

The two local groups allows users can connect to a machines remotely using PSRemoting by default:

  • Administrators
  • Remote Management Users

If users don’t require admin rights on the machine and but they will need to remote on, they should just be added to remote management users. It always best to setup least privileges for security.

Enabling PowerShell Remoting

First we need to enable PSRemoting, if it is not enabled or the WinRM ports are blocked between the two machines. We will receive and error like the below.

PS Remoting Error

To enable PSRemoting we need to run

Enable-PSRemoting
Enable PowerShell Remoting

Once enabled we can now connect using

Enter-PSSession ComputerName
PowerShell Remote Connection

Now that we are connect we can run commands as if we had the PowerShell console open directly on the remote computer.

Running Remote Command

To exit and return back to local PowerShell console, we just need to run

Exit-PSSession
Exiting PowerShell Session

Invoke-Command

Using Enter-PSSession is good for running commands against one machine but if we want to run against multiple machines we can use Invoke-command.

When running we specify the command that will be run in the sriptblock inbetween the two curly brackets {}.

Invoke-Command -ComputerName computer1,computer2 -ScriptBlock { Command}

In the below example I am running against three machines and getting the computersystem WIM class.

PowerShell Remoting Multiple Machines

PowerShell Sessions

Another method to run multiple commands against machines is to create a PowerShell session and then re-using this initial connection.

In the below example I am connect to the three machines, checking the printer spooler service and stopping the service in the third command.

PowerShell Sessions

This has been a quick few examples of setting up and using PSRemoting. Using PSRemoting makes administration a lot easier on remote machines. .

Some security teams don’t want remoting enabled (it is enabled by default on Windows Servers OS since 2012) as they see its as a security risk, while there are risks the benefits out way the risks and there are many ways to harden and reduce security risks associated with PowerShell rather than disabling PSRemoting.

PowerShell Beginner’s Guide – Error Handling Methods

In this post we will be going through different error handling methods available in PowerShell and examples on using these.

Error handling is very usefully to learn, it allow us to write scripts that can export / write errors to a log or completed certain task if a part of the script fails.

There are also two types of errors Non-Terminating and Terminating, Non-Terminating error can cause issue when using certain error handling methods, we will cover this more when we get to the try-catch section.

PowerShell has a few different ways to handle errors gracefully:

  1. Error: When using $error, we can return error messages that are stored in the default variable.
  2. Error Action Preferences: PowerShell provides different error action preferences like Stop, Continue SilentlyContinue…, allowing how to control the behavior when an error occurs.
  3. ErrorVariable: Creates a new variable to store error messages, this can then be used later to output or logging.
  4. Try-Catch: The try block run the code specified and in the event of an error the catch block catches and handles those errors. This allows for us to control how errors are managed within the script.
  5. Finally: PowerShell includes a finally block which executes regardless of whether an error occurs or not. This is useful for performing cleanup tasks or finalizing operations, like send a log file or email .

By using these features, PowerShell allows handle errors more effectively.

$Error variable

$Error is the default variable that all errors are written to, we can call this in side a script and use the index operator [0], zero returns the latest error.

I would generally not use this method but it can be usefully for simpler scripts that we just want to export the error while the script runs.

Below are some examples of using $error.

$Error[0]
Error Variable

We can also call specific properties to export more specific error propertied. We can view the properties by using Get-Member

$Error | Get-Member
Error variable additional properties

To chose a error propriety we put dot and exception.

Error variable exception

ErrorAction Parameter

ErrorAction Allows us to specify the action PowerShell should take when an error occurs. This is done using -ErrrorAction parameter.

I would generally only use this when I need to set an error to terminate and I am using error variable and don’t want to write the error to the PowerShell console.

Below example shows setting error action to continue silently.

Get-ChildItem -Path 'C:\Folder_Does_Not_Exist' -ErrorAction SilentlyContinue
Error action

ErrorVariable

ErrorVariable is used to captures error information into a custom variable, this can then be used to output to a log file or out to the PowerShell console.

This is a good method to create multiple errors objects and write a log file that outputs errors while the script runs.

Below example we are silencing the error and then adding it to a new a variable.

Error variable
Get-ChildItem -Path 'C:\Folder_Does_Not_Exist' -ErrorVariable MyErrors

$MyErrors

Below example shows exporting to a txt file.

Error variable out to file
Get-ChildItem -Path 'C:\Folder_Does_Not_Exist' -ErrorVariable MyErrors -ErrorAction SilentlyContinue

$MyErrors.Exception | Out-File C:\temp\Logs\Error_log.txt -Append

Try-Catch-Finally

The last method we will cover is try catch method, this method allows us to catch and handle errors gracefully within a script and then specify code to run in case of an error.

Try catch is a more complex error handling method as it allow for additional code or actions to be perform that can be as simple as out putting error or running additional command that could be use to fix or alert for issues while the script is running.

When using try catch the error need to be a terminating error or the catch wont work. Get-ChildItem isn’t a terminating error, due to this we will be using -ErrorAction stop to make it terminate.

Below examples show the difference when using a terminating and non-terminating error with try catch.

Try Catch terminating vs non
try {
    Get-ChildItem -Path 'C:\Folder_Does_Not_Exist'  -ErrorAction Stop
} 
catch {
    Write-Host "An error has occorred" $Error[0].ErrorDetails"
} 

We can add finally to the try catch to run a command at the end whether or not there is an error.

This can be useful if we want the script to do something like copy the log file or send a email or notification the script has completed.

Below example will remove the log file after the script has completed.

Try Catch Finally
try {
    Get-ChildItem -Path 'C:\Folder_Does_Not_Exist' -ErrorAction Stop
} 
catch {
    Write-Host "An error has occorred" $Error[0].ErrorDetails
} Finally { 
    Remove-Item C:\temp\Logs\Error_log.txt -Verbose
}

The above methods shows the different way to handle errors in PowerShell, being able to use error handling in scripts is very useful skill to learn and helps with more complex scripts.