Recently I have been looking to use Microsoft Graph to query specific information for Microsoft 365 services.
Microsoft Graph is an development tool that connects to multiple Microsoft 365 services to allow querying data and automate tasks.
There are a few steps required to start using Graph which involves creating a app registration on Azure to issue authentication tokens and API permission to view data.
Use the Microsoft Graph API – Microsoft Graph | Microsoft Docs
I also used a blog post by AlexAsplund on adamtheautomator as this was very good at explaining the process and goes more in depth.
Using the Microsoft Graph API with PowerShell (adamtheautomator.com)
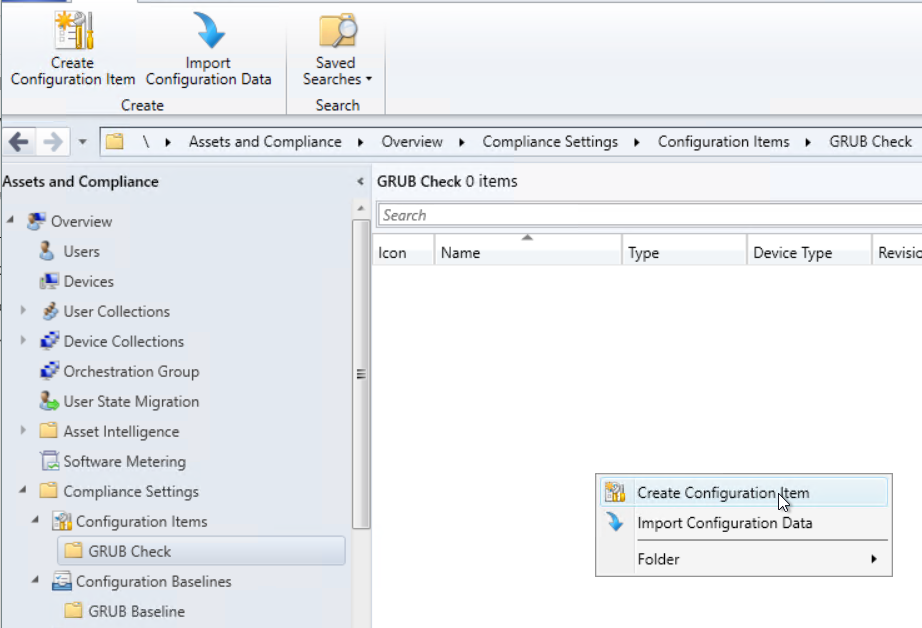
In this post we will be going through configuring the app registration and query some data from Azure AD.
First step is to logon to the Azure portal > Azure AD > App registration and click on New registration.

Give the app a name and specify the support account type in this case we only want account from our tenant.

Once completed, we should now see the app has been created.

Next step we need to configure the API permissions, depending on the type of access required we will use either delegated or application permission as some data can only be access by either permission types.
below is a extract from the Microsft Docs on permission types
Microsoft identity platform developer glossary | Microsoft Docs
permissions
A client application gains access to a resource server by declaring permission requests. Two types are available:
- “Delegated” permissions, which specify scope-based access using delegated authorization from the signed-in resource owner, are presented to the resource at run-time as “scp” claims in the client’s access token.
- “Application” permissions, which specify role-based access using the client application’s credentials/identity, are presented to the resource at run-time as “roles” claims in the client’s access token.
To assign permission go to the app registration we created earlier and go to API permissions > Add a permission and select Microsoft Graph.

To check which permissions are required I used the below Microsoft Docs .
Microsoft Graph permissions reference – Microsoft Graph | Microsoft Docs
Select the permission type and the required permission in this case I want to be able to read groups, users and directory so.

Once the required permissions are added if they required admin permission those will need to be granted using the grant admin consent option below.

There are many different way’s to connect to Microsoft Graph but in this post we will be using client secret.
We will need the application ID

We will create a client secret

Give the client secret a name and set the expire in this case we will use 1 year.

There should now be client secret and the value is used to authenticate. (Take note of the value and save in secure location like a password vault or Azure Key vault as once you leave the app blade the value will be hidden and if you lose, it will have to be recreated.)

Once we have the above configured we can connect to GraphApi to generate a token. We will used Invoke-RestMethod.
The secret can be hardcoded but I decided to use read-host so that I could add the secret manually, as it’s not recommend to have any password/secret hardcoded in script.
Below is the command I used to get the token.

$ApplicationID = ""
$TenatDomainName = ""
$AccessSecret = Read-Host "Enter Secret"


$Body = @{
Grant_Type    = "client_credentials"
Scope         = "https://graph.microsoft.com/.default"
client_Id     = $ApplicationID
Client_Secret = $AccessSecret
}

$ConnectGraph = Invoke-RestMethod -Uri "https://login.microsoftonline.com/$TenatDomainName/oauth2/v2.0/token" `
-Method POST -Body $Body

$token = $ConnectGraph.access_token
To verify we have a token run the variable $ConnectGraph to view.

Now that we have a token we can run a queries against GraphAPI.
Below we will be running a query for Azure AD groups and selecting display name.

$GrapGroupUrl = 'https://graph.microsoft.com/v1.0/Groups/'
(Invoke-RestMethod -Headers @{Authorization = "Bearer $($token)"} -Uri $GrapGroupUrl -Method Get).value.displayName
To view some examples we can use Graph Explorer.
Graph Explorer – Microsoft Graph
In a future post we will be going through more query’s and automating tasks using GraphAPI.


 Select Windows Desktops and Servers (custom)
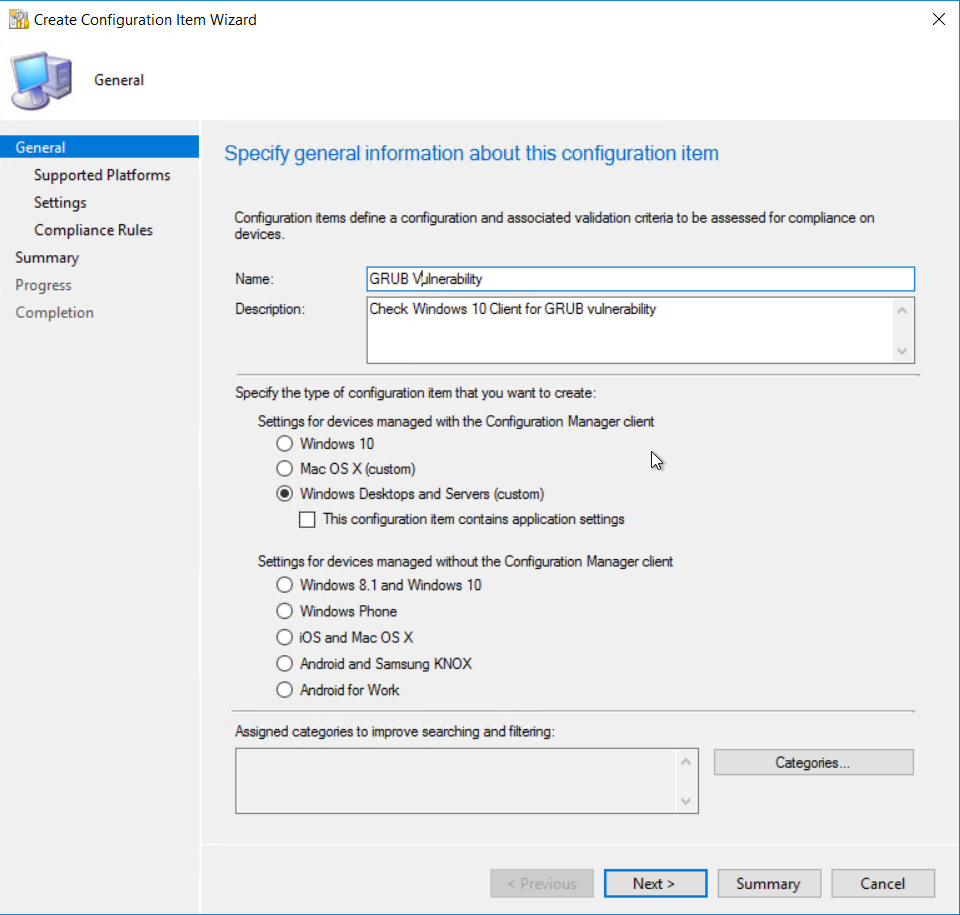 Select Windows 10 as the version of Windows that will be assessed.
 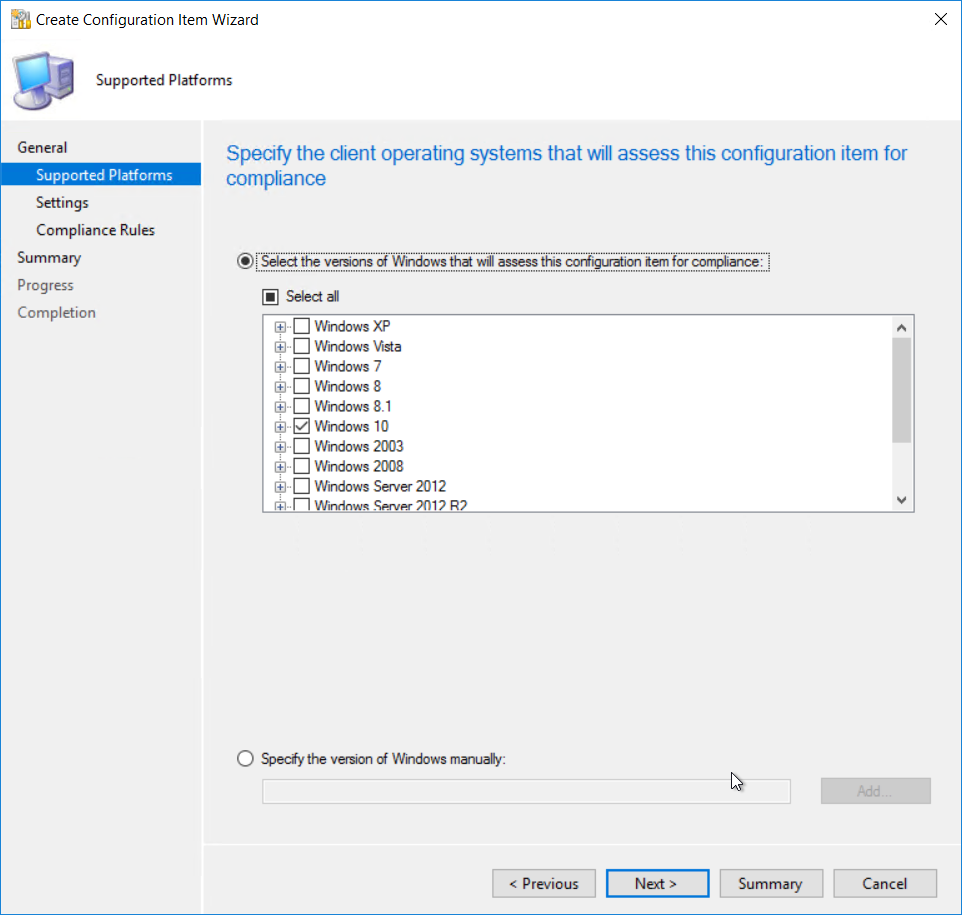 Add a new settings item.
 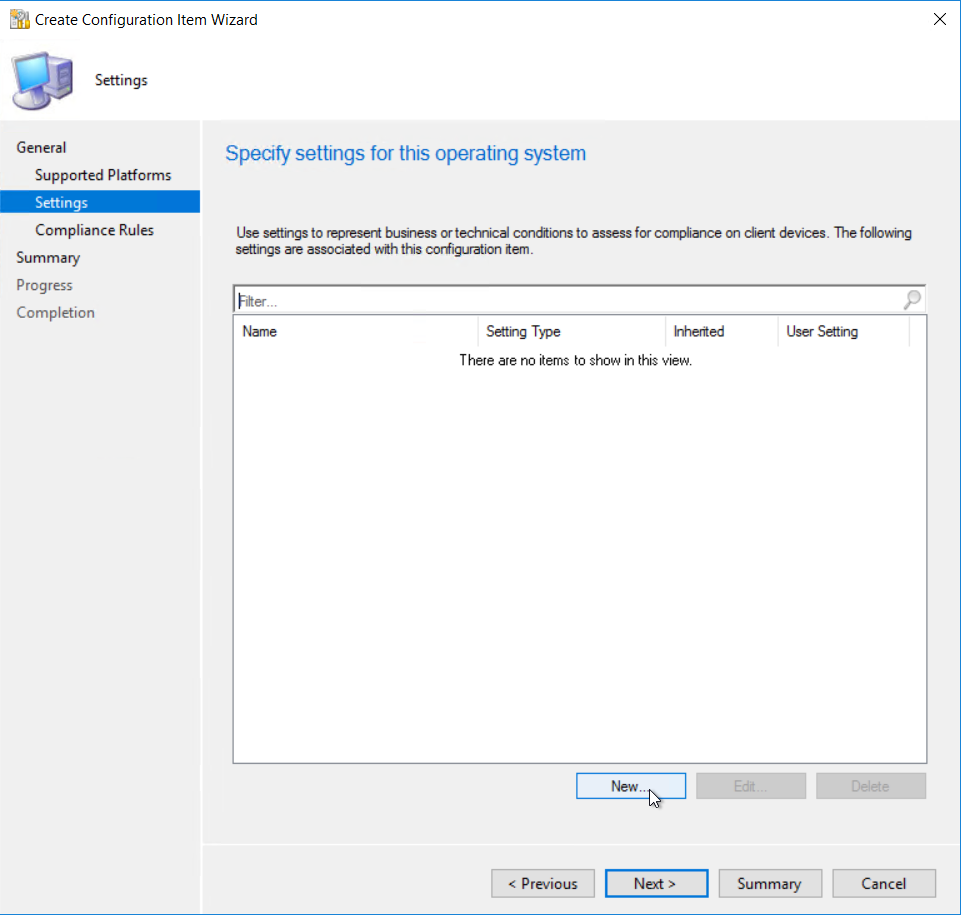 Give the item a name
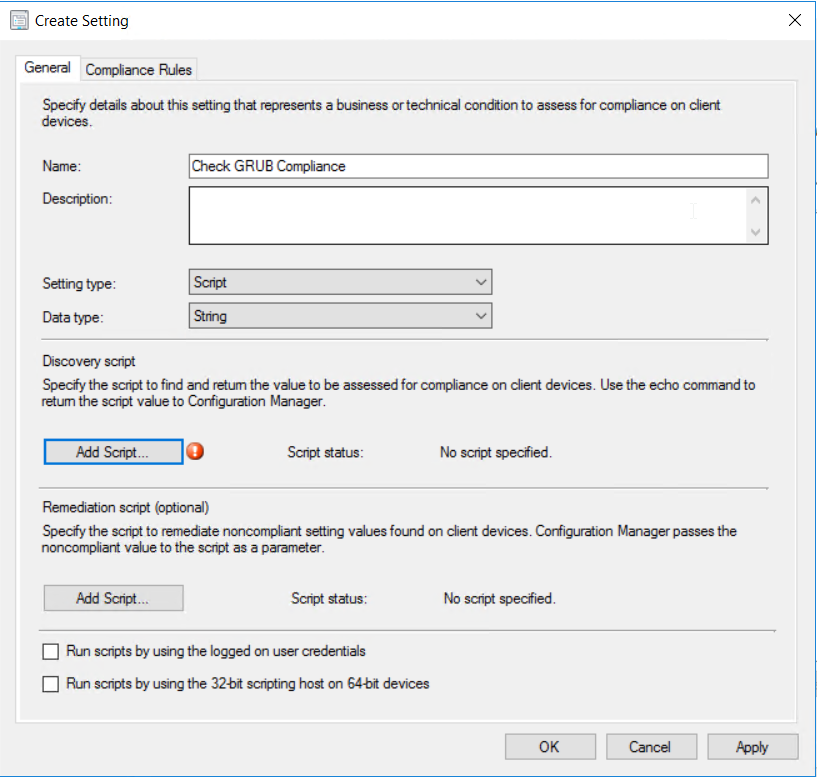 Put in the script above.
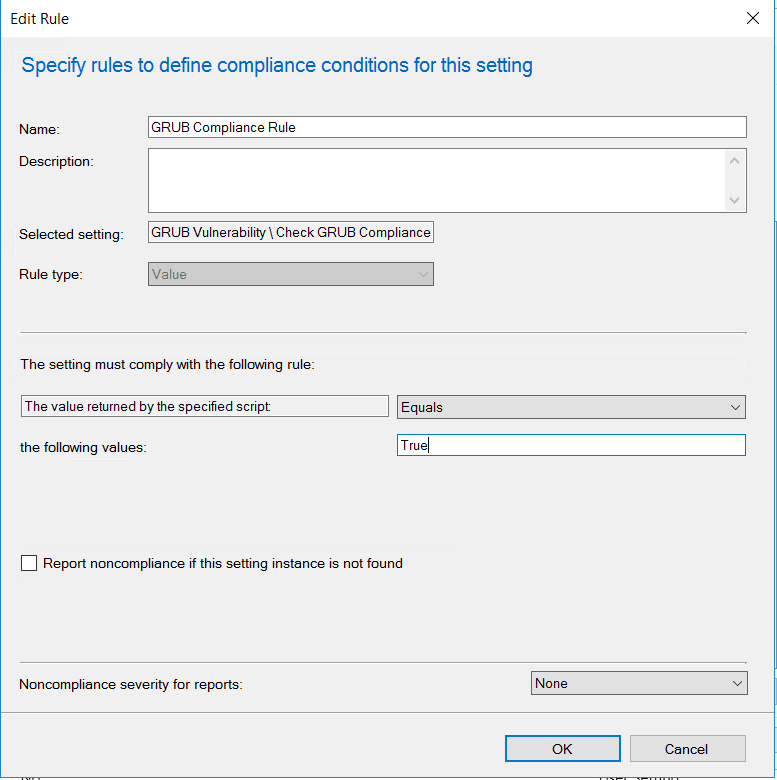
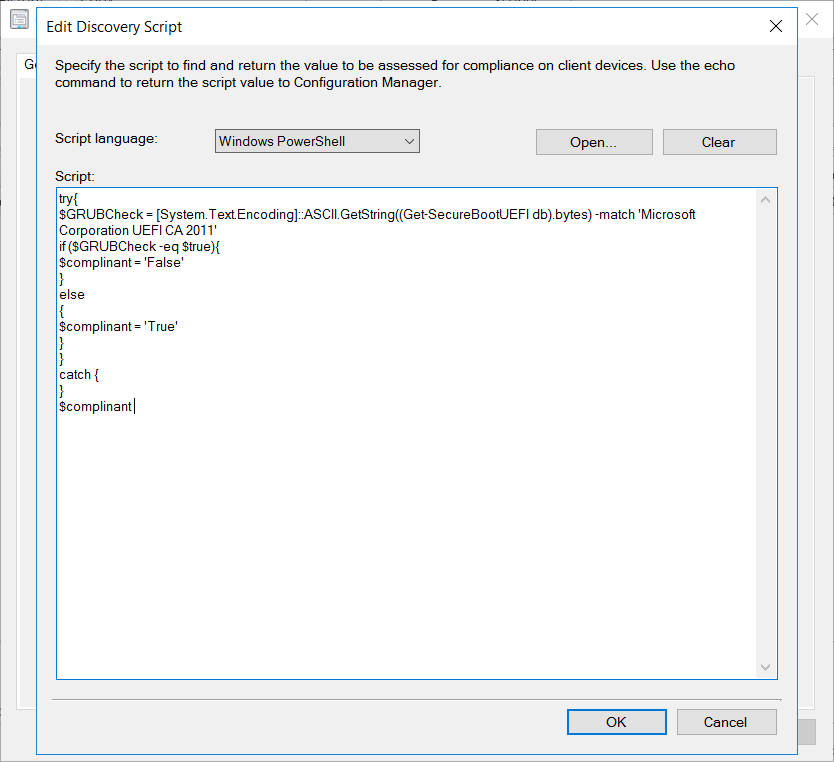 Next add in a compliance rule.
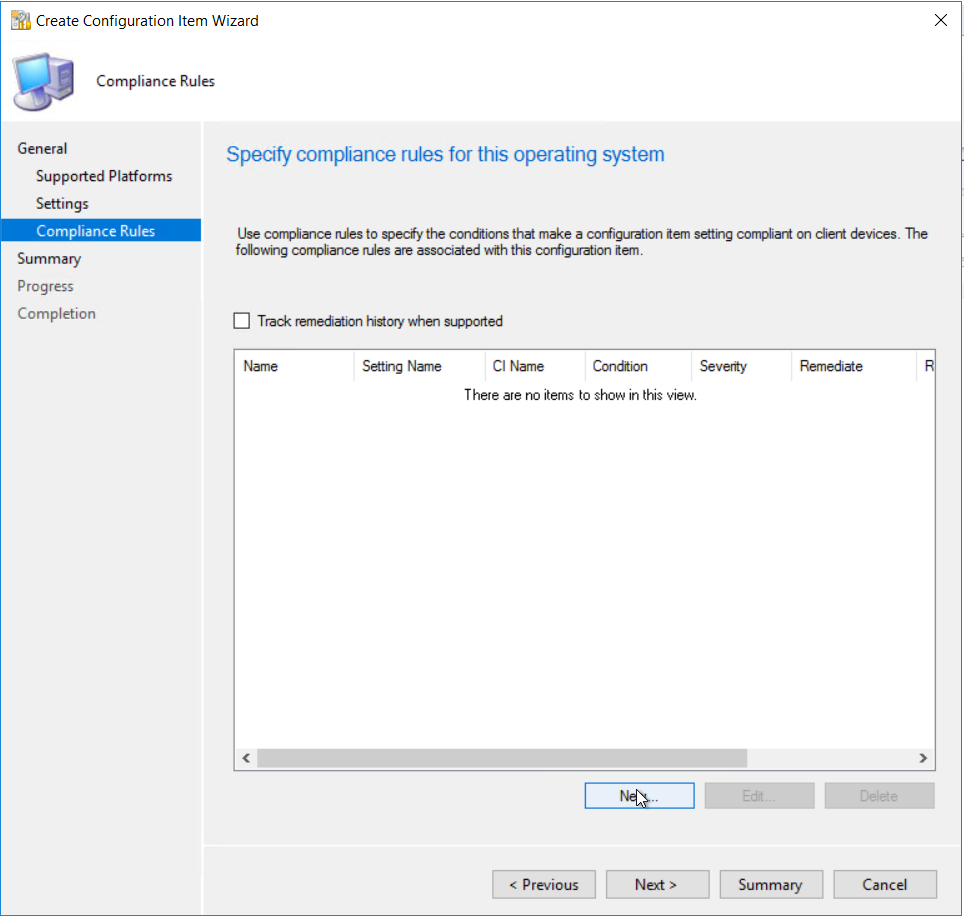
 Once all the settings and compliance rules are configure following the wizard to complete
 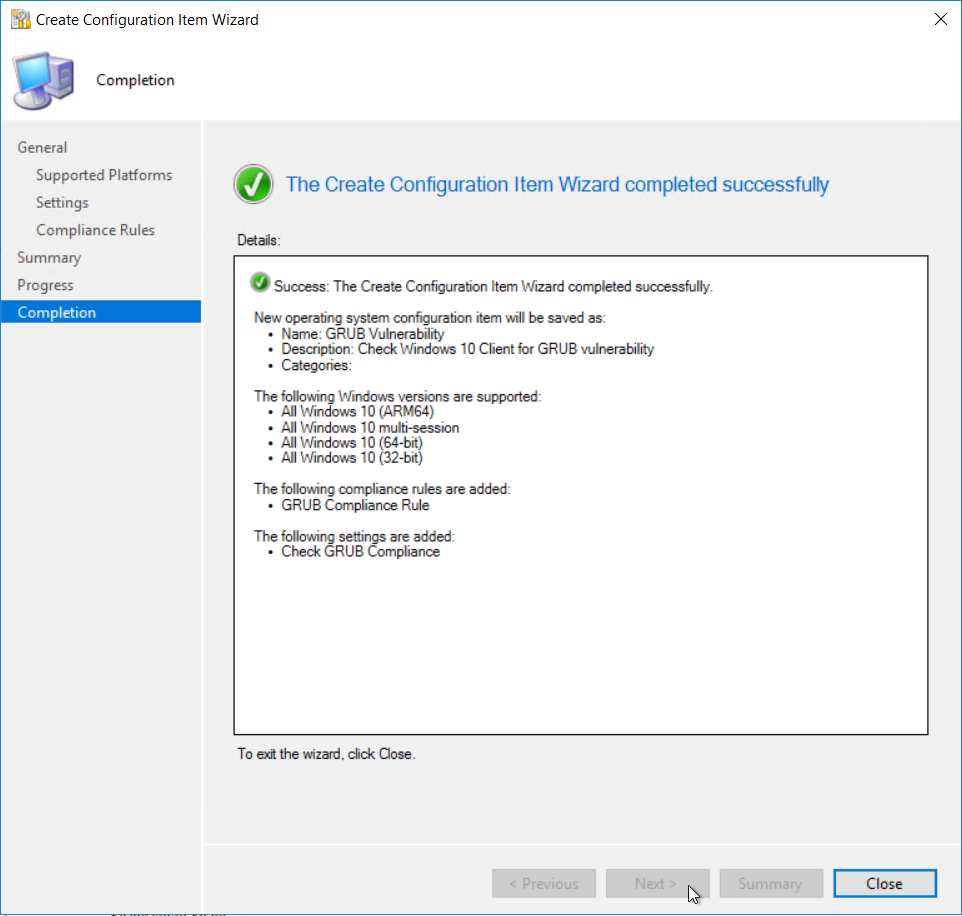 Next we need to create the configuration baseline
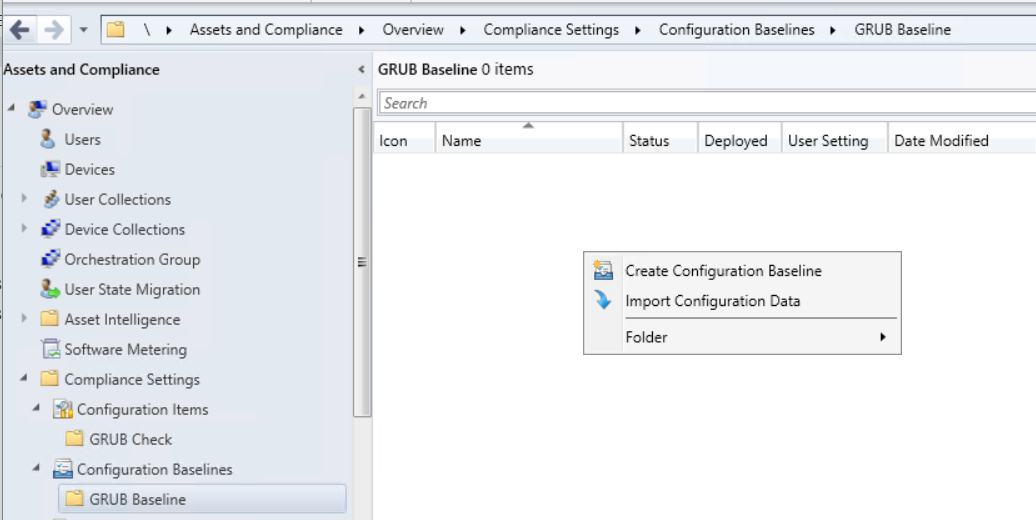 Give the compliance baseline a name
 Add the configuration item created earlier.
 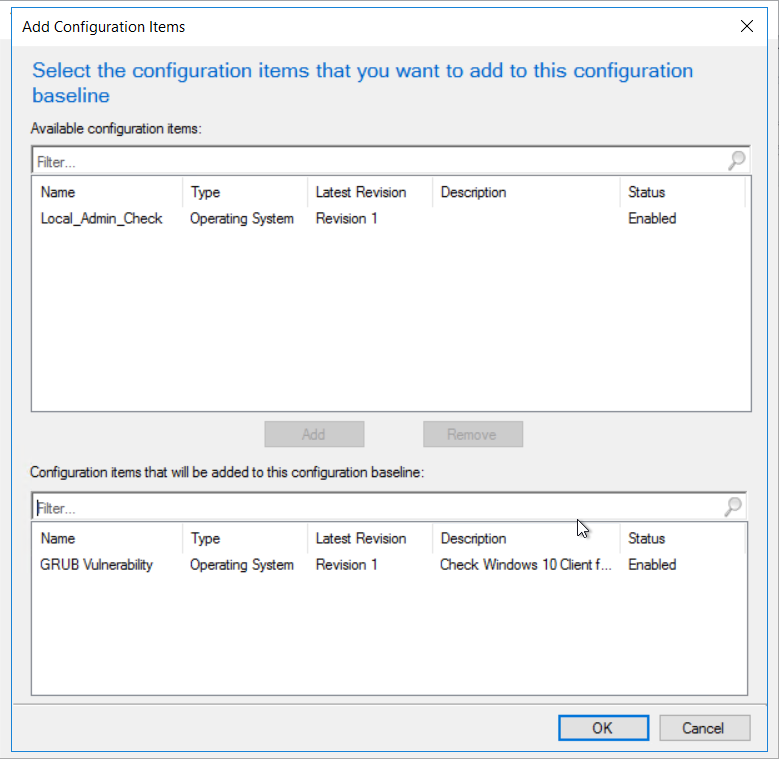 Click ok to complete the baseline
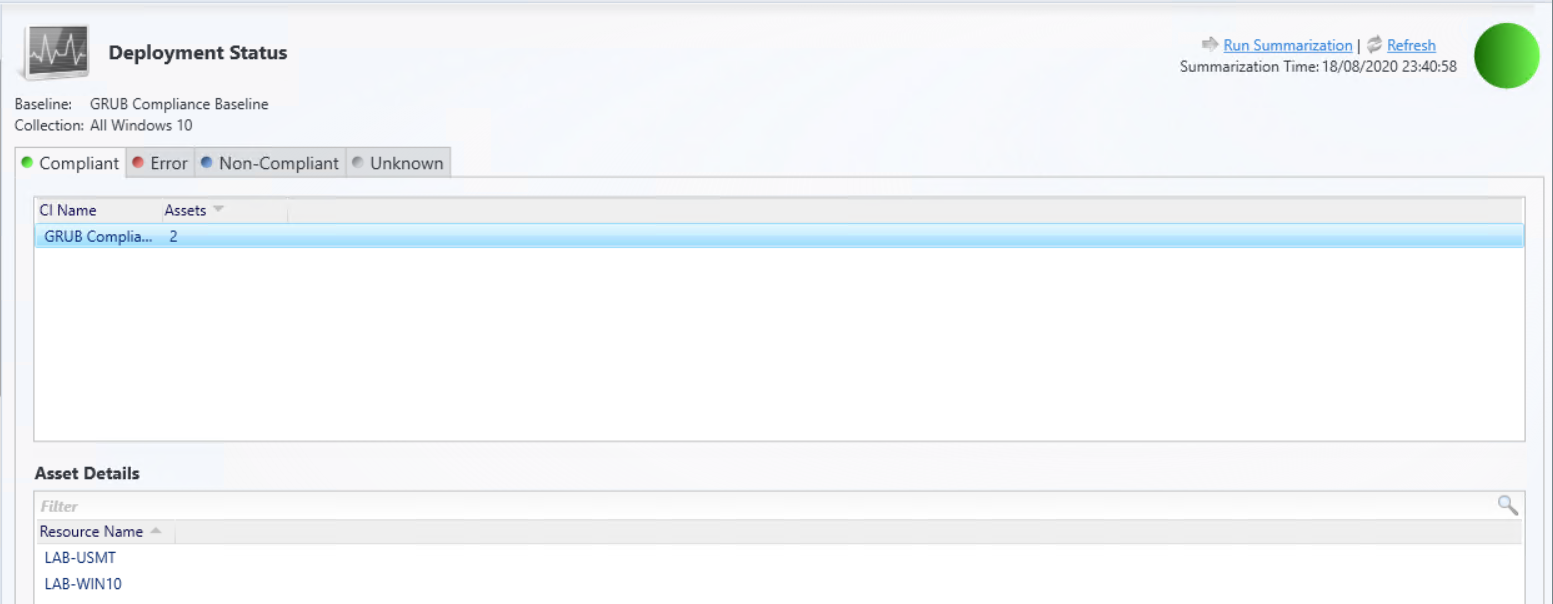
  Once the baseline is configured, deploy the baseline to the required device collection
  You can either wait for the next time the client does a machine policy retrieval or run the action manually from the client. Once the client get the updated policy the baseline should show under configurations.


 By default USMT will use the MigApp.xml and MigDocs.xml to set what will be copied.
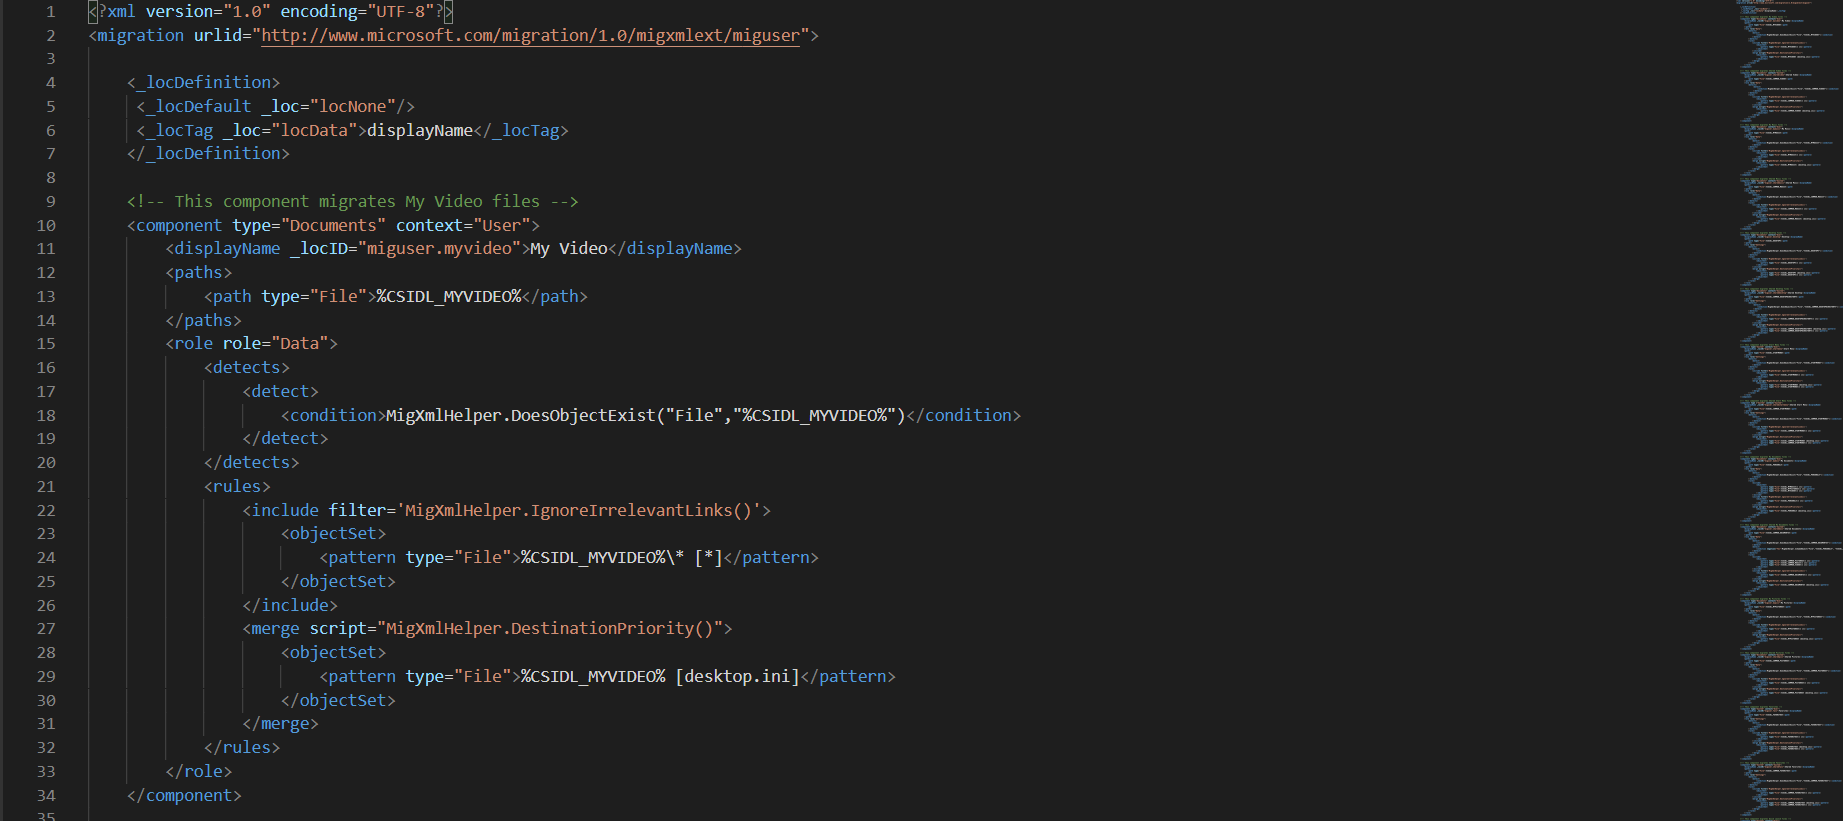 We will be using the default xml but you can create custom xml’s to customize what files and setting need to be copied and restored.
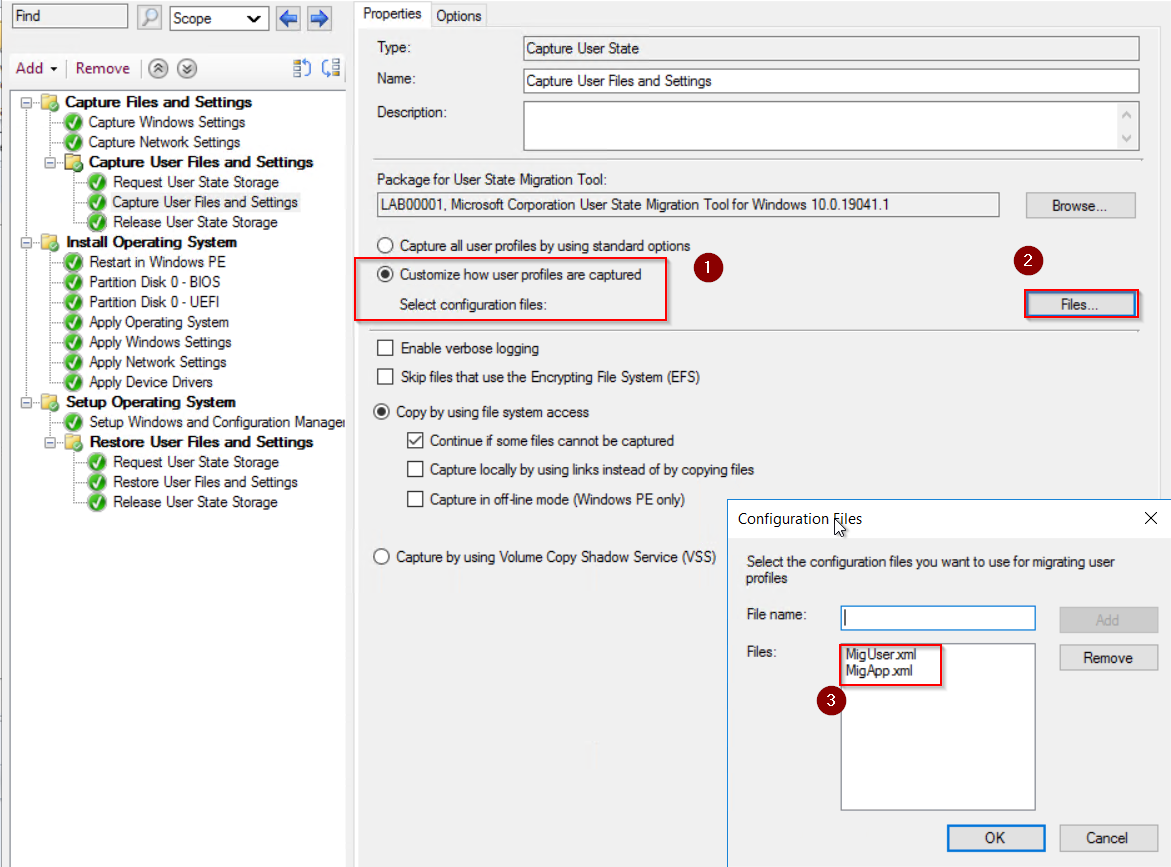 Once the TS is setup we just need to deploy to a collection so that devices can be added and pick up the wipe and reload TS.
 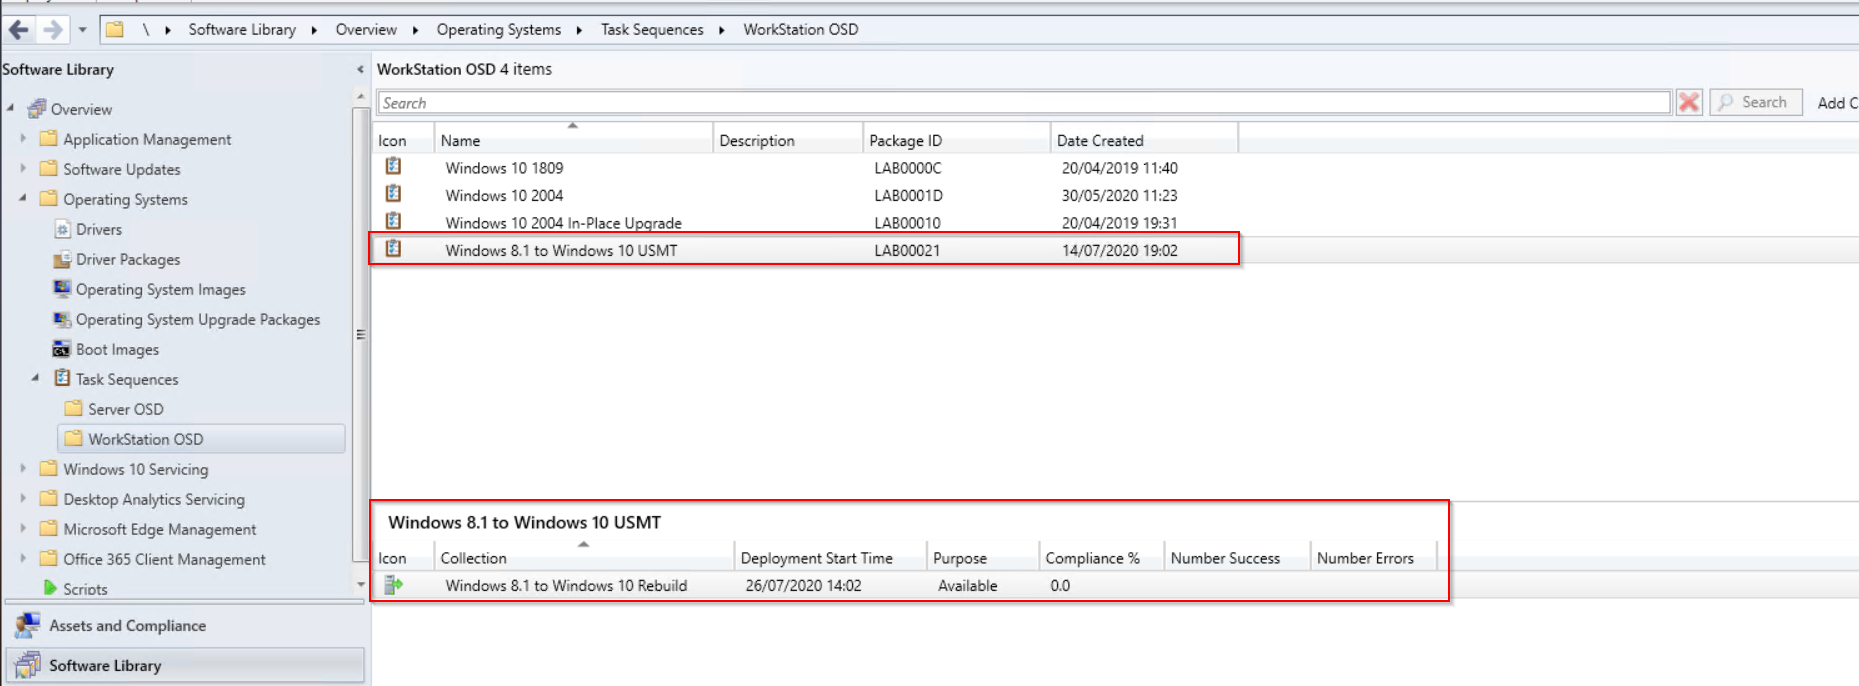 Once deployed either wait for the TS to be picked up or run the client action machine policy and app deployment evaluation.
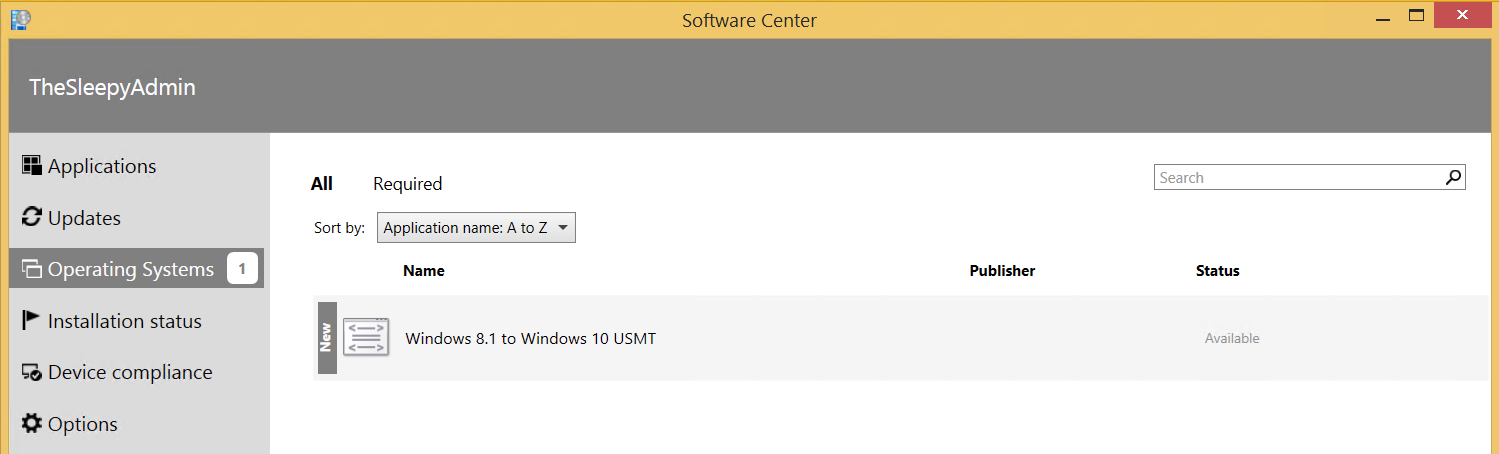
 We can check the smsts.log file to view what is happening we can see below that the files are being downloaded for the USMT package.
  Once the scanstate kicks off you can see the xml files that are used in the log.
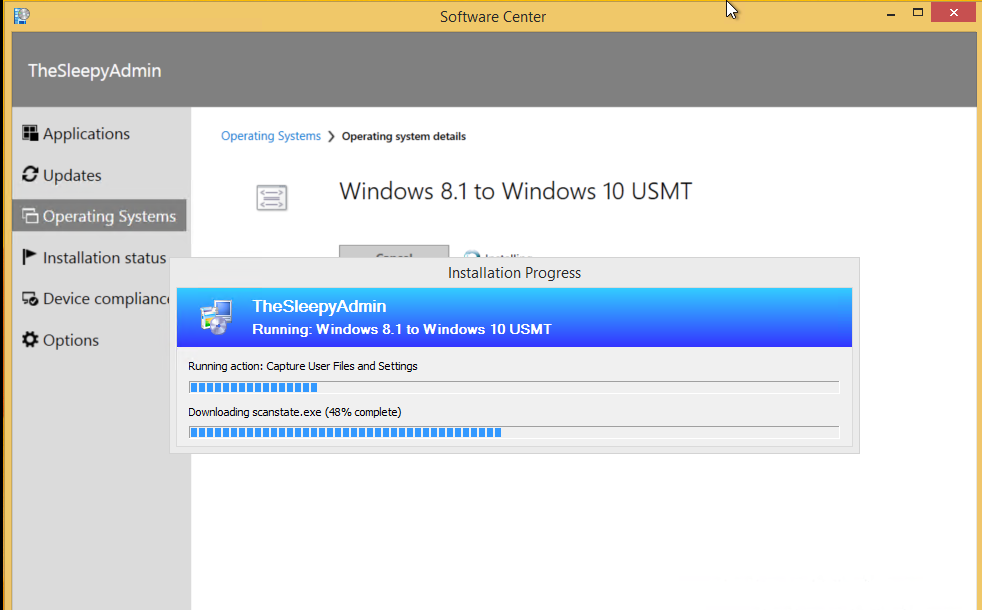
 We can check the USMT folder on the state migration point to see if data is being copied.
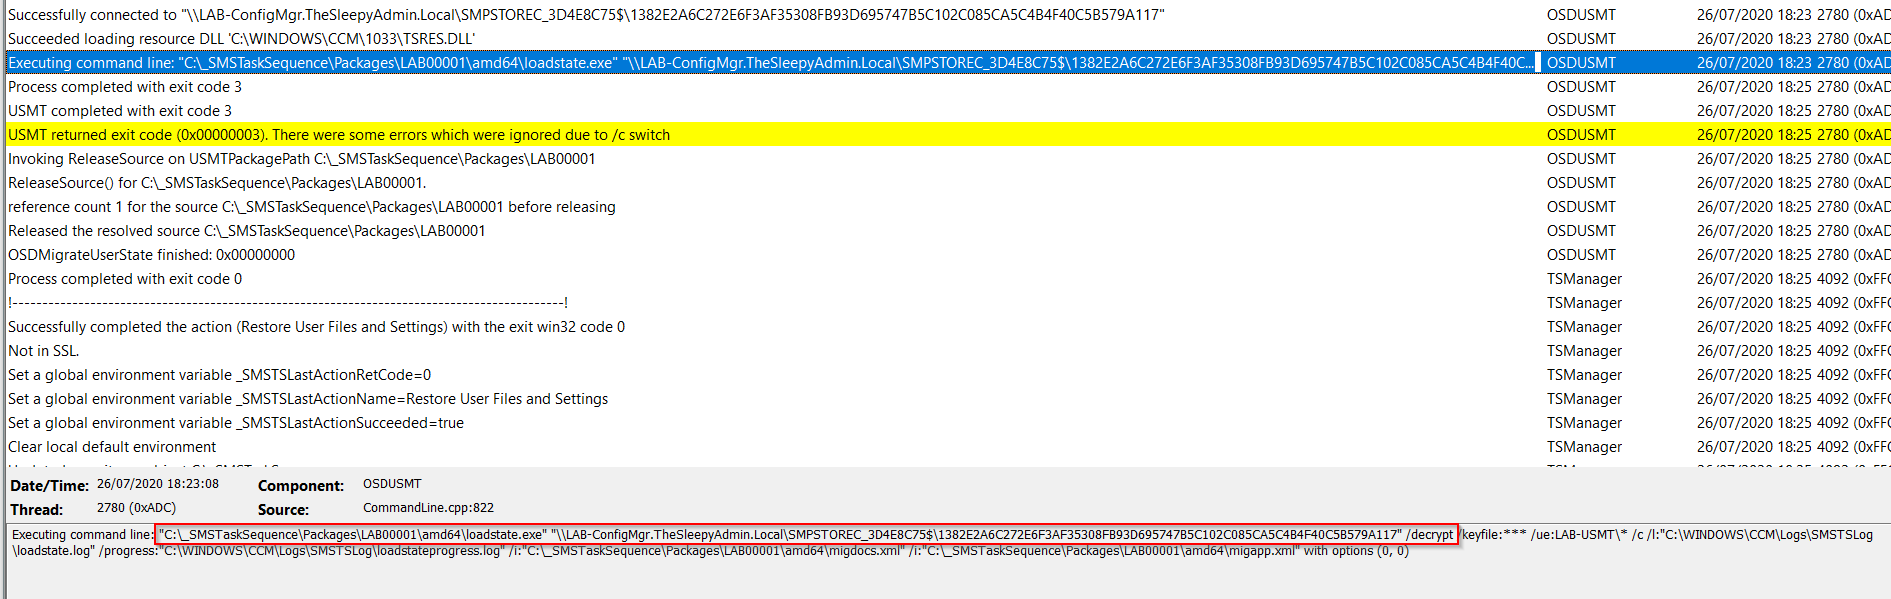
  Once the image is applied, we can check the restore state task in the smsts log. The command will call the loadstate and cause use the default or custom xml files.

 When the TS has fully finished we can logon to Windows we should see that the devices is running Windows 10 and also has the file and settings migrated.

 To read an XML report in PowerShell you can use the typecast to XML by using [xml] in front of the variable which should make querying the content easier.

 This is what the export will look like.


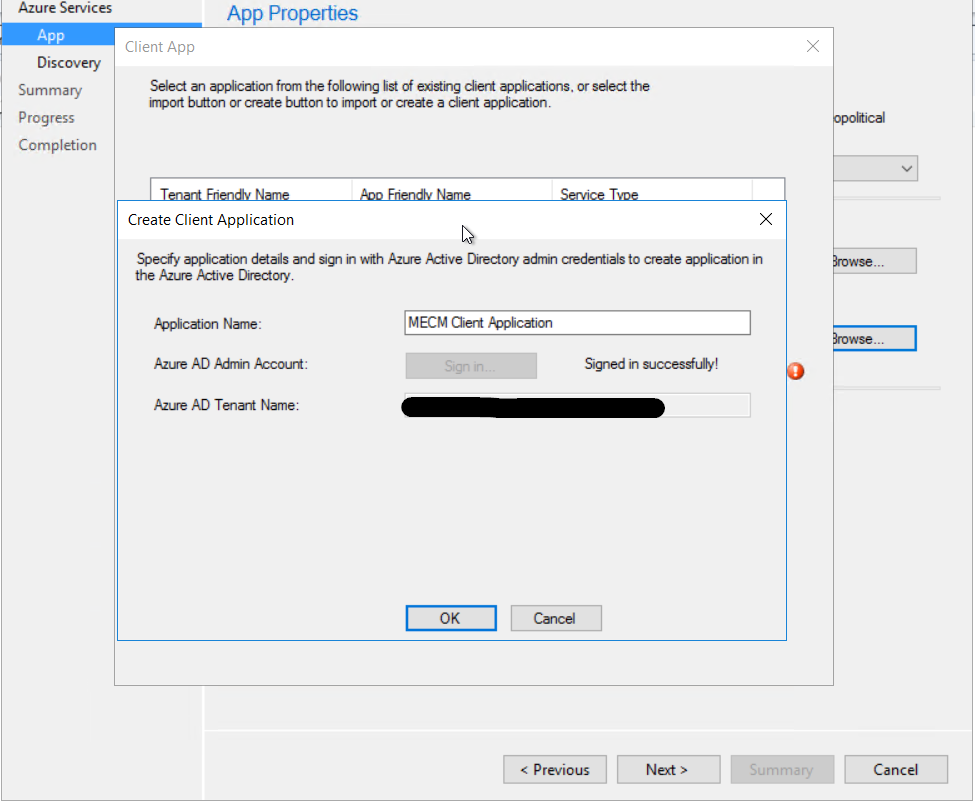
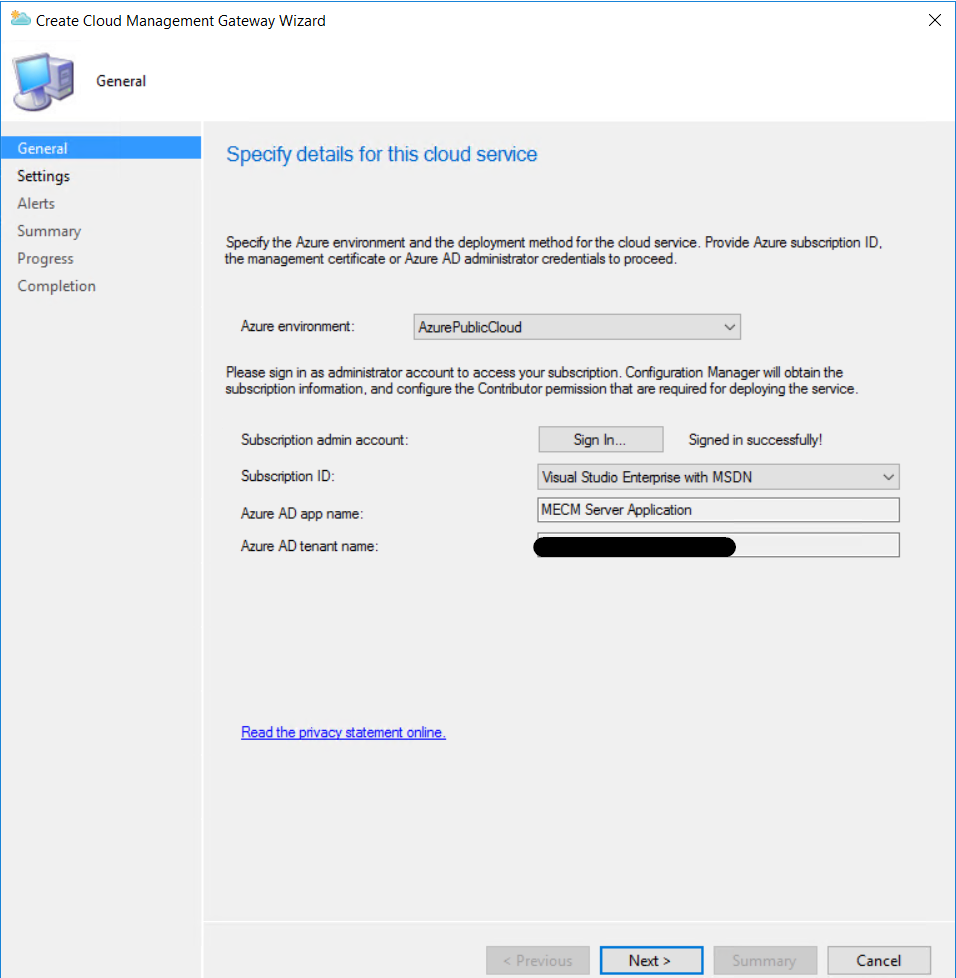
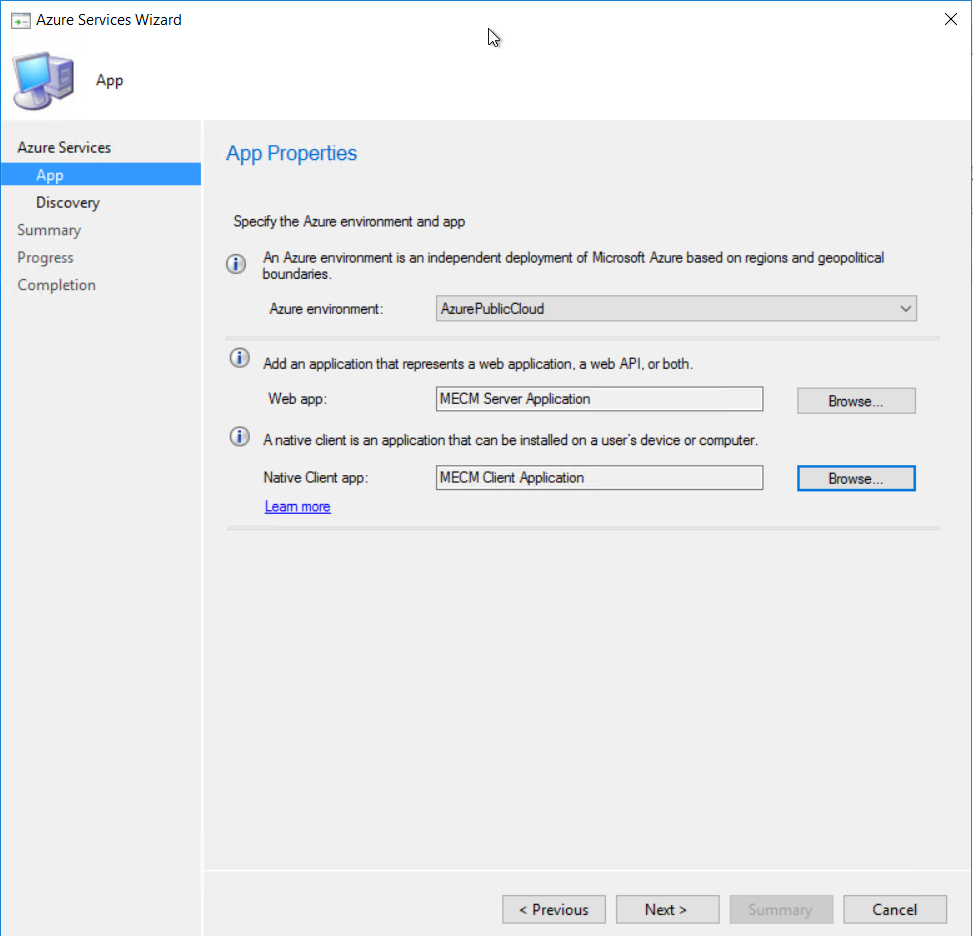 Give the applications a name and sign in to Azure using a account with the required permission
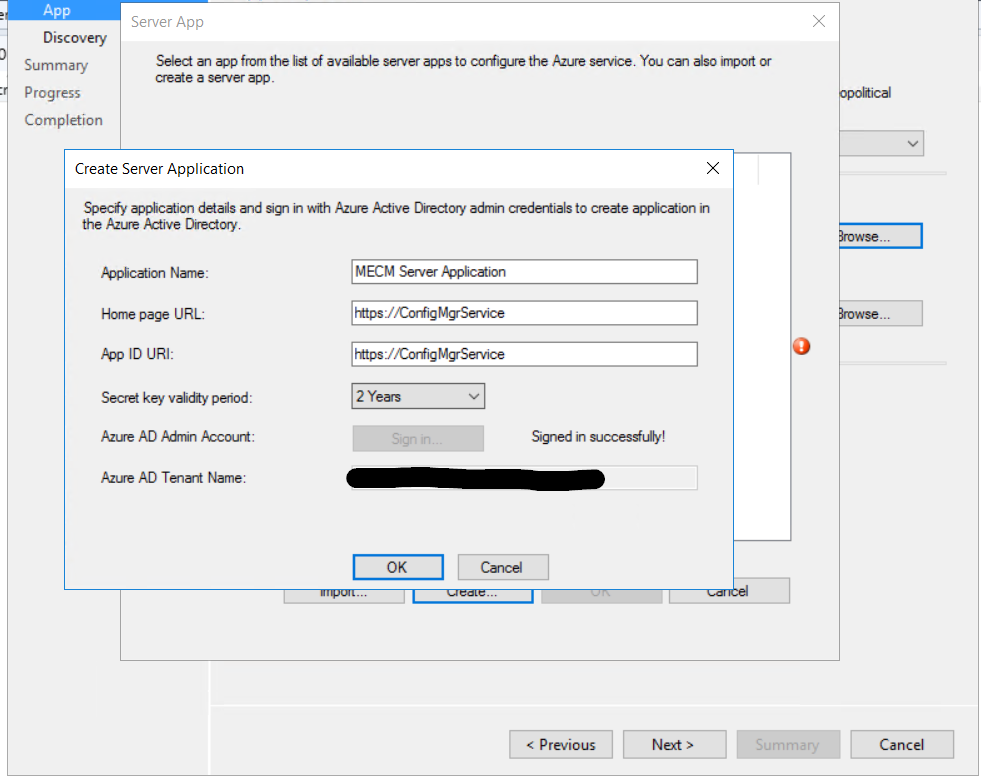
 I just left user discovery enabled.
  Click next to finish configuring the Azure services.
 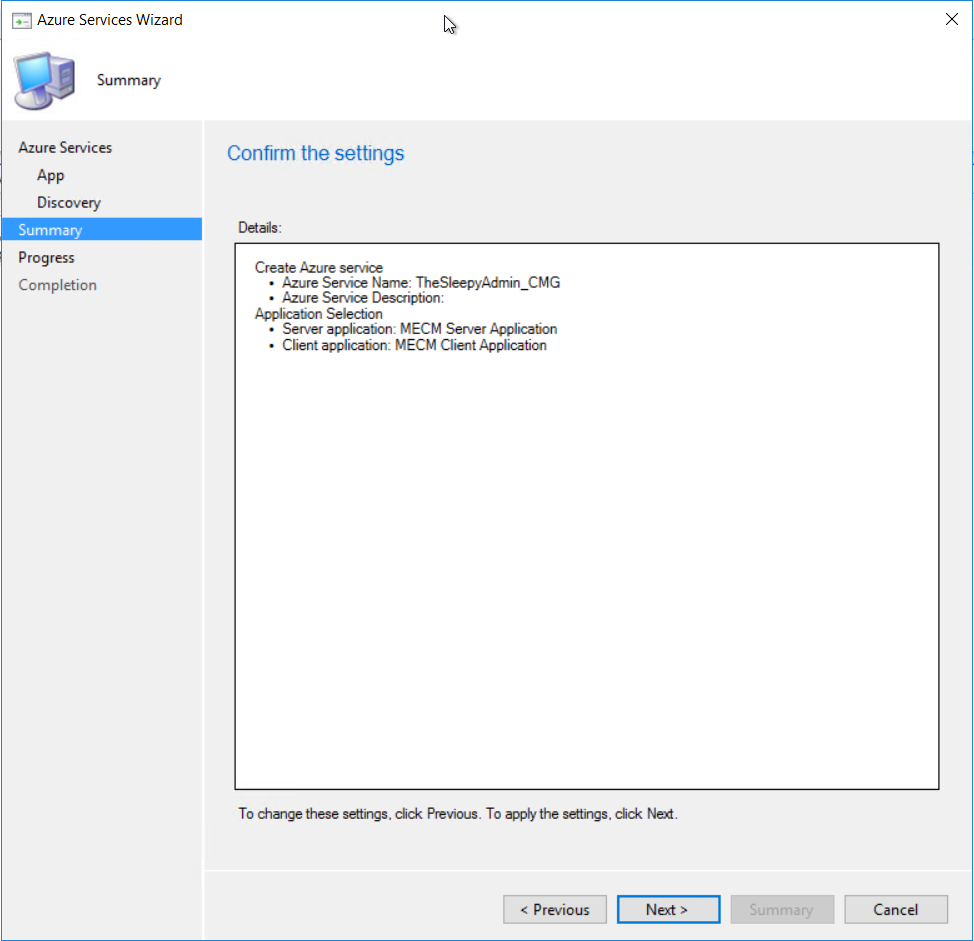 Once finished the Azure service should now be showing
  The Azure AD tenant should also show with both application we just created.

 I left the alerting as default
  Just follow the wizard to complete.
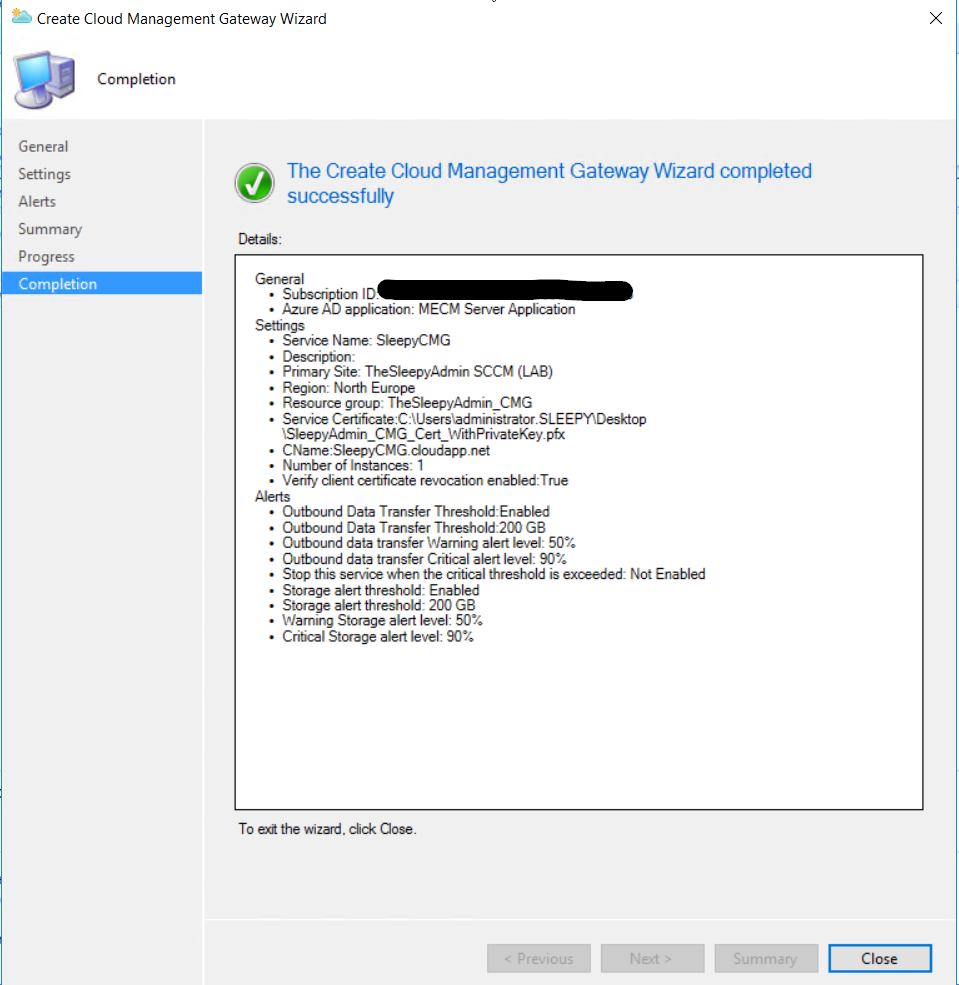
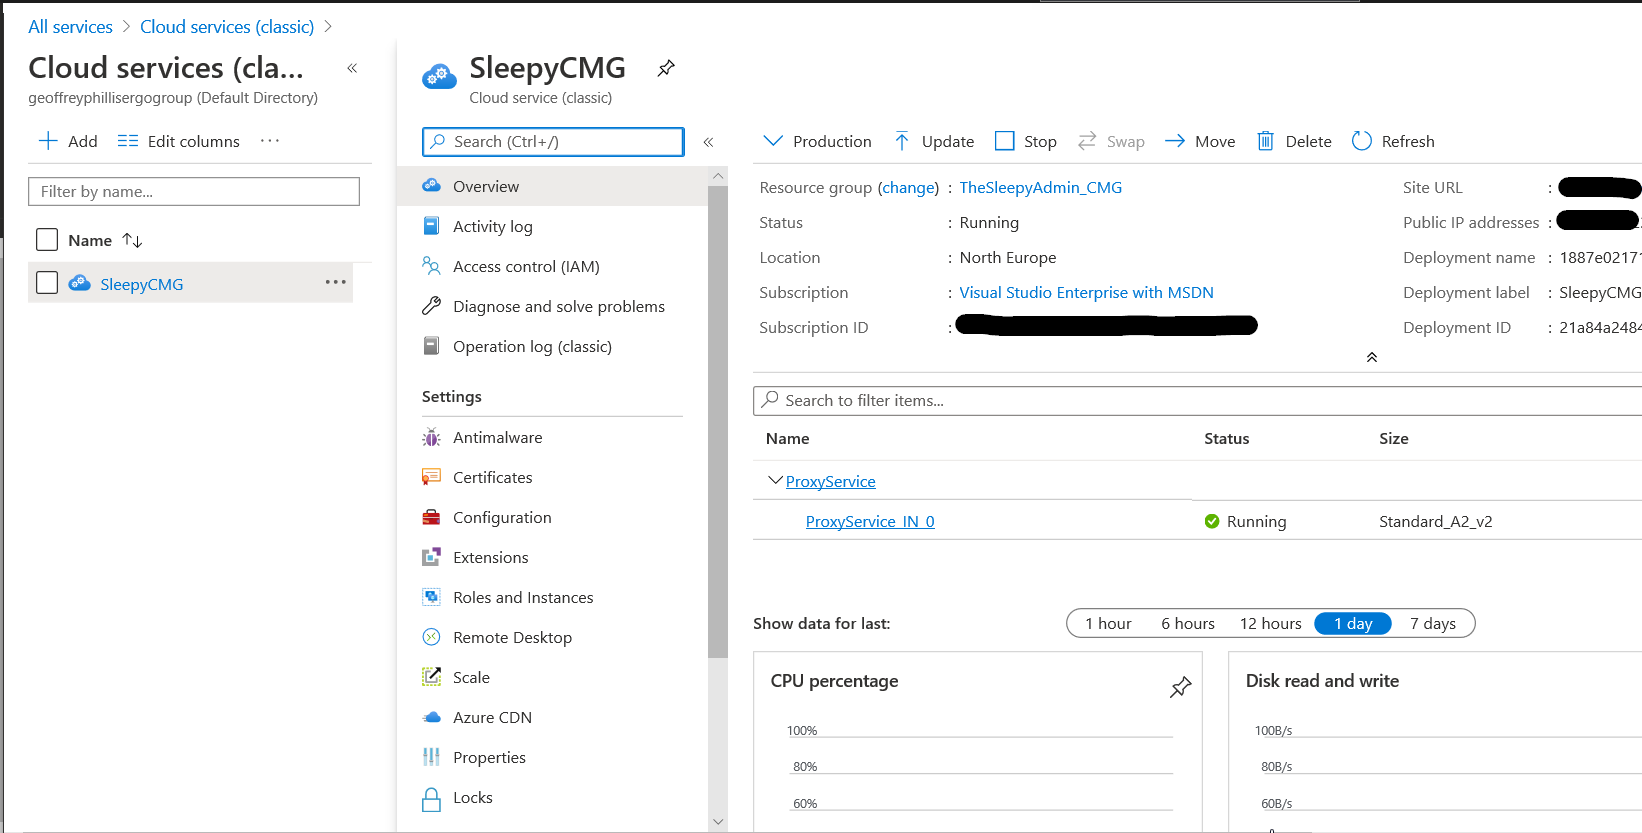

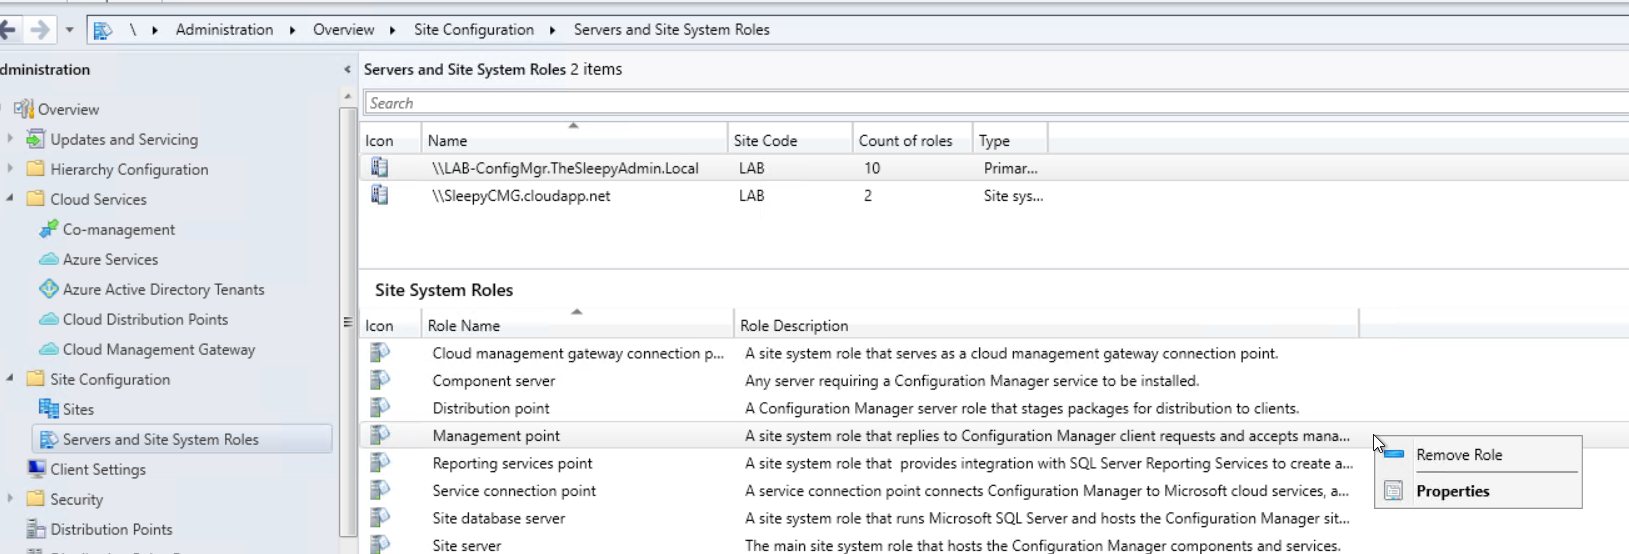
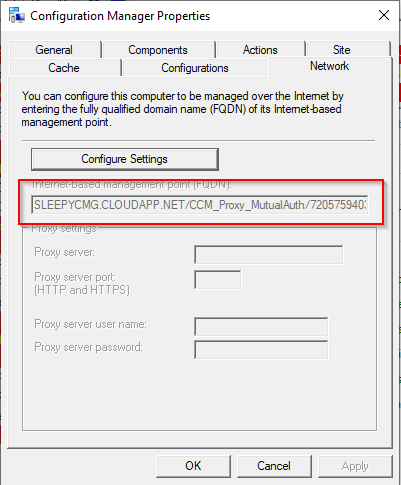
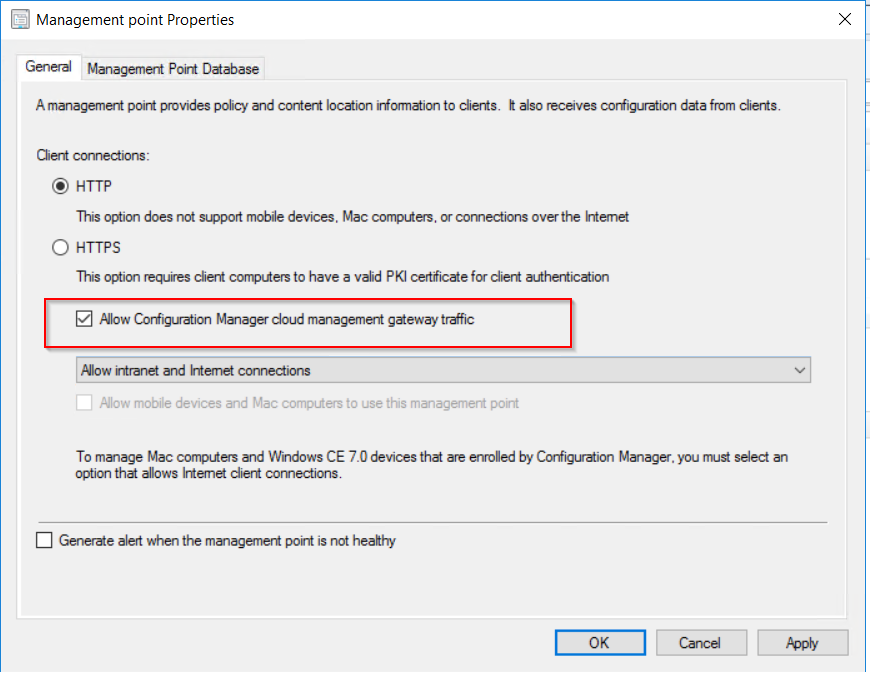 To allow the software update point to communicate with the CMG, tick the allow configuration manager cloud management gateway traffic.
 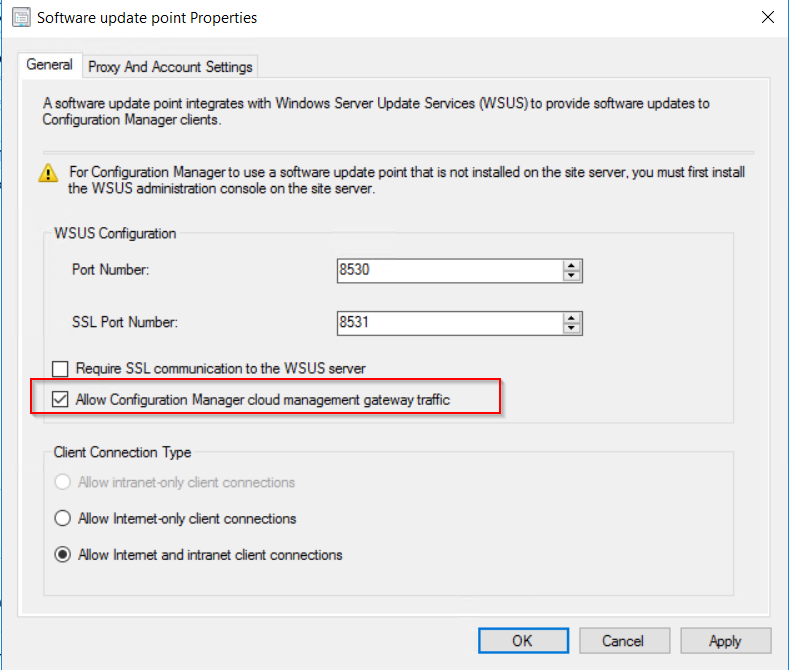 After this has been configured the clients should now pick up a the CMG as a internet based management point in the network tab of client agent properties.