I have been building and setting up some new Windows Server 2022 RDS farms recently and ran in to an issue when adding a second RDS connect broker after configuring High Availability.
The server would install the broker role and then fail to configure. This would return the below error.
The list of joined nodes could not be retrieved on servername. Privilege not held.
RDS Broker Error
I was also getting EventID 32814 and 4119 in the Microsoft-Windows-Rdms-UI/Admin event logs.
I enabled the debug logging also but this only returned the same error as where showing in the event logs.
Recently a request came in from our security team to audit recently create, deleted AD object, accounts due to expire (this is for third party users) and modified / created group policy objects so that they would be able to trace the changes happening in Active Directory.
I decided to write a PowerShell script that will export the required information and then send a the csv export to the user that require the information.
This could also be used to import the data to a dashboard by either using the CSV files or if the dashboard can use direct PowerShell script like PowerBI.
First there are some mandatory parameters. Exportpath and domain.
To allow the script to be run without emailing the csv I have left the smtpserver, to and from address as not mandatory parameters.
The script used two different modules
Group Policy:
ActiveDirectory:
To install these go on a Windows server go to add roles and features and select Group policy Management
and under RSAT enabled the Active Directory module.
Once all the features are enable we can run the script.
I have set the default time to last 7 days but if you want to go back further then update the date value.
To run the script so that it just export local without email the reports use the below.
We have been using LAPS for the last year or so and for the most part it is a great tool for managing local admins password.
In our environment we have multiple forest with trusts relationships and the one main issue that we have is that the LAPS UI client can’t check the local admin password of devices in other domains, unless we logon as a user in that domain and run the LAPS UI as that user.
We can use PowerShell but this requires either the commands to be run from a devices in the domain with the LAPS PowerShell module or can be done using remote ps session but this is not something everyone on the service desk would know how to do or will have rights to do.
I wanted to try create a script that would allow them to check the other domains without the needing to know how to do PS remoting or having modules installed.
To get around using the AD module we will be using ADSI search instead as this a default part of PowerShell. I used the below blog to get started.
The first part of the script gets the domain details and returns the objects back to the search variable.
Next part we will filter the results based on the client variable to return only the required computer details.
Once the script is working, I just needed to create some mandatory parameters and create a function called Check-LAPS so that it’s easier for people to use without having to hardcode anything in the script and has some help and examples.
Below shows how the script is run and the results.
I used the above script with WPF to create a GUI that is now complied in to an exe. I though this would be a lot easier to pass on the service desk as all they need to do is run the exe.
Recently we wanted to do a review of all our Active Directory Group policy objects (GPO’s), we wanted to see what GPO’s where not assigned or what OU they where assigned, so that we could try to consolidate or remove unused GPO’s.
There was a couple of hundred in each domain, so I didn’t want to have to check each one manually.
There is a PowerShell command that you can run to list all GPO’s but it doesn’t show assignments
To get more information on the GPO we can run the command Get-GPOReport which let’s you create either a HTML or XML report.
In this case I want to use an XML as I want to pull information from the xml report, the only issue is getting data directly from a XML report is a bit difficult.
To read an XML report in PowerShell you can use the typecast to XML by using [xml] in front of the variable which should make querying the content easier. The only part of the XML that I really want currently is the LinksTo, as this shows where the GPO is assigned. Once I had all this information I was then able to create the full script. I will put the script up on GitHub since it easier for people to copy the script file.
In this post we will be going through connecting Windows Admin Center to Azure to allow management of Azure VM’s. To install WAC see previous post.
The Azure integration allows the management of Azure and on-prem servers from a single console.
First step is to register WAC with Azure, Open the WAC admin console and go to settings tab.
Go to the Azure in the gateway settingsCopy the code and click on the enter code hyperlink and enter the code
Sign-in using an admin account on the Azure tenant.
Now go back to WAC and click connect to finish the registration
Once WAC is registered it require admin application permission to be granted to the application registration in Azure
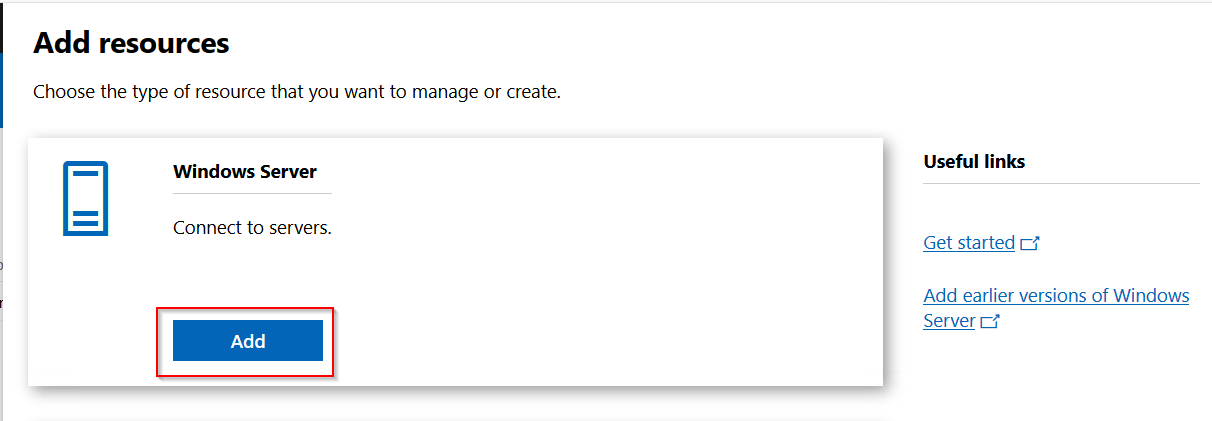
Now that the registration is completed we can now add Azure VM’s to WAC go to add and select Azure VM
Select the subscription (if there are multiple subscription in your tenant), resource group and VM that will be added.
Once the Azure VM is added, to allow management there will need to be management ports opened to allow a connection between WAC and the Azure VM. If you are using a site to site VPN you can just allow the ports over the VPN connection.
I have a public IP associated with my VM and I will be modifying my network security group to allow the ports from my public IP.
I wont be going through configuring an NSG as this was covered in a previous post.
On the VM itself you need to enable winrm and allow port 5985 through the windows firewall if enabled. This can be done by running the two command below from an admin PowerShell session.
winrm quickconfig
Set-NetFirewallRule -Name WINRM-HTTP-In-TCP-PUBLIC -RemoteAddress Any
Once the NSG is configured we should then be able to connect to the VM.
Below shows the overview of the VMWe can also now connect to the VM using integrated RDP console in WAC
WAC also allows us to manage services, scheduled tasks, backups, check event logs and other admin task, along with connecting using remote PowerShell directly from WAC.
I have previously looked at Window Admin centre (WAC) tech preview and wanted to configure the latest full release, to see what changes have been made and do a proof of concept to see if this will be useful if it is deployed to our production environment.
PowerShell version 5.1 is required on servers that will be added to WAC and will need Window Management Framework (WMF) 5.1 installed, some will require additional steps also. See list below for required pre-req before they can be managed in WAC.
I will use default port 443 and generate a self signed cert, if you have a certificate authority you can generate a cert that can be used for gateway.
Once the install is completed you can access the Windows Admin Centre URL using https://servername.
To add a server click Add. Click search active directory and put in the server name.
Once the server is added it will show in the admin console. To connect click on the server and connect. When connecting to servers, to allow single sign on there is an additional command that need’s to be run. If this is not done you will see the below warning when connecting.
I updated the command to run on all servers in AD, as I didn’t want to have to run on each individually.
The above command adds the admin server to the below attribute. Once this has been done when you click connect it should now use SSO.
We can now manage the servers from a central console without having to logon individually to each server. In the next post we will go through the different options and settings in Windows Admin Centre.
Recently I needed to check for all scheduled task running on servers using a certain account as the password needed to be updated. To search for these scheduled task I used schtask.exe
I wanted to integrate this with PowerShell so that I could do some connection tests, loop through a list of devices and output the results to CSV. Below is the script I created it has three mandatory parameters for the computer list, run as account and export path.
Once the script has completed there will be a result csv and if there are any non responding devices there will be a second csv. The export result will look like the below.
As part of a recent decommission / security audit, we needed to remove an old WINS server. For desktop client this is fairly easy as they are all assigned through DHCP so it was just a case of removing WINS from the DHCP scope options.
For the hundreds of servers it is set manually, which to remove one by one would take a long time and be pretty boring for the person tasked with it. So I decided the simplest option would be to use PowerShell.
First I wanted to check if servers had WINS enabled so I could reduce the amount of server I would need to run the disable script against.
I am going to use Get-WmiObject and the Win32_NetworkAdapterConfiguration class as this is the simplest way I found to do this in PowerShell.
We will use a text file with a list of server names and a variable called $WINSServer that will be used to filter only network interfaces that have WINS set.
Below is the script to check for WINS and output to PowerShell windows I am just getting all adapters that have WINSPriamryServer value set to the IP in the $WINSServer variable and then selecting the objects to be outputted.
If you wanted to export to a csv or text file just add a | after the WINSPrimaryServer at the end of the script and do either Out-file or Export-csv and the path to export too.
Below is the link to the script location on Github it called Check-Wins.ps1
I was having a issue with slow logon times and temporary profile when users where logging on to an Windows RDS 2012 farm. I had a look at the issue and it was down to the RDS profile path in AD being set to use an old decommissioned server.
Once I found the issue, I need to figure out how many users where affected so the easiest way I could do this was to use PowerShell.
Below is the report script that I used. The distinguished name used in Get-ADUser -searchbase will need to be update and the export path. (Test before running any script and also check the quotes and doubles quotes when copying)
## Get list of Users
$RDUsers = Get-aduser -SearchBase “OU=TestUsers,OU=Users,DC=Domain,DC=Local” -Filter *
## Set Results Array
$Results = @()
foreach ($user in $RDUsers){
$RD = [ADSI]”LDAP://$($user.DistinguishedName)”
if ($RD.Properties.Contains(“userParameters”)){
else {
Write-Host “No UserParameters set on” $user.SamAccountName -ForegroundColor Green
}
}
$Results | Export-Csv C:\Temp\Logs\RDSProfile.csv -NoTypeInformation
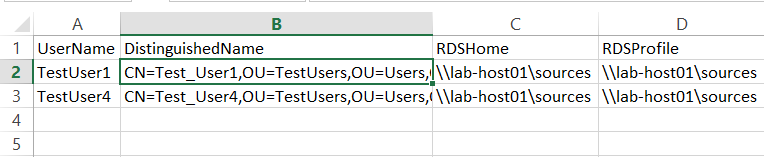
Once the script has completed the results will be export to a CSV with all user and there profile pathsOnce we have the list we can either remove manually or the better option use the CSV and remove the profiles using the invokeset method.
Below is the script I used. The script could be run against all AD users but I prefer to limit the amount of object I have to run against. (This will replace values on users so should be fully tested before apply to large amount of users.)
In the last post we went through deploying the LAPS agent using a script, GPO or SCCM. The next step is to configure the GPO settings to apply LAPS management policy’s
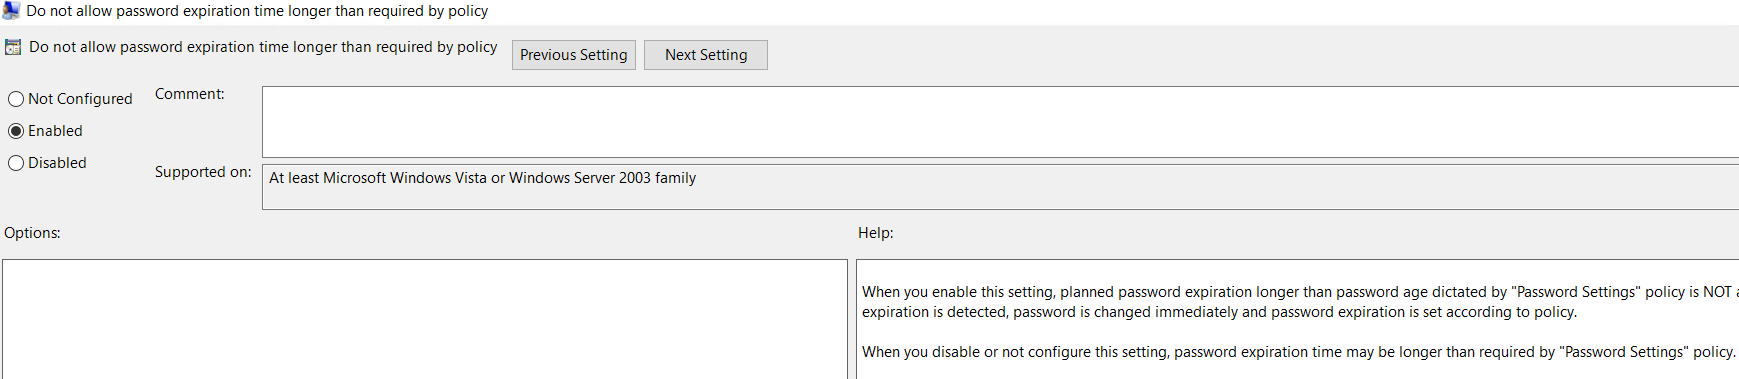
First, we create a new GPO to apply the LAPS management policy’s, the LAPS policy’s are under Computer Configuration > Polices > Administrative Templates > LAPS (If this doesn’t show the ADMX template is probable missing and will need to be installed. This can be done using the LAPS installer)Password settings policy used to set the password complexity, length and ageSpecify the account that the password policy will apply to if this is the default administrator account this should be left at defaultEnabled management of local admin accountOnce the policy is configured apply the policy against the required OUTo confirm that all settings are working, run a gpupdate on a test device. Once applied we can check the password in a few different ways
First way is to run PowerShell command:
Second way is to use the LAPS UI , this can be either used from the management server or installed on local computer using the LAPS installer and selecting the LAPS management tools
The third method is to check the AD computer attribute ms-Mcs-AdmPwd:
Last step is to set delegated access to a security group or set of users to view and reset the local administrator password. Use the below command to verify the current rights


 To read an XML report in PowerShell you can use the typecast to XML by using [xml] in front of the variable which should make querying the content easier.

 This is what the export will look like.

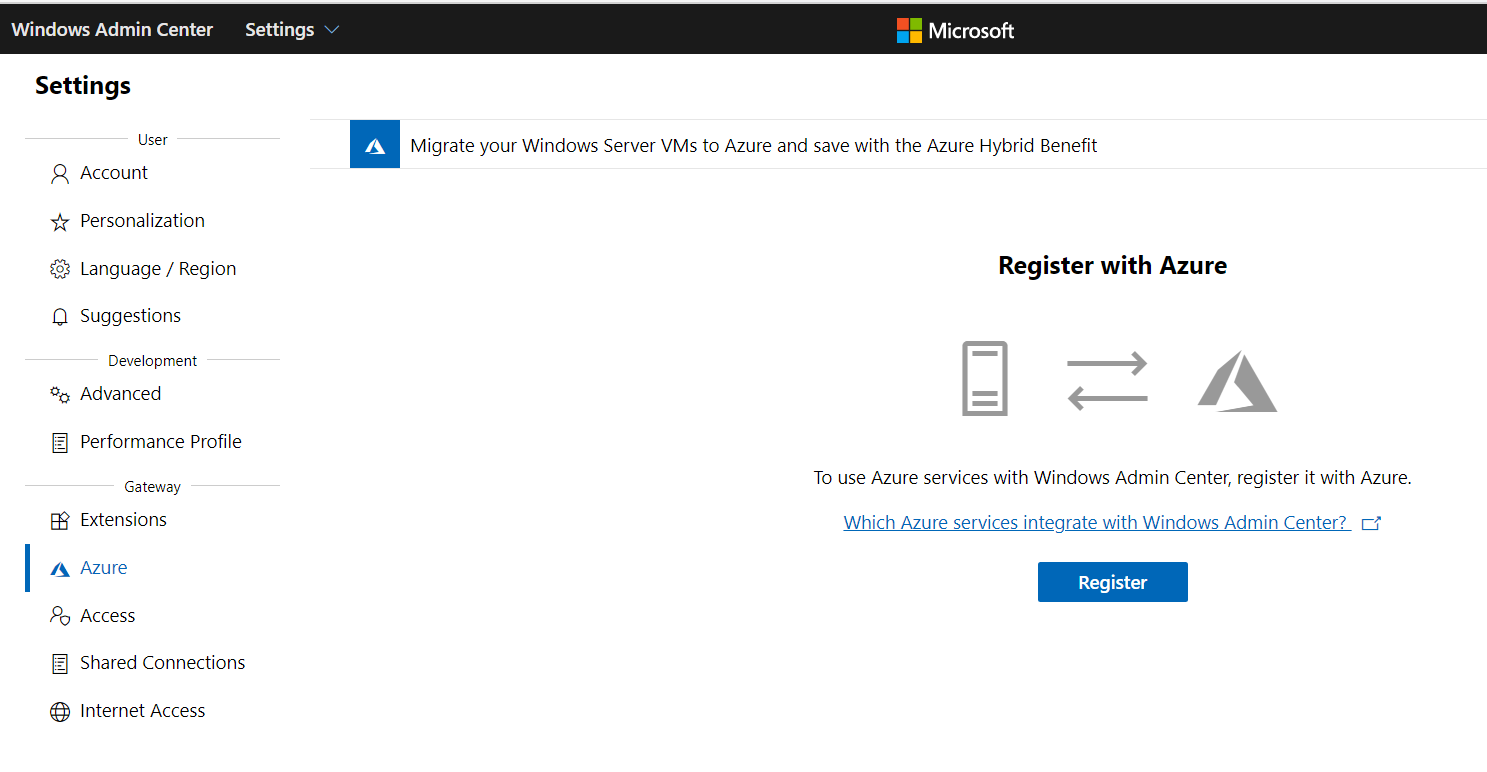 Copy the code and click on the enter code hyperlink and enter the code


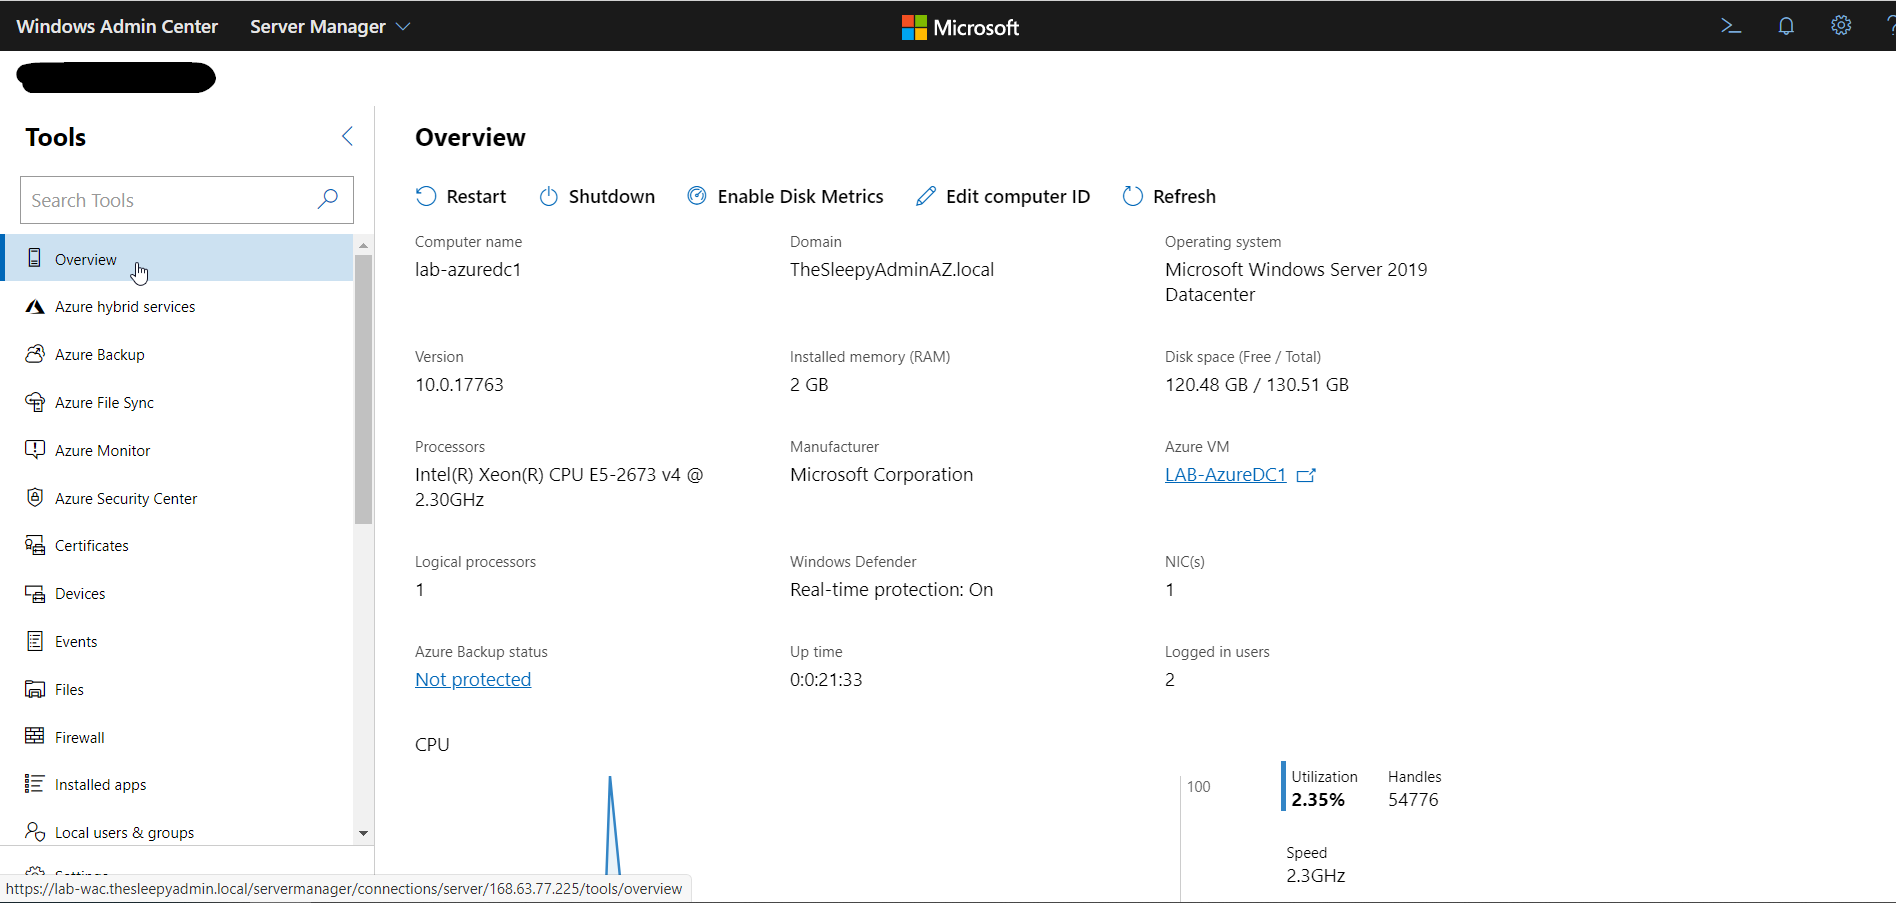 We can also now connect to the VM using integrated RDP console in WAC

 Accept the terms.


 To add a server click Add.
 Click search active directory and put in the server name.
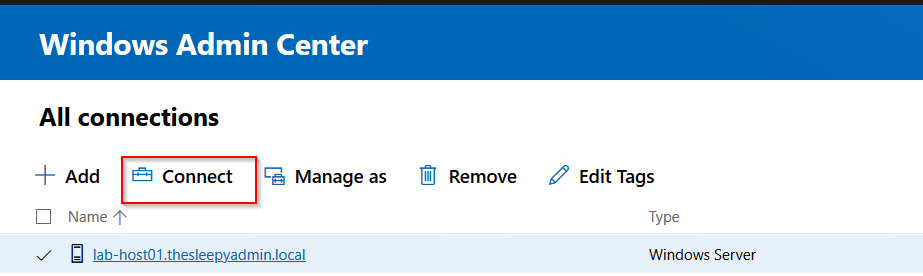 When connecting to servers, to allow single sign on there is an additional command that need’s to be run. If this is not done you will see the below warning when connecting.
 The above command adds the admin server to the below attribute.

 Once the script has completed there will be a result csv and if there are any non responding devices there will be a second csv.
  The export result will look like the below.
 To remove the WINS IP and set NetBios option, we will use the set method in the WMI class.
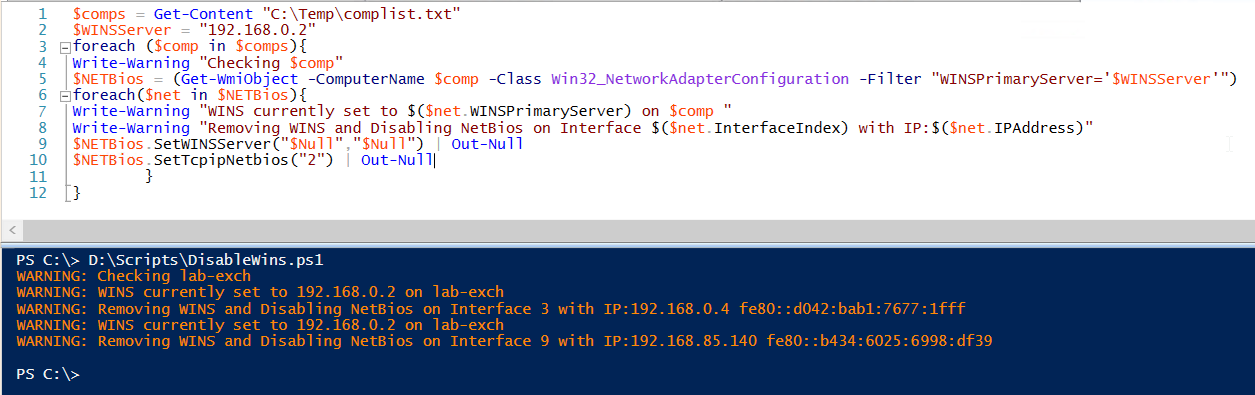 Once the script has run WINS should be removed and NetBios over Tcpip should be disabled this can be checked under the advanced properties on the NIC.


 Once we have the list we can either remove manually or the better option use the CSV and remove the profiles using the invokeset method.

 Password settings policy used to set the password complexity, length and age
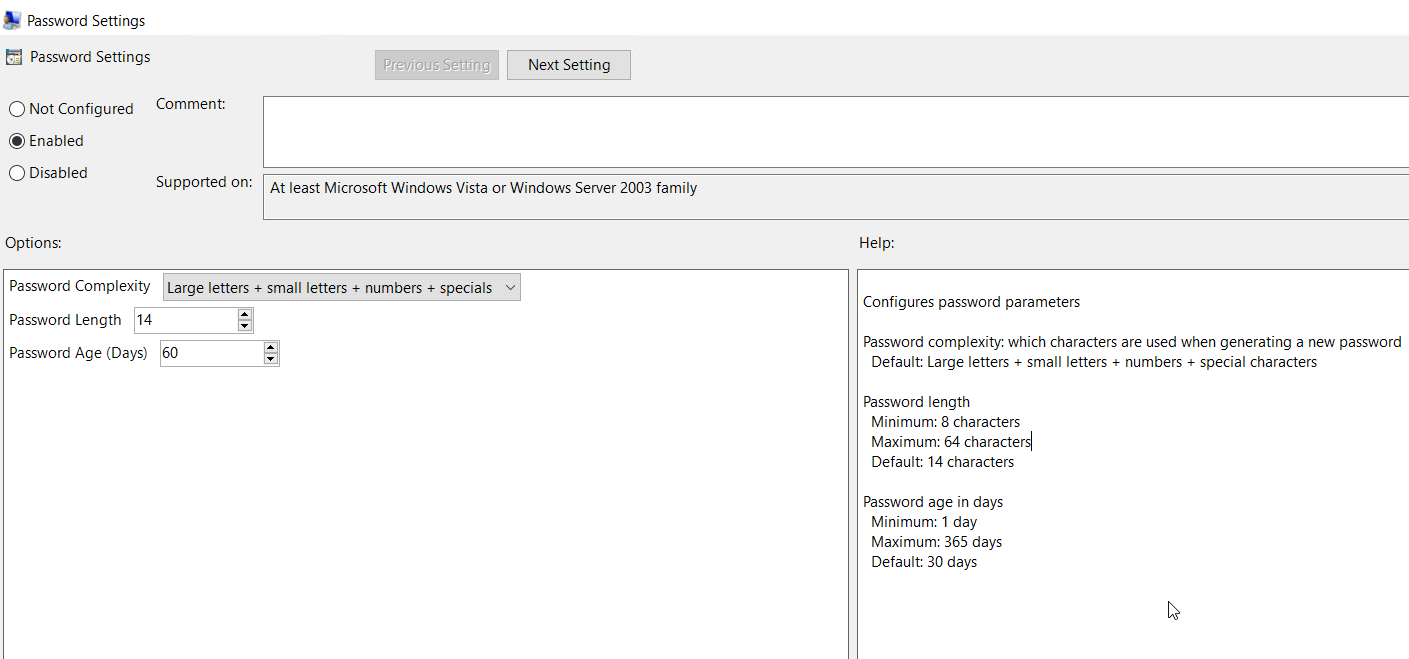 Specify the account that the password policy will apply to if this is the default administrator account this should be left at default
 Enabled management of local admin account
 Once the policy is configured apply the policy against the required OU
 To confirm that all settings are working, run a gpupdate on a test device. Once applied we can check the password in a few different ways


 There are two command to set the rights, one for read and one for reset rights
 Last step is to verify the permission have been applied
